May 8, 2018 | Gallery, Hand-Crafted Cards |
This month’s theme is appreciation and encouragement for Sara Douglas. Sara is the CEO of Stampin’ Up, sharing what she loves, and an inspiration to demonstrators throughout the world. I will be sending this card to Sara, thanking her for all that she does.

Tea Party for Sara Douglass
Everyone deserves a respite from every day responsibilities, so I thought it would be lovely for Sara to feel she could “come and sit a while with me.” This whole idea developed from the “Tea Party” challenge over at Paper Players this week:

The Paper Player’s photo could be my collection of antique cups and saucers. It looks like my grandmother’s, which I added to over the years. The cabinet is maxed out now, so the collecting has stopped. I think she’s happy I’ve continued to enjoy them.

I found the paper china cups for my project in the Designer Series Paper, Just Add Ink. Zeroing in on the three, stacked, cups, I die cut a section with a Stitched Shape Square. I used a smaller Stitched Shape Square to die cut the cups on each side. Two sheets of the same images were used. Does this picture make it clear? A picture is worth a thousand words. Right?

The cup on the right has dots that reminded me of a piece of our Tutti-Frutti Designer Series Paper, and that would be my background. Tea parties must have doilies, so I added one to the upper right corner, and trimmed it to fit the border.

Keeping with the feminine theme, I taped some Polka Dot Tulle Ribbon around the bottom, and added a bow with a Glue Dot. My layer was ready to glue to the Pink Pirouette card base. This ribbon is just too sweet!

I positioned the three die-cut squares, so they would match up, and glued the two side cups. Next, I had the fun of coloring the cups in Light shades of the Stampin’ Blends. I popped this up on dimensionals, which is “off” when viewing from an angle, but pretty good straight on.

The sentiment, “come and sit a while with me,” is from the Sitting Here Stamp Set. The Petals & More Die Set provided the die for cutting. I love this shape, and it is the right size for so many sentiments.

To complete the sentiment on the inside, I stamped, “We are cut out to be friends,” from the Crafting Forever Stamp Set. I used our new Detailed Trio Punch for the “cut out” corners. The envelope called for some decoration, so I used the same Powder Pink Fresh Florals DSP that is in the background of my photos.

Just one more detail to add, the Iridescent Sequins. They have to be the prettiest sequins of all time!

I will write a personal note for Sara, letting her know how much I appreciate her dedication to sharing what she loves. Stampin’ Up! has filled my life with creativity, and a bunch of new friends. I am truly grateful.


May 6, 2018 | Gallery, Hand-Crafted Cards |
The first thing I thought of when seeing this week’s CASE this sketch Challenge was our Banners For You Stamp Set. Here’s the sketch:

And, here’s my finished project:

Happy Birthday Banners for You
This triple banner is great, because it gives you room to write (stamp) so many different sentiments. The banner is in the Banners For You Stamp Set, which is carrying over to the new catalog, page 64, and page 32 in the 2017-2018 catalog. Yay! I stamped it in Tranquil Tide on Thick Whisper White cardstock. I’ll show you how I stamped the words:

I lined up “Happy Birthday To You” on top of the banner. Then, I pressed the acrylic block on top of the four words to pick them up. I inked the words and stamped them on the banner at the same time. Make sense? The words are from a retired stamp set, Crazy About You, but the possibility with other stamp sets is limitless.
Another great thing about this Banners for You Stamp Set is, it has the Bunch of Banners Die Set for cutting.

Now, my beautiful, birthday banner needed a beautiful background, and I chose this leaf print from the new Nature’s Poem Designer Series Paper. I can’t get over how pretty these papers are! I layered it on Whisper White, matching the banner, and a Sahara Sand card base, matching a leaf. Guess I’m into matching, LOL.
Before raising the leaf layer on dimensionals, I tied a piece of Crumb Cake Nature’s Twine around it. Love this twine!
While I was raising, I also added dimensionals to the banner.

I completed the inside by stamping “You’re Awesome” from the Epic Celebrations Stamp Set. I can’t seem to let go of this Sale-A-Bration stamp set.
The pretty leaf is from the Rooted in Nature Stamp Set, which I stamped in Sahara Sand.
I embossed the envelope flap with a leaf in the Nature’s Roots Die Set. This set has several dies that are meant for embossing, rather than cutting. I just ordered the new Embossing Mats, and I’m anxious to see how they work.

If you’re wondering about the paper you see in the background of my photographs, it’s the backside of the leaf print. You have so many options with Stampin’ Up’s two-sided Designer Series paper.
Off to post my project at the CASE this sketch Challenge. Thanks for stopping by!
May 4, 2018 | Gallery, Hand-Crafted Cards |
When I was at OnStage (a Stampin’ Up! event) in Las Vegas a few weeks ago, I had the opportunity to see and experience a number of new products. The product I’m featuring in today’s post is one that was at the top of my pre-order list. I was excited to have it in my hands at home, so I could start experimenting with it. It was the first time I’d seen paper like this, Delightfully Detailed Laser-Cut Specialty Paper. It was so pretty, with all of the intricate patterns. It was white on one side, and vanilla on the other. My big question; would I be able to color it?
My answer came quickly, without destroying a single piece of it:

How to Color Delightfully Detailed Laser-Cut Specialty Paper
I used three Stampin’ Blends (Light Bermuda Bay, Dark Bermuda Bay and Dark Smoky Slate) and one Stampin’ Write Marker (Lemon Lime Twist). How do you like the colors? I’m really liking this color combination, but I can’t take credit for it, because it’s from Fab Friday’s Color Challenge.

I placed scrap paper beneath the section of Laser-Cut Paper, and used the brush end of the markers to paint across the flowers and sprigs. The brush end gives good coverage, and you don’t even have to worry about staying in the lines. I was careful around the borders, though.
I left the leaves white, liking the contrast, and used pin dots of Tombow glue to attach the Laser-Cut piece to Smoky Slate cardstock. This was layered on Bermuda Bay cardstock, layered on Lemon Lime Twist cardstock, and layered on a Smoky Slate card base.
For the sentiment, I snipped the word “friend” from the oval in our Lovely Words Die Set. This set is retiring May 31st, so order it now while supplies last. The set also has “hugs” in a circle, and “lovely” in a heart. I’ve used the words many times, and even snipped the “ly” off of “lovely.” When making cards, paper words are a must!
Basic Gray in the challenge is represented by the Dark Smoky Slate Stampin’ Blend. I saturated the color so it would be darker like Basic Gray, and stand out.

I decorated the envelope with a piece of Fresh Florals Designer Series Paper, which will also be retiring. But, the five in-colors that it matches will be in the new catalog, so I’ll continue to get lots of use from it.

If you’re wondering about ordering the Delightfully Detailed Laser-Cut Paper, it is available NOW for demonstrators, or anyone who wants to join my team, and sign up for the Starter Kit. It’s available, along with all the products in the new catalog, for EVERYONE on June 1st.
Click my Shop button for all the news!
Thanks for visiting me today. I love sharing new products!
May 3, 2018 | Gallery, Hand-Crafted Cards |
I’m in a cheery, citrus mood today. Stampin’ Up has some wonderful Designer Paper named Tutti-Frutti that is a collection of bright, fun, paper. I was instantly attracted to this Paper Stack from the Occasions Catalog. It will be retiring May 31st, but you can order it now, while supplies last.
The three patterns I’m choosing for today’s card go perfectly with our Lemon Zest Stamp Set.

Tutti-Frutti Lemon Zest Birthday Card
First, I’m stamping the lemon from the Lemon Zest Stamp Set, cutting it with a Layering Circles Die, and then hand-cutting the circle into quarters with scissors.
Next, I’m using a Layering Squares Dies to cut four squares from the Lemon Lime Twist Tutti-Frutti DSP. I’m gluing the quartered lemons into the corners of this paper. Then, I’m using a scalloped edge Layering Squares Die to cut four squares from Whisper White cardstock, and more gluing.

I want the colors to stand out, so the card base is Thick Whisper White. I’m layering it with orange Tutti Frutti DSP, followed by my favorite Tutti-Frutti citrus print.

While I’m was piecing my card together, I’m thinking about what I want to say. Let’s choose, “Squeeze it for all it’s worth!” I’m finding in the Lemon Zest Stamp Set, and it will go with “Happy Birthday” on the inside.
I don’t know about you, but I like to squeeze my birthday for all it’s worth. It will last at least a week, and sometimes the entire month!
I ink up the sentiment, stamp it in Lemon Lime Twist ink on Whisper White, and use a Layering Squares Die for cutting. TIP: I turn the die around and make a second cut for making a rectangle.
I like dimension, so I pop up my five scalloped edge pieces on Dimensionals. Before adhering it all together, I tie some Crushed Curry Baker’s Twine around the layers, and add a bow.

I stamp a corner of the lemon to the inside, stamp Happy Birthday, add a piece of DSP to the envelope flap, and it’s ready to mail.

This whole idea began with this week’s Global Design Project challenge. We were to CASE Allison Okamitsu’s design. I think she likes the Tutti-Frutti paper as much as I do! Can you see why I wanted to cut my lemon into quarters?

Thank you for the inspiration, Allison. I wouldn’t have thought to quarter my lemon without you!
May 1, 2018 | Gallery, Hand-Crafted Cards |
For May’s project, I had a brainstorm while I was out of town. I envisioned see-through baby blocks with the letters, A, B, C, on them. I was excited to return home, and put my idea into action. It turned out, pretty much, like I imagined.

A B C Card Welcomes Baby to the World
The Letters for You Stamp Set provided the A (stamped in Mint Macaron ink,) the B (stamped in Blushing Bride ink,) and the C (stamped in Daffodil Delight ink.) The stamps give the letters a hand painted look, which is very artistic. Don’t you agree? I used the Large Letters Dies for cutting, and doubled the three letters for thickness.

To make the blocks, I used the Layering Squares Die Set. I fiddled around with the sizes to find the two that would give me the right fit for the letters. The outside needed to be scalloped, and there had to be enough width to hold the Mini-Dimensionals. After cutting my three frames, I put glue on the tips of the letters, and placed them on the blocks. I used a dozen Mini-Dimensionals on the back of each block for fastening to the card base.
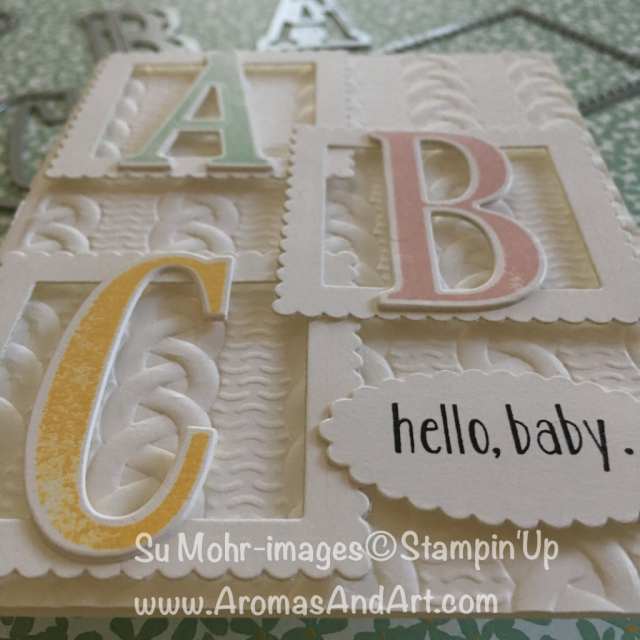
The card base is Thick Whisper White, embossed with the Cable Knit Embossing Folder. Keeping it white lets the letters stand out, and the Cable Knit adds a nice, baby blanket texture. I tried other colors, but this was my favorite.

“Hello Baby…” is from the Baby Bear Stamp Set. I stamped it in Basic Black Ink, and used an Oval Layering Die for cutting. See how it matches the scalloped edge of the squares?
The completed sentiment is on the inside, “Welcome to the world.” I remember this being my favorite thing that was said in cards to my babies.

I stamped the three small flowers from the Sweet Little Something Stamp Set in the colors of the A, B, C, inks. I like how the Cable Knit Embossing Folder decorates the other side.
The envelope needed some color, so I added a piece of yellow striped Designer Series Paper. Now my card is ready for a boy or girl baby.

Thank you for visiting my blog! Have a great day!
Product List
Apr 30, 2018 | Gallery, Hand-Crafted Cards |
The inspiration for today’s card is the Paper Player’s Tic Tac Toe challenge. I’m choosing the right row down, because I like the idea of a masculine, bird card with twine.

I had previously colored (Stampin’ Blends) my bird (Best Birds Stamp Set), and cut him out (Birds & Blooms Die Set), so he is ready to go. He had been waiting to make an appearance, and today is his day.

Best Birds Birthday Card for a Man
My bird will blend nicely with Tranquil Tide, so I’m selecting that color for the card base. The True Gentleman Designer Series Paper is especially for men, and I’m choosing a piece of it for the bird’s background. And, nothing says “masculine” more than Wood Textures, which I’m layering on the Tranquil Tide card base.

I’m using the same Wood Textures DSP for the bird’s branch, which I’m cutting with a Seasonal Layers Die.
TIP: The branch is thin, so I’m triple layering it with Thick Cardstock, so it will be sturdy over the opening I’m planning.
I get a thrill from dimension on my cards. It’s one thing that really separates us hand crafters from Hallmark, don’t you think? So, I’m layering the True Gentleman DSP on Thick Cardstock, cutting a hole with a Layering Squares Die, and placing it on Adhesive Strips.
TIP: Adhesive Strips are twice as thick as regular Dimensionals, so I use them when I want extra elevation.

The twine is Night of Navy, which I’m winding around two times, and knotting. “Happy Birthday” is in the Sweet Cupcake Stamp Set, and I’m choosing it, because it’s the right font (masculine) and size to cut with the Classic Label Punch. I’m attaching it to the twine with Tombow Glue.
By the way, I’m photographing on top of another sheet of True Gentleman DSP. It will be retiring May 31st, so if you like it, scoop the pack up now.

I hope you enjoyed making this masculine, bird card with me today. I wouldn’t have thought of it without inspiration from the Paper Players, so thank you to their design team!
Tomorrow (Tues May 1), I’m honored to be in a Blog Hop with Kylie Bertucci’s Top Ten Winners, all about babies. It goes live at 2PM Pacific Time. I hope you get a chance to hop along!





