Jan 22, 2018 | Gallery, Hand-Crafted Cards |
I was ready for some new inspiration, and looking forward to Fab Friday’s challenge. When seeing it was a sketch with a heart, I thought, YAY!, I get to make another Valentine!

Valentine Lovebirds from the Bird Banter Stamp Set
Here’s the sketch:

As I read the rules, I learned the heart shape could be any object, but I happily chose a heart. I used a Layered Hearts die to cut the heart from Thick Whisper White cardstock.
Lovebirds, hearts and Valentines go together, and the two, little parakeets from the Bird Banter stamp set would fit perfectly on my heart. Plus, they could kiss, because there’s a left and right facing parakeet stamp. I stamped the birds in Basic Black on Thick Whisper White, and set them aside to dry.
The Tutti-Frutti Designer Paper has a wonderful array of bright prints, and I selected one with red berries for a 2″ panel. I chose a speckled print for the heart, which I die cut and adhered to the previously cut heart. For the second 2″ panel, I used one of the Petal Pair embossing folders.

My little parakeets were patiently waiting to be fussy cut (hand-cut with scissors) and colored. I used Stampin’ Blends in Light and Dark Daffodil Delight, Old Olive and Light Cherry Cobbler.
I popped the lovebirds up on dimensionals, but they told me they wanted to stand on something. I found “love” in the Sunshine Wishes die set, and they thought this was perfect.

I have to show you the inside of this card. “Happy Valentine’s Day” (last year’s Sealed with Love stamp set) is stamped in Berry Burst Ink. The beautiful branch is die cut with a Petals & More die.
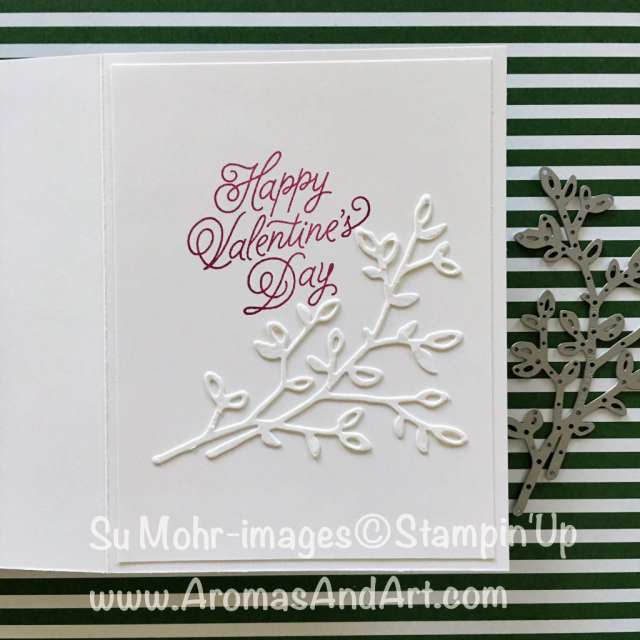
I left enough room for the sender to sign, or maybe it will say, “from your secret admirer.”
Valentine’s Day is so much fun! Thank you for visiting my blog.

Jan 21, 2018 | Gallery, Hand-Crafted Cards |

Welcome to the Remarkable InkBig Blog Hop for January 2017. This month our theme is Valentines. The time has come for Sale-A-Bration, when the new Occasions 2018 Catalog is available to everyone. This means free stamps sets with qualifying orders, January-March.
You may just be starting the blog hop here at my blog, Su Mohr, or may have come from the person previous to me in the list. If you get off track at any time, the full lineup below will help you move along from blog to blog so you see all the projects.
For this Valentine, I’m using a die cut word from my favorite Sale-A-Bration set, Celebrate You. I adore paper words, and we’ve already heard that this set will carry over beyond March. The other words in the set are “celebrate” and “amazing.” And, to make it even better, there is a coordinating stamp set, Amazing You, so you can put phrases together.

Valentine for the Remarkable InkBig Blog Hop
Today, I’m on a roll, literally, because I’m using Sponge Brayers. They are nifty, little tools that roll a sponge across the ink pad that you roll across paper to apply the color. It’s like painting a wall on a miniature scale. Fun!
Here’s a picture from a previous post, my first adventure with a sponge Brayer.

Valentine Love With Sponge Brayer Technique
I’m using the same three colors for this card: Berry Burst, Emerald Envy, and Lemon Lime Twist. This color combo was part of a Fab Fri challenge, and I liked it so much I wanted to use the colors again before cleaning my sponges.

This time, you can really see the three colors. I rolled them over the same Sweetheart Embossing Folder. Then, I glued this to Basic Black cardstock, a scooch bigger (1/16″), for a thin border. I used the Lovely Words Die to cut a heart with the word “lovely.” The little blackbird (Birds & Blooms die) pecked off the “ly,” wanting to simple say “love.”
We found the “YOU” in the new Sale-A-Bration, Celebrate You, die set. The little blackbird appreciated having the “u” for a perch, and said just what we wanted to say.
The front of the Whisper White card base is embossed with the Woodgrain embossing folder, adding texture behind the heart. It’s retired, but you could use the Seaside embossing folder for the same effect.

Thanks for taking part in our blog hop! I hope that you get lots of inspiration to make this Valentine’s Day extra special. Remember, you are currently at my blog, Su Mohr, so check the blog hop line up to see who is next in the list.
Jan 20, 2018 | Gallery, Hand-Crafted Cards |
Valentine’s Day will soon be here, and this makes me very happy (Thick Whisper White card base embossed with HAPPY). It’s a beautiful day, blue skies, and fluffy, white clouds, a gentle wind, a perfect day for making Valentines.

Happy Valentine’s Day from the Bluebird.
While I’m looking out my window I see the prettiest, little bluebird (die cut with Bird and Blooms) sitting on a tree branch. The tree branch looks just like the ones I’ve been making with a Seasonal Layers die, layered with cardstock and topped with Wood Textures Designer Series Paper.
The bluebird’s chirping draws my attention to something hanging from the tree branch. It’s a Valentine envelope (Love Notes die set) that I made last year! And, the pink paper (Love Blossoms) is even older! How did it last this long?

I can see the note inside reads “Valentine’s Day” (Teeny Tiny Wishes stamp set). I have no idea how it was tied to the tree branch with red string (At Home With You stamp set).

It’s a mystery. Perhaps even a figment of my imagination. But, I’m going to continue on with my happy day, knowing that someone saved one of my Valentines that was blowin’ in the wind.
My imagination was enhanced by the Tic Tac Toe challenge squares: Pink, Red, Light Blue.

And by the CAS(E) this sketch challenge:

Have a happy day!
Jan 19, 2018 | Gallery, Hand-Crafted Cards |
This one is for Frenchie.

A Sympathy Card for a Friend
If you think you aren’t able to form true friendships online, please reconsider. I could give you many examples, but this is just one.
I was introduced to this sweet lady in a Facebook group called “Pals.” We share a common interest in paper crafting, and would see each other through daily comments. Frances became Frenchie, as we became friends. Her comment about her brother passing was the first thing I saw this morning. And so, I made this card with Frenchie on my mind and in my heart.
I’ve had the colors from the Paper Players on my work table all week, not having time to participate in their challenge. So, this decision was right before my eyes.

I used the Aqua Painter to apply the colors, Lemon Lime Twist and Tranquil Tide to stamped flowers from Petal Palette. I stamped the flowers in Tranquil Tide on Stampin’ Up Watercolor paper, and lifted them on dimensionals. The Petals & More set has the die I used for cutting.
The card base is Dapper Denim, as well as the ink I used for the sentiment.
The design is one I used a month ago, so casing myself made it quick and easy.

The sentiment, “Comfort and Healing to you…” is from the Flourishing Phrases stamp set. And, the verse inside says exactly what I want to say.

It just so happens that the theme at TGIF is “awesome friends.”

Sending prayers your way, Frenchie!
Jan 18, 2018 | Gallery, Hand-Crafted Cards |
I haven’t seen many creations using the Sweetheart Embossing Folder. It’s on pages 103 and 210 in the annual catalog, if you want to take a peek. I’m guilty of overlooking it, but not today. I’ve had this Valentine in my head, and decided to make it come to life.

Sweetheart Valentine From the Heart
I wanted the flower to have a watercolored look, and I found the perfect, little blossom in the Petal Palette stamp set. I stamped nineteen (yes, I counted them) in Sweet Sugarplum Ink on Whisper White cardstock. The Petals & More die set has a die for cutting the blossom, so it didn’t take very long.
TIP: If you stamp the blossom in the same direction, the die lines up easily for faster cutting.
Next, I layered the Thick Whisper White card base with Bermuda Bay cardstock, topped with the Sweetheart embossed layer.
The really fun part was putting Mini Dimensionals on the blossoms, and filling in the heart. Can you see how the heart shape is in the embossing folder?

The last step was stamping “From the Heart” from the Petal Palette stamp set in Peekaboo Peach Ink. Then, I used the die from Petals & More that fits the sentiment perfectly for cutting.
I added a Peekaboo Peach Enamel Heart Shape for fun.

This would make a good class project, because it would be hard to make a mistake. And, you could use any color combination under the sun.
My color inspiration today, Sweet Sugarplum, Peekaboo Peach, and Bermuda Bay, came from the Global Design Project.
I’m off to make more Valentines! Thanks for stopping by.
Jan 17, 2018 | Gallery, Hand-Crafted Cards |
When I saw the Birthday Wit stamp set in the new Occasions catalog, I couldn’t stop laughing. The humor appealed to me, and I was looking forward to seeing how I could use it on a card. Here’s my first one:

Birthday Wit with the Birthday Friend’s Baker Man
I thought if I used the bright, striped Birthday Memories Designer Series paper, I could stamp the sentiment in black. This made it very easy. All I did was stamp, cut it out, and glue it to the colorful stripes.
I used Thick Whisper White for the card base, and topped it with another piece of white that I embossed with the Oh My Stars embossing folder.

How about that cute, little Baker Man! Do you remember him from the Birthday Friends set?
I stamped him in Basic Black Ink also, and rolled him through the Big Shot using his own die for cutting.

The piece of Basic Black cardstock was punched with the Tear Tape Punch, and serves a purpose. You’ll discover the purpose when you check out the TGIF sketch for this week:

I wouldn’t have thought to add that strip, but it completes the overall design, don’t you think?
Speaking of completing, here’s the rest of the sentiment on the inside:

You can see I used the same striped paper for “celebrate,” which I cut with a die from the Celebrate You set.
This card will go to someone who shares my sense of humor. I’m laughing as I type.
Thanks for visiting with me today. Have a good one!





