Jul 1, 2019 | Gallery, Hand-Crafted Cards |
Who doesn’t make a wish when they see a dandelion? How about three?

Dandelion Wish
Today’s card began by cutting three dandelions, from Thick Whisper White Cardstock, making them sturdy enough to raise on Dimensionals. I wasn’t sure how they would be used, but I couldn’t wait to break them out of the new, Sweet Silhouettes Die Set.
Knowing the dandelions would feel at home among earth tones, I chose a Mossy Meadow card base, topped with Daisy Lane Designer Series Paper. The leafy print coordinates with my dandelions, don’t you think?

Fortunately, the word “wish” was made available by the Hand-Lettered Prose Die Set, and it’s beautiful, cut from Noble Peacock Foil in Old Olive. This is just one of three gorgeous colors of foil, that you can see in my Product List.
“Wish” is flush to the card front, because I first cut the letters from the DSP, and then filled in the holes with the foil letters.

I discovered after making this card that the “h” is actually a “y.” Oh well, you might not have noticed, if I hadn’t said something. The added loop is very pretty!
To finish off the card, I tied the dandelion stems together with Linen Thread, securing them with Tear & Tape. Lastly, I added Glitter Enamel Dots to their centers for some extra pizzazz.

Since everyone needs to make a wish on their birthday, I’m sharing this card with Seize the Birthday. Plus, it qualifies for their “toppings,” because it “covers the card.”
I’ll be sharing another card with Seize the Birthday on Thursday, July 4th, because they’ve asked me to be a Party Guest Designer. I’m excited to share it with you too!

Thanks for stopping by. Now, birthday or not, make a wish!
Product List
Jun 30, 2019 | Gallery, Hand-Crafted Cards |
Happy Sunday, everyone! Paper Players has a fun, Tic Tac Toe challenge for you this week, so I hope you’ll play along.

Wood Textured Tree
I chose the end row, “die-cut, pearls, wood,” to make my thank you card.

Stampin’ Up! has a beautiful sheet of wood textured paper in the Pressed Petals Designer Series Paper, so that was my starting point.
Next, I used the gorgeous tree from the Sweet Silhouettes Die Set to die-cut the “bush” from the wood textured paper.

The bird, perched on a limb, was fussy cut from a piece of Bird Ballad DSP.
For the background, I used a Rectangles Stitched Die to cut a piece of Whisper White Cardstock, which I embossed with the Subtle Textures Embossing Folder. Then, I cut a piece of Pool Party Cardstock to give it a border that matched my bird.
The card base is Thick Whisper White Cardstock that I embossed with the Layered Leaves Embossing Folder.

After gluing everything together, I chose the sentiment, “Thanks,” from the Well Written Stamp Set. I used a label die from the Merry Christmas Die Set, which is the perfect size for many, small, sentiments. It’s easy to overlook, if its stashed with your holiday sets.
And, if it wasn’t for the Tic Tac Toe challenge, I may have forgotten the pearls,“the icing on the cake!”

Thanks so much for visiting! I appreciate your support, and shopping in my store! Now, check out the Paper Player’s blogs to see how they used Tic Tac Toe.

Product List
Jun 29, 2019 | Gallery, Hand-Crafted Cards |
A marriage proposal requires an answer, and the answer is usually, “yes.”

“Yes” is the answer
I normally like it quiet when creating, but recently I’ve been tuning in to the Hallmark channel. The sweet love stories are appealing to me. Plus, they are so predictable, I don’t have to concentrate on the dialog. The endings let you know a marriage proposal is imminent. Do you see the diamond?

I fussy cut the two little birds from Bird Ballad DSP; the stripe is from Magnolia Lane DSP; the Stitched Lace die-cut is from Perennial Essence DSP; and the wood lettered “yes” is from Pressed Petals DSP.
Wow, I used all four of my Designer Series Paper collections!

“Yes” was made with the Hand-Lettered Dies, which I layered for thickness. The card base of Soft Suede was chosen to match the letters.
I found the words, “cake is the answer,” from The Piece of Cake Stamp Set. I covered the word “cake” when stamping with Soft Suede Ink. The Merry Christmas label die was the perfect size for cutting.

I have to show you the inside, which completes the dot, dot, dot.
“Forever” was made with a Sweet Silhouettes Die, and the same wood DSP from Pressed Petals.

Thank you for checking out my Hallmark movies inspired card. You can see all of the Designer Paper in my Product List. I appreciate you shopping in my store!
Product List
Jun 28, 2019 | Gallery, Hand-Crafted Cards |
This clean & simple “adventure” card was really not so simple. I like how it turned out, but this was my third attempt.

adventure
I don’t want to put scary thoughts in your head, so I’ll write the instructions, minus my errors.
Cut the card base from 8 1/2 X 11 Thick Whisper White Cardstock, score at 4 1/4. From the other half, cut a card front layer 4 X 5 1/4.
Cut a piece of See A Silhouette Designer Series Paper (bright red and yellow) a spec smaller than 4 X 5 1/4, so the edges won’t show.

Make the vertical lines with a Swirly Frames stamp, leaving a space for the word, “adventure.” Use Memento Black Ink and the Stamparatus, so your lines will be straight.

Use the “adventure” die from the Sweet Silhouettes Die Set to cut the word from the card front. Save the five, tiny pieces to fill in the letters.
At the same time, you can cut the circle, using a Layering Circles Die. Position the circle die (second to smallest) a bit over the edge.

Glue the card front to the red/yellow DSP, using tiny dots of glue around the letters, so they won’t lift.
Remember the five, tiny pieces? I filled in the letters, but you don’t have to, because “adventure” is still legible.
In case you’re wondering, the inside says, “Go confidently in the direction of your dreams-Thoreau.,” which is in the Silhouette Scenes stamp set.” It comes in a bundle with the Sweet Silhouettes Die Set. Sorry, I forgot to put in in my Product List.
CAS(E) this sketch was my inspiration for today’s card.

If you choose to recreate this card, hopefully my instructions will help you get it right the first time. This card was definitely an “adventure!” The good news is, the Product List is very short!
As always, I appreciate you visiting. Thank you!
  Product List
Jun 27, 2019 | Gallery, Hand-Crafted Cards |
This sweet, Silhouette Scenes, girl is sending up balloons to celebrate a birthday.

Birthday Balloons
My silhouette girl is stamped in Night of Navy Ink on Thick Whisper White Cardstock, and fussy cut with Paper Snips. I wish this stamp set had dies for cutting, but she was fairly easy to cut by hand. Next, I used the Balloon Bouquet Punch to cut the three balloons from Noble Peacock Foil. The colors are: Pretty Peacock, Old Olive and Blueberry Bushel. It was difficult to photograph, but you can see the shine in the first photo.

For the background, I cut Whisper White Cardstock with a Rectangles Stitched Die, and embossed it with Eyelet Lace. Before embossing, I stamped “Happy Birthday,” from the Beautiful Bouquet Stamp Set, in Bermuda Bay Ink. If you’re wondering, you are seeing the debossed side. This was layered on Bermuda Bay 6X6 Designer Series Paper, atop a Thick Whisper White Cardbase.

Since the balloons were “popped” on Dimensionals, my Silhouette Scenes girl was given Dimensionals also.
Woven Threads Sequins in turquoise, and Iridescent Sequins in green, were tossed on for added sparkle.

My inspiration for today’s card was the “balloons” theme at Global Design Project.
Thank you for stopping by. Keep scrolling to see my Product List. My store is always open for your convenience!
Product List
Jun 26, 2019 | Gallery, Hand-Crafted Cards |
Hello! Welcome to my blog. I’ve been looking forward to using the Hand-Lettered Prose Dies, and they were perfect for today’s project.

Hand-Lettered Hello
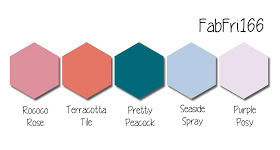
Inspiration came from two challenges: Fab Friday, for showing off Stampin’ Up’s five, new, In Colors.
And, TGIF for using the Ribbon Ruffles technique.

Since the word “hello” has five letters, it was the one I chose to use with the new colors: Terracotta Tile, Rococo Rose, Purple Posy, Seaside Spray, and Pretty Peacock.
The gingham pattern in the 6X6 Designer Series Paper adds interest to the pretty letters, which I triple layered for thickness.

The letters are glued toThick Whisper White Cardstock, which has a scalloped edge, made with a Be Mine Die. Organza Ribbon (retired) was used with Glue Dots for the Ribbon Ruffles Technique. I’m always reaching for my Carpet Pin, and it helped in placing the Glue Dots.

The card base is Thick Whisper White, embossed with the Button Button Embossing Folder. Right before I took the pictures, I added the three Pearls.

I’m so glad Stampin’ Up gave us these Hand-Lettered Prose Dies. If you missed out on the Large Letters Dies, no worries. You can say so much more with these medium sized letters, and they’re available today at a great price. Just click on the picture in my Product List to go shopping at my store. Thank you!
P.S. For the sake of accuracy, I should tell you, I mistakenly, used the “y” for the “h”. But, it does give an extra pretty loop!
Product List





