Jul 19, 2018 | Gallery, Hand-Crafted Cards |
When I saw this week’s CAS(E) this sketch, I had to take it literally.

The die for cutting a diamond is the one die in the Eclectic Layers set I had yet to use, and I needed an engagement card. The Twinkle Twinkle Designer Series Paper provided the perfect background. Do you see the hearts in the constellations?

Diamond Engagement Card
I began by layering the Thick Whisper White card base with Basic Black. This made a nice contrast with the soft Petal Pink color of the Twinkle Twinkle Designer Series Paper. Plus, I wanted to use these two colors for Mary’s challenge, “inspired by color.” Check out those shoes!

It was fun die cutting the diamond from the Silver Glimmer Paper, seeing it sparkle.

Rather than two more diamonds, I die cut two hearts. The larger one (Whisper White) is a favorite from the Sunshine Wishes die set. The smaller one (Petal Promenade DSP) is from a retired Stampin’ Up set.
I stamped, “You’re Engaged,” from the Itty Bitty stamp set. The last detail was the Polka Dot Tulle Ribbon across the front, before gluing everything together.

The sentiment inside is from the Better Together stamp set.

Now, I’m ready with a card for the newly engaged couple. As always, I appreciate you stopping by my blog. I hope you’ve been inspired.

Product List
Jul 19, 2018 | Gallery, Hand-Crafted Cards |
Uh Oh! I knew I was in trouble when I saw the theme was Country/Farm Life at this week’s Global Design Project. Cat would insist on being featured.

Cat always wants to play outside, and would love nothing better that to be on a farm in the country. Plus, he has been asking for Bokeh Dots fur, since he saw his friends wearing it. Peer pressure, I guess.

Bokeh Dots Country Cat
So, you see, he got his way. He is sitting on a Stitched Seasons frame of Crumb Cake cardstock, which I embossed with the Pinewood Planks embossing folder. 
I’ll admit that Cat was helpful in contributing to the farmland scene. He found the plant material in the Enjoy Life stamp set, and said I should stamp it in Soft Suede on Vellum cardstock. He said it would be a good place to hide, and look like rows on a field.
I added some earth and sky using the Tranquil Textures Designer Series Paper. This was glued to the Crumb Cake card base, topped with the Vellum, and then the frame.
TIP: The frame is perfect for hiding the glue that can be detected through the vellum.

Cat is really very friendly, and likes to have company. Can you see the sentiment he found? It was in the Sitting Here stamp set.

I’m not sure who will receive this card. It has to be someone who likes cats. Of course, Cat thinks everyone does. Thanks for paying us a visit!
Product List
Jul 18, 2018 | Gallery, Hand-Crafted Cards |
The Sunshine Wishes die set has been a favorite of mine. The dies are, well, “to die for.” The die I’m using today is a butterfly, at least, that’s what it looks like to me. Or, do you think it’s a flower? Either way, I like it in these sunshiny colors.

Sunshine Wishes Butterflies
The three colors are Pineapple Punch, Mango Melody, and Lemon Lime Twist. I used the die to cut the butterflies from cardstock in these colors.

To add a bit more color, I snipped pieces of Delightfully Detailed Laser-Cut DSP, and used Sponge Daubers with ink pads for coloring. These were lined up on Whisper White cardstock, embossed with the Simple Stripes embossing folder.

My inspiration for the lay-out is this week’s CAS(E) this sketch.

To complete the card front, I stamped “Happy Day” from the Itty Bitty Greetings stamp set. And, I added three Glitter Enamel Dots to the butterflies, making them extra happy.

Sunshine Wishes Butterfly
For the inside, I stamped “Happy Birthday” from the Better Together stamp set. The rainbow effect was achieved by applying the three ink colors to the stamp before stamping. The cute do-dad is also from Better Together.

You can see the supplies I used for today’s card by continuing to scroll. It’s a bit difficult to read the words backwards in the Sunshine Wishes die set, but you get the idea.
Thanks for stopping by. I’m sending you sunshine wishes!
Product List
Jul 17, 2018 | Gallery, Hand-Crafted Cards |
Today’s inspiration is from my yard, blooming Agapanthus.

Botanical Press Agapanthus
Here they are in my yard two weeks ago. The height of their blooming period is July 4th, which is nice, but I wish they’d last forever.

It was once popular to preserve flowers by pressing them. Since the Big Shot is a pressing tool, I wanted to put it to work. I’ve tried this with Bird of Paradise, and a few others, so I was ready to see what would happen with my beautiful agapanthus.
I tried it first with just the stems. Neat, huh?

Next, the flower.
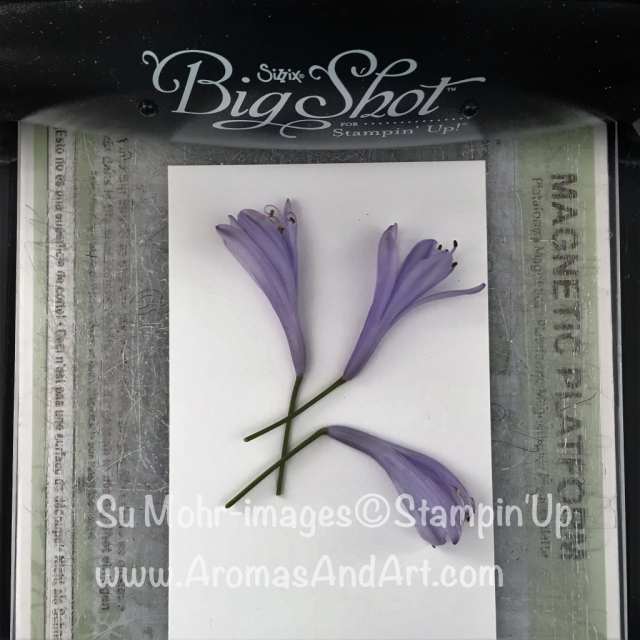
I peeled off the part that was loose, leaving some portion with real flower, and some with imprint.

I came up with the idea for the Stitched Shapes circle dies, because of the challenge at TGIF. I thought it was a great lay-out for my botanical press agapanthus.
I added a panel of Crumb Cake cardstock, which I embossed with the Subtle Texture embossing folder. And, I added a thin strip of Old Olive cardstock along the left side of the panel.
The sentiment, “With love and sympathy,” is from the Itty Bitty Greetings stamp set. It is resting on Burlap Ribbon, fastened with Tear & Tape.

Now, off to see what needs pressing, hopefully, not clothes! Other than the flowers, my supply list is below, and clicking on the pictures takes you to my store. Please keep in mind, I’d love to be your demonstrator!
Product List
Jul 16, 2018 | Gallery, Hand-Crafted Cards |
It’s always fun to break out a new stamp set. This is the first time I’ve designed a card with the Pick a Pennant stamp set, and the Playful Pennant dies. I received the stamp set as a gift at On Stage in April, and I was waiting for the dies I received in my last order.

Playful Pennants Strung on a Fence
It’s also fun using NEW colors, and this is a perfect example why I need ALL of them. Paper Players is having a color challenge this week, using Lovely Lipstick, Highland Heather, and Granny Apple Green, and I’m prepared.

I stamped each of the beautiful, new colors on Thick Whisper White cardstock using a Pick a Pennant stamp. I “stamped-off” one time, creating a lighter shade. At the same time, I stamped three tassels. The tassels are full strength, so you can see the difference “stamping-off” makes.
Next, I figured out what I wanted to say, and stamped the letters in Basic Black ink. The alphabet comes in the Pick a Pennant stamp set, and made for easy stamping. I didn’t even need the Stamparatus this time.

The next step was cutting. Happiness is having dies to cut the pennants and those cute, little tassels. Talk about easy!
I imagine I’ll find clever ways to hang the pennants, but today I strung them across a fence, made with the Wood Grain embossing folder.

For the card base, I chose Highland Heather, and used Highland Heather ink for the sentiment. The sentiment, “Today we celebrate wonderful brilliant fabulous you,” is from the Picture Perfect stamp set.
The Oh My Stars embossing folder decorated the envelope flap, and that’s a wrap.

I hope you were inspired by the the colors, the pennants, or both. Thanks for visiting!
P.S. The embossing folder for the fence is Pinewood Planks, not Woodgrain.
Product List

Woodgrain Textured Impressions Embossing Folder
[127821]
$7.50
Jul 15, 2018 | Gallery, Hand-Crafted Cards |
I’ve been thinking about the Global Design Project sketch since Monday, and now it’s Saturday night. My husband is at a Pares game with some friends, so I’ve had time to play. Here is the sketch I’ve been pondering:

I needed to decide what my three objects would be and chose the precious, little bird from the Painted Glass stamp set. I stamped three birds on Whisper White cardstock, and colored them with Stampin’ Blends. For the sake of time, I didn’t list the colors I used, but all of the Stampin’ Blends are now available at my store. Yay!

Graceful Glass Birds
The birds are resting on a branch from the Petals & More die set. It was cut from Soft Sea Foam cardstock, making a nice resting place for the birds. Did you notice they landed in a “square-like” fashion, mimicking the sketch?

I was anxious to use the new Stitched Seasons dies, and determined to work that into the design somehow. I used the largest die in the set to cut a frame from Soft Sea Foam cardstock, matching the branch. This fabulous die set is available to demonstrators in July, and will be available to everyone in August. You can check it out in my product list below.

My favorite, little sign from the At Home set is tied to the branch, enabling the birds to say “hello.” I embossed the Whisper White cardstock layer with the Subtle embossing folder after stamping the string in Basic Black ink.

I placed the birds and sign on Mini-Dimensionals, and that’s all there was to it. Now, off to post this to meet the deadline at the Global Design Project challenge.
Product List