Aug 19, 2017 | Gallery, Hand-Crafted Cards |
As soon as I saw the lines in this week’s CAS(E) this sketch #235, I knew what I would do, at least in the beginning. It was time to bust out my new Year of Cheer Washi Tape.


I used gold to make the three vertical lines, and added copper and multicolored horizontal lines on the bottom. I deliberated for quite some time, but decided the fourth line needed to be a long, narrow sentiment. I found “Merry Christmas Wishes” in Santa’s Sleigh (the stamp set.) I played around with different colors for the card base, but I got a good feeling in my soul when I put it next to Soft Suede.
For those who like lots of “white” space, (Crumb Cake in this case) I could have stopped here. But I couldn’t leave it alone, and the Soft Suede grew a branch.
The branch was die cut from Seasonal Layers, and would soon be adorned with ornaments from the Carols of Christmas stamp set. It was great fun using the Card Front Builder die to cut the three ornaments from Gold Foil, and I glued them right over their stamped images.

I think you could call this a sophisticated Christmas tree. My mother would have made this type of decoration. She was very artistic, and would surprise us with her creativity. One year she captured a tumbleweed, and turned it into the most beautiful Christmas tree. This was only in addition to our real pine tree, of course. Santa Claus couldn’t possibly put gifts under a tumbleweed!

I’ll be thinking about who will be receiving this Christmas card this year. It’s not for everyone, but don’t you like how that washi tape shines?

Aug 18, 2017 | Gallery, Hand-Crafted Cards |
“May the spirit of the season be the melody that plays in your heart all year long.”
So, here we are in August, and since this is my wish for you, why not make this card?

As soon as I received the Musical Season Bundle, I couldn’t wait to die cut the French horn from Copper Foil paper. In fact, this horn and the little drummer boy are the two reasons I HAD to have this bundle. Not to mention, the Merry Music DSP that will coordinate beautifully.
I decided the background for my French horn would be sheet music, layered on black cardstock with just 1/8″ showing. Brian King, the king of layering, taught me that this tiny bit can pack a big punch. For our traditionalists, I tied and knotted an Emerald Envy ribbon around the bottom, before gluing it to a Very Vanilla card base. I stamped and layered the sentiment the same way, but raised it on dimensionals. The horn was also raised, since I was able to find enough larger spots for the dimensionals.

Almost finished, but something needed to be blowing out of the horn. I was playing around with sequins when hearts jumped out at me, little, red enamel hearts. Perfect for “the melody that plays in your heart.”

Thanks for stopping by my blog. I really appreciate you taking time to pay me a visit!
Aug 17, 2017 | Gallery, Hand-Crafted Cards |
After seeing many beautiful cards designed with the Painted Harvest Stamp set, I was excited to receive it yesterday. This morning, I saw the new challenges at Freshly Made Sketches and Tic Tac Toe, and dove right in. The angled sketch and the middle row across (flower-thank you-angled) could work well together.


I was anxious to try stamping the sunflower, and used Daffodil Delight for the first layer, Pumpkin Pie for the second (now I’m getting hungry) and Cajun Craze for the center. I fussy cut my sunflower, because I wanted to pop it up on dimensionals, and it didn’t come with a die for cutting. It was fairly easy, because it was meant to be irregular, or so I told myself.
CONFESSION: I actually made two of these flowers, because I didn’t like the center on my first one. So, my layered sunflower is really a “cover-up.”
Once I had my flower, I decided the pattern I wanted to use from the Painted Autumn Designer Series Paper, which I layered on a Very Vanilla card base. I wasn’t sure how to create the angled piece, and I’m curious how others solved this challenge. I ended up making a template from a piece of scratch paper, which I placed with the “real thing” on the Stampin’ Trimmer.
Two hours later………
After stamping the sentiment, “gather together & give thanks,” in Early Espresso ink, I added a little texture to this angled piece with the Softly Falling embossing folder. Then, I used Tear Tape to adhere lace ribbon along the bottom edge, and glued the piece on top of the DSP.

My sunflowers (plural) needed some foliage, and I chose the two-step fern from the same Painted Harvest stamp set. Using the colors, Pear Pizzazz, Lemon Lime Twist, and Early Espresso, I had fun experimenting with different combinations. What time is it now? I began fussy cutting, stopped after three (because it’s the magic number), and tucked them beneath the flowers.

This can be known as the project that took an entire morning. Sometimes you work on something for such a long time, you lose perspective. I sent a pic to my husband to make sure I hadn’t lost my mind, and he said it was “beautiful.” He’s a nice guy. I think I’ll give him this card for Thanksgiving.
Thanks for stopping by my blog. Relax, have fun, enjoy your day!
P.S. I just discovered a new challenge, The Sisterhood of Crafters. Their theme this week is Harvest Hoe-down, and sunflowers fit that perfectly. What a great name and graphic they have. I think I’ll have to join!

Aug 16, 2017 | Gallery, Global Design Project, Hand-Crafted Cards |
I believe this prominent flower made with the Daisy Punch is a “wannabe” sunflower. But, isn’t she cute? She takes a starring role on the Soft Sky tag, a 2″ wide piece of cardstock. The tag is embossed with the Petal Burst embossing folder, and has a top that is cut with a die from the Hometown Greetings set. I don’t own a tag topper punch, so I was delighted to find one in this set. (p. 39 Holiday catalog).

Credit for the lay-out goes to Louise Sharp, an Artisan who designed this for the celebration of Happy 100th Global Design Project. It was especially fun this week, because we got to choose which designer’s sample we wanted to CASE. I chose this lay-out, because it was unique, and would also work for a challenge that Lisa Pretto has going on over in her InkBig Academy.


For the tag background, I chose a gorgeous sunflower pattern from the Painted Autumn Designer Series Paper, and layered it on a Garden Green card base. After cutting the Sky Blue Tag, I made sure the dimensions of the Whisper White and Garden Green layers that would be beneath it were correct, and I raised the three layers with Foam Adhesive strips.
I loved the little border that Louise added at the bottom of her tag, and I used the Ticket Tear Border Punch to mimic this. The tag would have a tie at the top of Copper Trim, and I have to tell you, it is so much fun to pull apart! If you haven’t experienced it yet, you must!

I fiddled with the leaves much longer than I should have, but I became stubbornly committed to having them match the color and shading of the ones in the DSP. I ended up using an Oh So Eclectic stamp with Garden Green ink on Lemon Lime Twist cardstock. After cutting two sets with an Eclectic Layers die, I doubled them, so they could withstand hanging over the edge.
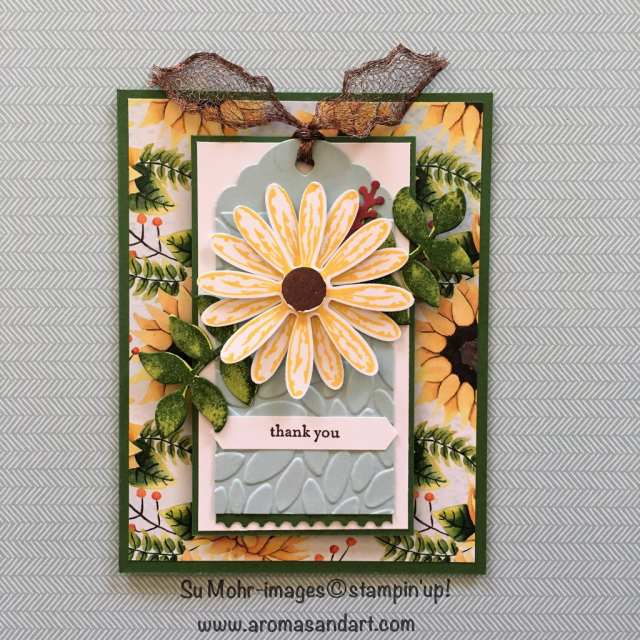
The final touch was that little sprig of Cajun Craze, also cut with a die from Eclectic Layers. Do you see the bits of that color in the DSP?
Thank you Louise Sharp and Lisa Pretto for the inspiration, and Happy 100th to everyone who has made Global Design Project a great place to be!
Aug 15, 2017 | Gallery, Hand-Crafted Cards |
Starting back to school is always an exciting time, even when you’re not ready for summer to end. More than likely, the teachers have been hard at work preparing lessons and getting their classrooms ready. How nice it would be for parents to show their appreciation with a thank you card.
Remembering my “back to school” times, the chalkboard played an important role. The teacher would write his or her name, along with other important information that we were supposed to remember, like homework. So, for this project, I wanted to create a chalkboard.

The frame for the chalkboard was cut with a die from Project Life, and decorated with black and white dotted paper from Whole Lot of Lovely Designer Series Paper. Before cutting, it was glued to Thick Whisper White cardstock, so it would be sturdy when lifted on Foam Adhesive Strips. I used Craft Whisper White ink to write the Watercolor “thank you” on Basic Black cardstock. Doesn’t it look like chalk? This was glued to the Lemon Lime Twist card base prior to adhering the frame.
I thought it would be fun to use a number “2” for the word “to,” and found it in the Number of Years stamp set. I stamped it with Lemon Lime Twist on Thick Whisper White, which I doubled for thickness.

The front of the card was finished, but something special needed to be added to the inside. Using the piece of Thick Whisper White cardstock that was cut from the middle of the frame, I made a pocket, just the right size for a gift card. First, I decorated the inside with Lemon Lime Fresh Florals DSP, and a piece of plain Whisper White for personalizing. The gift card pocket was attached with Tear Tape, and Washi tape decorated the sides.

Before slipping in the gift card, it was important to write “you’re the best” from the Watercolor Words stamp set. It happens to match the “thank you” on the front of the card.

Thank You! You’re the Best!
Aug 14, 2017 | Gallery, Hand-Crafted Cards |
Remember the children’s book, “The Little Engine That Could?” It was written in 1930 to help children understand the value of optimism and hard work. When I saw the stamp set, Designer Tee, I thought this little engine must have been taken from that story.

My idea for the card developed from the requirements of the Less is More challenge #341. I needed to do a “one layer” card, as well as feature a vehicle. I hadn’t realized I was lacking in vehicle stamps, and had to go back to last year’s Sale-A-Bration to find one.

I could see the little engine chugging up a hill, but I needed some background scenery. Hometown Greetings Edgelits Dies from the new Holiday catalog provided my village. I used two of the dies to cut stencils from Kraft paper, then held them in place while sponge daubing over them with Night of Navy and Lemon Lime Twist.
You might notice the snowman is missing. I could tell you he melted in the summer heat, but the truth is, I snipped him from the stencil with scissors. It seemed to me he was the only thing that shouted Winter, and I wanted to have options for the season.

I like stories with happy endings, so this sentiment from the Feel Goods stamp set was perfect for making this a “congratulations” card.

“She believed she could…so she did,” is, after all, a nice moral for adults too!





