Dec 13, 2019 | Gallery, Hand-Crafted Cards |
My Christmas cards are in the mail, so I rewarded myself with time to play with a new stamp set, Thoughtful Blooms.

Wandering Vine
Thoughtful Blooms happens to be one of the 2020 Sale-A-Bration stamp sets, and the really exciting thing about it is the coordinating, Small Bloom Punch. I know how we all love punches, and both items are FREE with a qualifying order, beginning January 3rd!

I began by stamping three, solid flowers, in half-strength Highland Heather Ink on Whisper White Cardstock. Next, I stamped their outlines in full-strength, Highland Heather Ink, and the centers in Crushed Curry Ink. Then, I had the fun of using the Small Bloom Punch for cutting.
The vine for my flowers was easily stamped, three times, in Garden Green ink on Whisper White Cardstock. After stamping the vine, I used the Brick & Mortar Embossing Folder to build the wall.

The small, “thank you” is also from the Thoughtful Blooms Stamp Set, surrounded by Garden Green Cardstock, cut with an Ornate Frames Die. Isn’t it cute?

If you’re wondering what inspired me to make a climbing vine, it was this week’s CAS(E) this sketch challenge.

The Sale-A-Bration items aren’t in my store yet, but you’ll find the other supplies in my Product List.
Come back Jan. 3rd to shop, and qualify for FREE Sale-A-Bration items! Thanks for visiting me today!

Product List
Dec 12, 2019 | Gallery, Hand-Crafted Cards |
Sale-A-Bration is coming soon! January 3, 2020, you’ll be able to qualify for FREE product. You’re going to want the Lovely Lily Pad Stamp Set and coordinating Lily Pad Dies, two of the FREE items with a qualifying order.

Lily Pad Day
This stamp set is special, because it’s reversible; a unique quality Stampin’ Up! introduced last season.
I first used the smooth side of the stamp, stamping the lily in Flirty Flamingo Ink. Then, I turned the stamp over, stamping in Melon Mambo Ink for the outline.
The leaves were stamped the same way, using Granny Apple Green and Garden Green. I chose my pinks and greens from the colors in the coordinating Lily Impressions Designer Paper, even though it doesn’t appear on this card. The DSP is another FREE item, and it’s gorgeous!
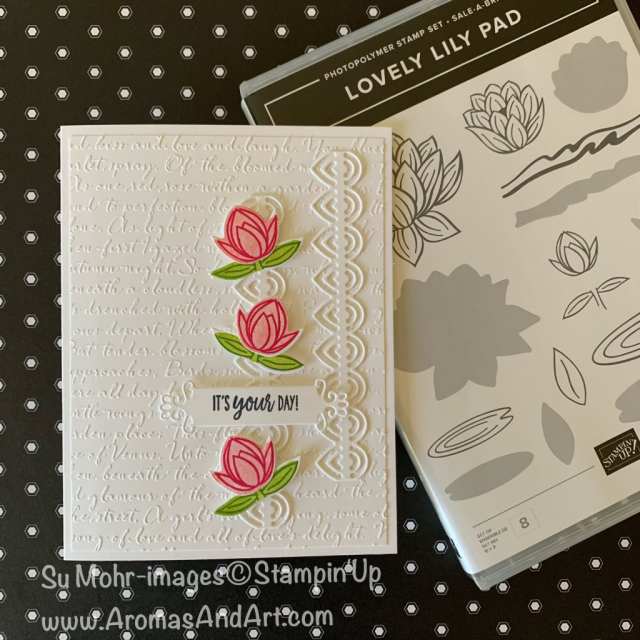
After stamping the three flowers and leaves, I used the Lily Pad Dies for cutting, and glued the lilies on the stems.
I wanted the lilies to stand out, so used a Whisper White background, embossed with the Scripty Embossing Folder, which I glued to a Thick Whisper White card base. Additional texture was added with two strips of Thick Whisper White Cardstock, cut with a wonderful, Lily Pad Die. See the die on the left? It’s 4 1/4″ long.

Last, but not least, the sentiment is from Under My Umbrella, a new stamp set from the 2020 Mini Catalog. I stamped “It’s your day” in Memento Black Ink, and used an Ornate Frames Die for cutting. After lifting the lillies and sentiment on Dimensionals, my “sneak peek” card was complete.

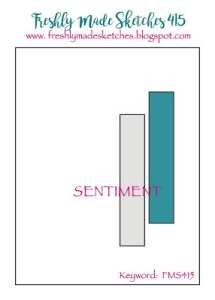
I think you can see how Freshly Made Sketches was my inspiration.
Now, back to addressing Christmas cards. Sorry, I just had to take a break into Spring!
The Sale-A-Bration items aren’t in my store yet, but you’ll find the other supplies in my Product List. Come back Jan. 3rd! Thanks for visiting me today!
Product List
Dec 11, 2019 | Gallery, Hand-Crafted Cards, Pals Blog Hop |

Welcome to the Pals’ Blog Hop! We’re so glad you’re here because we made some great projects for our Retirement Fun Fold Party – showcasing our favorite products from the Holiday Catalog that will be leaving us forever. You may be starting the hop here or coming from a previous Pal’s blog. Either way, you’ve come to the right place. You’ll find the full line-up below to help you move, or “hop” along from Pal to Pal.
I know we have Holiday on our minds, but the retiring items I’m sharing are fabulous year-round. And, this is the best reason for getting them before they retire. Today’s card is celebrating a wedding, but would work perfectly for an anniversary, birthday, or Happy New Year!

“clink”
The “fun fold” I chose is called a Double Z Fold Card, and photographing it is the most difficult part about it. Funny, huh? Hopefully, my instructions will enable you to make it quite easily.
First, cut a piece of 8 1/2″ X 11″ Cardstock in half, 4 1/4″ X 11″. This is in the neutral color, Gray Granite. Score at 2 3/4″ and 5 1/2″. I used the “bubbles’ die from the retiring Sip & Celebrate Die Set to cut the back section of the card base. And, I added Whisper White Cardstock to the middle section for a personal message.
Second, cut a band for the bottom, 11″ X 1 1/2.” Score at 5 1/2″ and 2 3/4″. I decorated the band with three strips of Perennial Essence Designer Paper, which I embossed with the retiring embossing folder, Stylish Scroll.

The trickiest part of the Z-Fold is fastening the band. Apply glue to the front of the card, and to the back of the end of the band. I don’t normally use this much glue, but I wanted you to see it. LOL. Then attach the band, closing the card while fastening to make sure it attaches evenly.
TIP: Liquid Glue gives you a little wiggle room.

Close, flip up, and position.

Now, for the champagne! I used the die from the Sip & Celebrate Die Set to cut the stemware from Mercury Glass Acetate. This was backed with Whisper White Cardstock that I stamped in Blushing Bride Ink with a stamp from the Sip Sip Hooray Stamp Set.

Next, I cut “cheers” from Sparkle Glimmer Paper, using a die from the Cheers Die Set, and glued it to the front band.
“Happy Wedding Day” is from the Beautiful Bouquet Stamp Set, stamped in Gray Granite Ink, and cut with an Ornate frames die. A second die from the set was used to cut the fancy frame from Perennial Essence DSP.

For the final touch, I used the Hand-Held 1/16″ punch to add a few Sparkle Glimmer Paper “bubbles.”

If you haven’t tried this Fun Fold, you should! It will fit right inside our Medium Envelope, which is another thing to love about it.
Thanks so much for stopping by today.
More inspiration awaits! Use the Blog Hop Line-up below to visit the rest of this month’s Design Team. My fellow Pals are excited to show you what they’ve created! Don’t forget to show us some love by commenting on our creations. Please click to leave a COMMENT HERE.
Mark your calendars for Wednesday, January 8th, for our Time to Sale-A-Brate blog hop when our Design Team showcase projects using brand new products from the new mini catalog and Sale-A-Bration brochure. Don’t miss the fun!
Pals December 2019 Blog Hop Line-Up
- Mary Fish at Stampin’ Pretty
- Jackie Beers at Blue Line Stamping
- Lisa Ann Bernard at Queen B Creations
- Beth McCullough at Stamping Mom
- Katy McGloin at Just Fun Stamping
- Stesha Bloodhart at Stampin’ Hoot!
- Jeanie Stark at Just Stampin’
- Su Mohr at Aromas And Art ***YOU ARE HERE***
- Debra Simonis at Deb’s Stampin’ Grounds
- Lynn Kolcun at Avery’s Owlery
- Peggy Noe at Pretty Paper Cards
- Jen Roque at Stamp Camp with Jen
- Mary Hanson at Up North Stampin’
- Karen Hallam at Karen’s Stamping Habit
- Tricia Chuba at ButterDish Designs
- Wendy Klein at Doggone Delightful Stampin’
The supplies for today’s card are in my Product List. The first group has the five products that are retiring, and the second group are continuing. The retiring products are only while supplies last, so click on the pictures to put them in your shopping bag.
And, here is a deal from Stampin’ Up! you don’t want to miss! 24 hours of FREE SHIPPING. It’s only happening December 11. 12:01 am (MT)–11:59 pm (MT)

Thanks so much for shopping with me! I appreciate your support!
Product List
Product List
Dec 10, 2019 | Gallery, Hand-Crafted Cards |
I love receiving Christmas cards, and today’s card is one I received from a very dear friend.
My very talented friend, Lisa, and I have been friends for 40 years, and she has been sending cards for as long as I’ve known her. But, funny thing, she hadn’t known about Stampin’ Up! So, I introduced her to it three years ago, and she signed up. Her cards are filled with detail, and love, but she doesn’t post them. I did get her permission!

By Lisa
When we were looking through the 2019 Holiday Catalog, she was instantly attracted to the ice skates and the Toile Tidings Designer Paper.

You can see how Lisa brought her vision to life.

Thank you for letting me share your love of card making, Lisa! You add joy to the lives of many.

Don’t you agree that this Free Skate Bundle is fabulous! If you’d like to order it, do so ASAP, because it’s on the retiring list, and liable to go quickly. Just click on the pictures in my Product List.
And, don’t forget, tomorrow December 11th, is FREE SHIPPING for 24 hours with a 50.00 qualifying order!
Product List
Dec 9, 2019 | Gallery, Hand-Crafted Cards |
Before telling you about today’s card, I have some exciting news!
Got fun goodies on your Stampin’ Up! wish list? Then it’s time to circle Wednesday, December 11 on your calendar and get ready to shop. Why? For one day only, shipping on any qualifying product order is absolutely free. Simply spend a minimum of $50 (before tax). But don’t wait! This offer will be over in a flash!
Sales Period: December 11, 2019 12:01 am (MT)–11:59 pm (MT)
Now, what do you think of this adorable raccoon?
He is brand new from the Special Someone Stamp Set in the 2020 Mini Catalog. When I saw the sentiment, “This is a special balloon” and “it’s filled with heal-ium!” I wanted to start stamping as fast as possible.

Raccoon’s Special Balloon
I realized the stamp set is actually “Two-Step” stamping, so I knew I wanted to use my Stamparatus. This would insure the stamps would line up properly. I began with the detailed, raccoon stamp in Early Espresso Ink on Whisper White Cardstock. This was followed by stamping the solid, raccoon stamp in Gray Granite Ink on top of the first image.
TIP: Be sure the white part on his face is lined up. The stamps are clear, photopolymer, so you can see.
Next, I placed the balloon string on the Stamparatus, and stamped it in Early Espresso Ink. Then, I stamped the outline of the balloon in Merry Merlot Ink, followed by the solid stamp (stamped off) in Merry Merlot Ink.

I cut my stamped image using another new, 2020 product I was excited to try, a Stitched So Sweetly Die. Don’t you love the scalloped edge? I used a smaller size for the sentiment. The dies are perfect for sentiments, stamped images and layering. How fun, and sweet!
With all this newness, I thought the raccoon should have a new background. He is standing in a field of poppies from 2020 Peaceful Poppies Designer Paper, and the dotted paper is from the same pack. Isn’t it gorgeous?

My inspiration was the CAS(E) this sketch challenge. Although, I took liberties with the sketch, so I could complete the sentiment.


Thanks for stopping by! You can see details on the new 2020 items in my Product List. They are available for demonstrators now, and customers, Jan 3. You can, also, read about the Stamparatus, if you aren’t familiar with it.
Contact me with any questions about FREE SHIPPING on Wednesday, December 11.
[email protected]
Have a wonderful day!
Product List
Dec 8, 2019 | Gallery, Hand-Crafted Cards |

Are you looking for last minute gift ideas? Nothing beats a gift card or cash, especially when it’s delivered in a personalized, handmade holder.
I’ve made this gift card holder in many different papers, and today’s selection is from Feels Like Frost Designer Paper.
To coordinate with the DSP, I used three colors of cardstock: Purple Posy, Gray Granite, and Seaside Spray.

Reindeer Gift Card Holders
INSTRUCTIONS
An 8 1/2″ X 11″ piece of cardstock makes two gift cards that are 7 3/4″ X 5″. Score at 6″ and 2 1/2″.
The 7 3/4″ X 1″ strip on the side becomes the band around the gift card holder. If you want to conserve paper, you could cut the 3/4″ strip first (shown on the bottom in pieces), and use it for the second band. However, I prefer the 1″ width.
The band is scored at 6 1/8″ and 2 1/2″. You want that extra 1/8 inch on the scoring, so the band will slide off and on easily.

Cut two pieces of Designer Series Paper: The bottom front is 4 3/4″ X 2 1/4″. The top front is 4 3/4″ X 1 1/2″.

Cut one piece of Whisper White cardstock for the sentiment on the inside, 4 3/4″ X 1 1/2″.
Use a circle punch to make a finger slot in the middle of the bottom front.
Attach a piece of Tear & Tape to each side of the bottom (inside), and close, sealing your pocket.

I decorated three of the bands with reindeer from the Dashing Deer Stamp Set, stamped in three ink colors: Early Espresso, Night Of Navy, and Highland Heather. I stamped on Thick Whisper White Cardstock, and used their Detailed Deer Die for cutting.
TIP: Glue the band with the raw edge in front. This will be covered by the reindeer, which keeps the back looking smooth and pretty.
I used a pice of Tear & Tape to hold the reindeer securely.

The other three bands have a reindeer cut from Sparkle Glimmer Paper with their Detailed Deer Die.
TIP:This paper is a good choice, because it is flexible, and their delicate, “free-flying” antlers are not as likely to tear.

Here’s another look at this completed trio. Well, almost complete; just need to enclose a gift card, or cash, along with a personal note.

I used Stampin’ Up’s new Paper Trimmer for measuring, cutting, and scoring.
You can purchase the Paper Trimmer, along with all the Gift Card Holder supplies, in my store. Just click on the pictures in my Product List below, and have fun shopping. Thank you! I appreciate your support!

For more Christmas ideas, continue on the hop with the Kre8tors. Clicking the next button takes you to Libby’s blog. We love reading your comments. Please click to leave a COMMENT HERE.

Melissa Tennison
Tricia Butts
Su Mohr
Libby Fens
Laura Mackie (UK)
Janey Backer
Jan Musselman – USA
Angie McKenzie – USA
Cheryl Taylor (UK)
Rebecca-Jo Unwin – Australia
Margriet Siekman (NL)
Deb Naylor
Dana Sullivan
UPDATE: I discovered that Feels Like Frost is not available right now. But, the good news is, it will be in next year’s 2020 Holiday Catalog. In the meantime, you can be creative with many other holiday papers. May I suggest, Wrapped In Plaid?

Gift Card Holders
Product List





