Today’s card features a well used stamp set, Beautiful You, which I re-named “Barbie.” The sketches look so much like the illustrations in the booklets that came with the Barbie doll when she was introduced in 1959. Yes, I owned the original, and too many to count after that.
Dancing Barbie
When I saw Anne Marie’s challenge for Paper Players this week was “paper piecing,” I couldn’t think of anything other than making dresses for Barbie.
Because today’s project also needed to be Clean and Simple, I used very few supplies, which you’ll see in my Product List below.
First, I decided on a Thick Whisper White card base with just a single layer of vellum from Floral Romance Designer Series Paper. This provided a gorgeous frame for my dancing girl from the Beautiful You stamp set.
Next, I stamped Barbie in Soft Suede ink on Whisper White cardstock, along with the sentiment, “Life looks beautiful on you.”
A Rectangle Stitched die was used to cut this piece, which I glued in the middle of the floral, vellum DSP.
And, now for the fun, “paper piecing technique.” For Barbie’s dress, I stamped her entire image on a leaf print from the same pack of Floral Romance DSP. Then, I cut off her arms and legs, even her hair, leaving only the dress. Just like paperdolls! I glued on her dress, and my card was complete!
Here’s my video for those who like a live demonstration:
Thanks for visiting me today. Thank you for shopping at my store!
Stop by the other Design Team blogs to see more Paper Piecing.
Is Stampin’ Up! retiring the “Happy Birthday” die? The answer is “yes.” So, if you want to have it in your stash, order now, while supplies last.
The beautiful lettering makes easy work of creating a handmade card in a jiffy. For this card, I chose a Balmy Blue card base, layered with Tranquil Textures Designer Series Paper. The bubble print combines all of the colors in the DSP, which is bordered with Fresh Fig, and “Happy Birthday” is in Tranquil Tide.
Floating Bubbles
I decided to try the Multipurpose Adhesive Sheets for the first time. If you look in my Product List, you can see that the sheets are shown with “Happy Birthday.”
I was pleasantly surprised to discover the ease in using the Adhesive Sheets, however, I just found out this is also a retiring item!
This card took so little time to make, I decided to add some dimension with floating bubbles. I used a hole punch for bubbles in the cardstock colors in my Product List, along with a few in Sparkle Glimmer Paper. I “popped” them up (pun intended) on tiny bits of dimensionals. Can you see how they are floating?
Of these colors, Fresh Fig and Tranquil Tide are retiring.
I think this calls for a retirement party! But, I’m sharing my “Happy Birthday” card with Seize the Birthday
Bottom line is, if you want any of these items, “seize” them now, while supplies last.
The Geared Up Garage stamp set is perfect for Father’s Day cards. Guys like cars, right?
Garage Gears
The stamp set has sentiments to prove my point. For this card, I chose “Best Dad,” which has coordinating, Geared Up Garage, dies. I stamped the sentiment in Gray Granite ink on Thick Whisper White cardstock, then cut the top piece from Gray Granite cardstock, and glued the two together.
How do you like the way I colored the car? Actually, it was cropped from a piece of the Classic Garage 6X6 Designer Series Paper. How fun is that!
There are many great dies in this set, and a favorite is the gears. They are made to shine by using some Champagne Foil.
The red leather background is also a piece of the Classic Garage 6X6 DSP, which I cut with a Rectangle Stitched die. The red leather is layered on Neutrals 6X6 DSP, which is layered on a Gray Granite card base.
After the car and sentiment were placed on dimensionals, the last detail was a small edge of gears in Basic Black cardstock, as seen in the TGIF Challenge.
On a side note, my mother drove a pale yellow, 1964 fastback mustang, and it was one of her prized possessions. It had beautiful, black leather seats, a gorgeous wood steering wheel, and she drove it until she could no longer see. Gals like cars too!
The stamp set being featured at WWYS this week is Flourishing Phrases, my “go to” for sentiments with beautiful font and meaning.
My daughter’s birthday is later this month, and I found the perfect verse for her card in this stamp set: “God wanted to brighten up the world…”
God’s work
And, I love how the sentiment is completed on the inside, “SO HE MADE YOU.”
While I’m here, I’ll tell you that the border around the sentiment is a Swirly Frames stamp, the flower was made with a Flourish die, and “Happy Birthday” is from the Piece of Cake stamp set.
Lemon Lime Twist is definitely a bright color, and I chose that for the card front.
I began by stamping the image of two leaves from the Flourishing Phrases stamp set. Using VersaMark, I stamped randomly, and off the edges in places. Then, I sprinkled Clear embossing powered over my stamped leaves, and set it with the Heat Tool.
Although, hard to photograph, you can seen the shine when the light catches it.
I gave my heat embossed leaves a border of Whisper White cardstock, taped two pieces of Organza Ribbon (retired) in place, and glued it to a Granny Apple Green card base.
The sentiment is stamped in Black ink on Thick Whisper White cardstock, cut with a Stitched Shapes oval die, and placed on dimensionals.
The branch and three flowers are from the coordinating, Flourish die set. The branch is cut from Thick Whisper White cardstock, and the flowers are from Pineapple Punch, Calypso Coral, and Mango Melody cardstock. They just seemed to call for Black Faceted Dots in their centers.
The envelope flap is decorated with a piece of 6X6 In Color Designer Series Paper, which you can see in the first two pictures. I cut a piece of DSP, 5 3/4 X 2 1/4, use liquid glue around the edge of the flap, press the DSP to the flap. and trim the edge with Paper Snips, using the flap as a template.
My layout was inspired by this week’s challenge at Freshly Made Sketches.
And, one final look at the completed birthday card for my daughter.
Thanks so much for stopping by. Keep scrolling to see my supply list, where clicking the pictures will take you to my store for shopping.
If you have this stamp set, please post your creation at What Will You Stamp? Yes, that is the question!
Welcome to the Kre8tors April 2019 Blog Hop. For my contribution, you’ll be seeing a number of gingham cats and butterflies.
Spring colors are gorgeous, so if you want a bundle of inspiration, hop along with the Kre8tors today to see how we made this photograph come to life.
I have wisteria, the color of Highland Heather, growing over the gazebo in our backyard. It comes back, year after year, and I always look forward to its beauty.
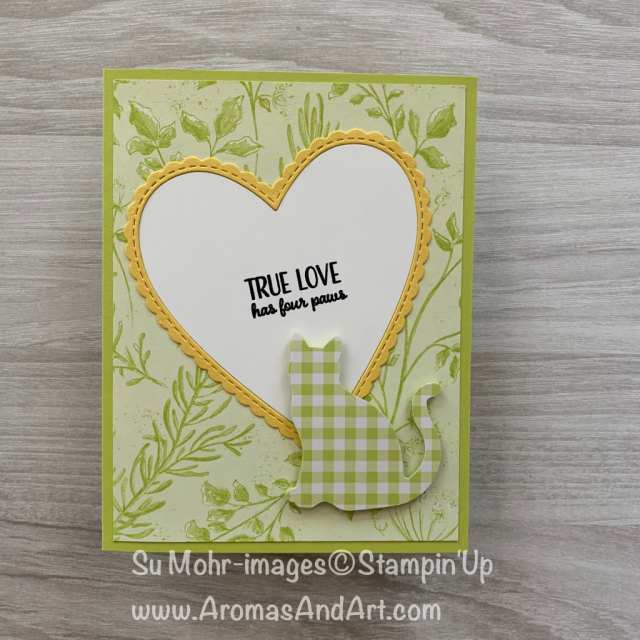
For this month’s Spring color challenge, I used Highland Heather, Granny Apple Green, Daffodil Delight, and a few additional colors. I have a friend who owns a Veterinarian Hospital, and she asked me to make sympathy cards for cats and dogs. I was honored by the request, and couldn’t wait to get started.
If you follow my blog, you know I enjoy using the Cat Punch, and my recently acquired Dog Punch. Along with the stamp sets, Happy Tails and Nine Lives, I was well equipped. I started with the cat cards, because I wanted the cats to be in Spring colors, punched from Gingham Gala Designer Series Paper.
I made ten cards of the same design, but varied the colors and paper. Here they are, already in glassine envelopes.
The hearts were cut with a die from the Be Mine Stitched die set. The scalloped trim cuts at the same time, and I was able to mix & match some of the colors. The card base colors are Daffodil Delight, Granny Apple Green, Grapefruit Grove, Highland Heather and Balmy Blue. It worked out perfectly that the Botanical Butterfly Designer Series Paper coordinated.
I stamped “True love has four paws,” in the middle of each heart, and glued the heart, trim, and Butterfly DSP to the card bases. The cats were fun to punch from the Gingham DSP, and they received a couple layers of cardstock before I placed them on dimensionals.
I discussed the inside sentiment with my friend, and decided on, “Thinking of You….Please know that I care.” It’s from the retired, Thoughts and Prayers, stamp set.
The dog cards have been completed, and I have those scheduled to post on April 29th. I read every comment, and appreciate your effort to do so.
Today’s “quick & easy” butterfly card just fell into place.
This week’s Paper Players color challenge determined the colors: Daffodil Delight, Balmy Blue, and Calypso Coral.
My layout and butterfly idea were from the Global Design project.
I started with a Thick Whisper White card base, layered with Daffodil Delight cardstock, and Tranquil Textures Designer Series Paper in Balmy Blue. The two layers were cut with Rectangle Stitched dies, so I didn’t even have to measure.
The design behind the butterfly was cut with a die from the Beautiful Layers die set. Isn’t it great? It’s cut from Thick Whisper White cardstock, and raised in the middle on dimensionals.
The Calypso Coral and Daffodil Delight, butterfly, was in the Botanical Butterfly Designer Series Paper, cut with the Butterfly Duet Punch. The butterfly is mostly free, simply attached with a tiny strip of dimensionals.
The sentiment, “Thinking of you,” is from the Colorful Seasons stamp set, which I stamped in Black ink on the Balmy Blue DSP. Happily, I used the Stamparatus, because it took more than one stamping to make the words dark enough.
If you need some tools to make this “quick & easy” card, you can shop at my store by clicking on the pictures in my Product List. Thanks for stopping by!
Now, off you go to visit more of the Paper Players blogs with loads of inspiration.
Enter your email below to receive each of my new posts by email!
Archives
Categories
Disclaimer
My name is Su Mohr, Independent Stampin' Up! Demonstrator. I am responsible for the content on this site. Stampin' Up! does not endorse the use of or contents of the classes, services, or non-Stampin' Up! products I may offer here.