Mar 11, 2019 | Gallery, Hand-Crafted Cards |
Toads and toadstools for What Will You Stamp? Design Team. Rather than make our So Hoppy Together frogs green, they became lumpy, brown toads.

Toads & Toadstools
My idea began when I saw the toadstool design from our new Painted Seasons Designer Series Paper I just received. The recent order also included the Hop Around dies that coordinate with the frogs from the So Hoppy Together stamp set. This made me think of the Love You To Pieces stamp set with the sentiment, “let’s get together soon.” So, one thing led to the next, and I ended up with today’s card for What Will You Stamp?

To begin, I stamped two of the toads in Soft Suede ink on Sahara Sand cardstock, and colored with Stampin’ Blends. The colors are listed in my Product List below.
It was so much fun using the dies from the Hop Around set for cutting the toads. I snipped the one that’s jumping on the lily pad free from its unicycle.

The two puzzle pieces, in the Painted Seasons, toadstool pattern, were cut with a Puzzle Pieces die, and layered three times for thickness. The lily pad was made with Pear Pizzazz cardstock, embossed by the Subtle Textured folder, and cut with a Hop Around die.
The card base is Soft Suede, with a layer of Sahara Sand cardstock, embossed with the Dot To Dot embossing folder. Doesn’t it look like lumpy toad skin?
I created the scalloped, Whisper White cardstock border, with a Be Mine Stitched die. I love the detail, and this die is very easy to use.

“Let’s get together soon” is from the Love You To Pieces stamp set, stamped in Soft Suede ink on Whisper White cardstock. I used the Classic Label Punch for cutting, and layered it to be the same thickness as the puzzle pieces.
After gluing everything in place, the toads hopped on with dimensionals on their backs.

The So Hoppy Together frogs have been given much love. We’re here to say, toads are cute too!

We thank you for visiting. Have a “hoppy” day!

Product List
Mar 10, 2019 | Gallery, Hand-Crafted Cards |

Welcome to the Kre8tors March 2019 Blog Hop. Today, we are getting ready to say “bye bye” to our wonderful Stampin’ Up! Sale-A-Bration items. I hope your favorites are still available, because they are offered only as long as supplies last, through March 31st. The Country Floral embossing folder is one of my favorites, so that is what I chose to highlight today.

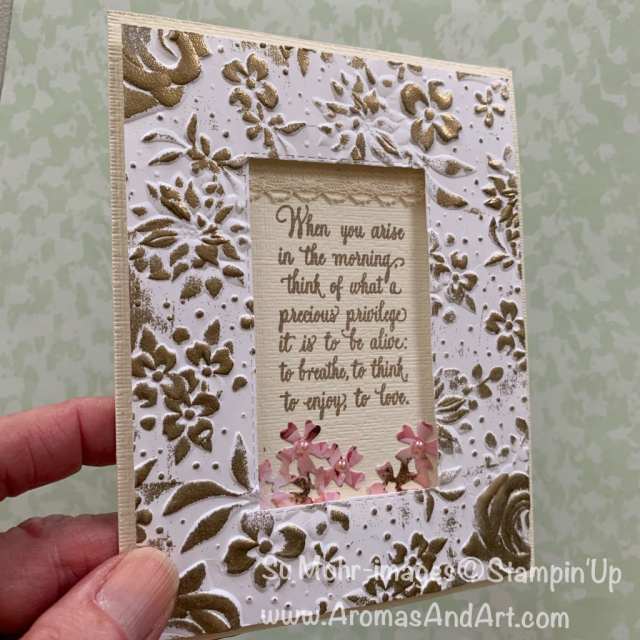
Antique Frame
This antique frame was made with Thick Whisper White cardstock, trimmed to 4″ X 5 1/4″. After cutting out the middle with a Rectangle Stitched die, I embossed it with the Country Floral embossing folder. Then, I rubbed the VersaMark pad over the top of it, sprinkled it with Gold embossing powder, and set the powder with the Heat Tool. My mother had an antique frame that looked just like this!

The frame has a sturdy foundation of Foam Adhesive Strips. Wanting to achieve an antique look, I used Thick Very Vanilla for the card base.

Looking for a sentiment appropriate for framing, I found one with a beautiful font in the Enjoy Life stamp set:
“When you arise in the morning, think of what a precious privilege it is to be alive; to breathe, to think, to enjoy, to love.”
I stamped the sentiment in Crumb Cake ink in the middle of the Very Vanilla card base, and gave the entire card base some Subtle Texture embossing.

To enhance the antique look, I placed some Lace Trim at the top of the sentiment with Tear & Tape. For a bit of color, I used a small flower die, from the Bouquet Bunch Die set, to cut flowers from Petal Promenade Designer Series Paper.
Share What You Love Artisan Pearls, added to the flower centers, was the final touch.
Thank you for joining me on the Kre8tors Hop today. We love reading your comments. Please click to leave a COMMENT HERE.
Don’t miss out on ordering your favorite items, and keep scrolling to shop at my online store. Clicking the “next” arrow will take you to Tracy’s blog. There is also a name list, in case you get lost along the way. Enjoy!

Melissa Tennison
Sue McDonald
Tricia Butts
Su Mohr-YOU ARE HERE
Tracy Marie Lewis
Pia Gerhardt (DE)
Laura Mackie (UK)
Jacqui Lawrence
Sandra Roberts (UK)
Jo Blackman
Kathy Maurer
Deb Naylor
Ximena Morales – Stampin’ Xime
Anastasia Radloff
Janey Backer
Alexandra Rauf
Linda Handford
Dorothee Buhn
Annette Elias
Jacqueline Bobeldijk
Eva Pottsova
Cheryl Taylor
Jan Musselman – USA
Rebecca-Jo Unwin
Becky Browning
Cheryl Hamilton
Product List
Mar 10, 2019 | Gallery, Hand-Crafted Cards |
A rainbow of balloons “for you on your birthday.” The sunlight in my craft room this morning is creating the shadows.

Rainbow of Balloons
The rainbow idea began with Claire’s challenge at this week’s Paper Players.

Since it’s a birthday card, I’m sharing it with Seize the Birthday.

I applied a fun technique of painting a rainbow of color on Thick Whisper White cardstock, prior to die cutting. In this case, I used the brush end of Stampin’ Blends, starting in the corner, as you see in the picture. The colors are overlapped, so they blend together. Then, I used the die from Candles & Confetti to cut nine colored balloons, and three plain white. I love this balloon die with the string attached!

I painted the colors in this order: Light Cherry Cobbler, Light Poppy Parade, Dark Pumpkin Pie, Dark Mango Melody, Light Old Olive, Dark Pool Party.

After deciding on the balloon’s placement, I glued them to a Thick Whisper White background, which was glued to a Thick Whisper White card base. Four of the balloons were “popped” (laughing out loud) on dimensionals.
The sentiment, “For you on your birthday,” is from the coordinating stamp set, Blow Out the Candles. I stamped the sentiment in Black ink on Thick Whisper White cardstock, cut it with a Layering Ovals die, and placed it on dimensionals.

Thanks so much for visiting me today! I hope you enjoyed my rainbow technique. Give it a try, and join us in the Paper Player’s gallery!
Get more inspiration from all of the Paper Players Design Team!
The Paper Players Design Team
Product List
Mar 8, 2019 | Gallery, Hand-Crafted Cards |
I never thought I’d be making a Christmas card in March. But, The Painted Seasons stamp set made me do it!

Pinecones
I began by stamping the realistic pinecone from the Painted Seasons stamp set in Soft Suede ink on Thick Whisper White cardstock. It stamped so beautifully, I got carried away, and stamped five times. Then, I trimmed it to fit the space on my Tranquil Tide card base, and used a Be Mine Stitched die for the scalloped edge treatment. That same die was used for the Real Red cardstock trim on the bottom. My grandmother called this bric-a-brac.
It was easy to select the Designer Series Paper above my stamped pinecones, because the Painted Seasons DSP is covered in little pinecones, and coordinated perfectly.

I used the die from the Merry Christmas die set to cut the word, “Christmas,” from Real Red cardstock, and placed it on an angle.
It may be hard to see, but I added interest to the card by trimming an inch from the card front, and letting the Whisper White, scalloped edge, hang over a smidge.

On the inside, I stamped the word, “blessings” in Tranquil Tide ink, along with a design in Real Red ink, both from the Merry Christmas To All stamp set. As I was doing this, I remembered a small pinecone from the Winter Woods stamp set. So, the final touch was stamping five pinecones in Soft Suede ink.

Thank you for stopping by. Keep in mind, the Painted Seasons stamp set and DSP are each FREE items with a 50.00 order, but can only be ordered through March 31st, or while supplies last. Clicking on the pictures in my Product List will take you to my store. Blessings on your day!
Product List
Mar 6, 2019 | Gallery, Hand-Crafted Cards |
This Painted Seasons Designer Series Paper is gorgeous! I love the succulent’s colors of Lemon Lime Twist and Pool Party. Two cards ended up developing from one idea, a “two for one.”

One Idea-Two Cards
When I saw this week’s CAS(E) this sketch, I thought of the Puzzle Pieces die that cuts out a square jigsaw puzzle.

I began by using the Puzzle Pieces die to cut the jigsaw puzzle from The Painted seasons DSP. Then, I glued the puzzle pieces together on a 3 1/2″ X 3 1/2 square of cardstock. This was layered on a 4″ X 5 1/4″ piece of Pool Party cardstock, which was layered on the 4 1/4 X 5 1/2″ Lemon Lime Twist card base.

I used the single Puzzle Pieces die to cut a jigsaw piece from the Painted Seasons DSP design in Pool Party. The sentiment, “One piece at at time,” is from the coordinating Love You to Pieces stamp set. I stamped it in Black ink, glued everything together, and that was it!

I had a nice frame of the succulent DSP left over from the first card, so I backed it with the design in Pool Party. This square was glued to a Pool Party card base. Then, I used that single puzzle die to cut to cut two succulent pieces, which I glued in the square. “Let’s get together soon” is another great sentiment from the Love You To Pieces stamp set, stamped in Black ink, and cut with the Classic Label Punch.
TIP: The puzzle pieces have several layers of cardstock, so they look and feel realistic. And, I layered the sentiment to match.

I hope you enjoyed my “two for one!” I see that the Painted Seasons DSP isn’t on my Product List, but clicking on my “shop” button will take you to my store where you’ll find it. It’s available through March 31st, while supplies last. Have a great day!
Product List
Mar 4, 2019 | Gallery, Hand-Crafted Cards |
This week’s featured stamp set at What Will You Stamp? is Well Said. I chose the words, “make me smile” for my cheery, gingham card.

You Make Me Smile
The Well Said stamp set has wonderful sentiments for numerous occasions, and its versatility is hard to beat!

I began with a Thick Whisper White card base, layered with Highland Heather, one of the 6X6 Gingham Gala DSP colors. The top layer is Highland Heather cardstock, embossed by the Country Floral embossing folder. For some reason, I was in the mood for rounded corners, and the Detailed Trio Punch made easy work of it.

Before embossing the top layer, I cut “YOU” with a Celebrate You die. Then, I cut another “YOU” from the smaller check, Gala Gingham DSP, and layered it several times for thickness.
While I was die cutting, I cut the two birds (Botanical Tags die set) from Gorgeous Grape cardstock, and two branches (Botanical Tags die set) from Granny Apple Green cardstock.
After stamping the sentiment (Well Said stamp set) in Gorgeous Grape ink on Thick Whisper White cardstock, I used a Merry Christmas label die for cutting.

Before gluing everything in place, I tied Organza Ribbon around the middle, to give the birds a place to perch.

I hope to see what you create with the Well Said stamp set at WWYS?
Thanks for visiting! Keep scrolling to see my list of supplies. Even better, go shopping at my store!
Product List

Whisper White 5/8″ Organza Ribbon
[114319]
$6.00





