Jan 16, 2019 | Gallery, Hand-Crafted Cards |
Today’s card came together quickly. I love it when that happens!

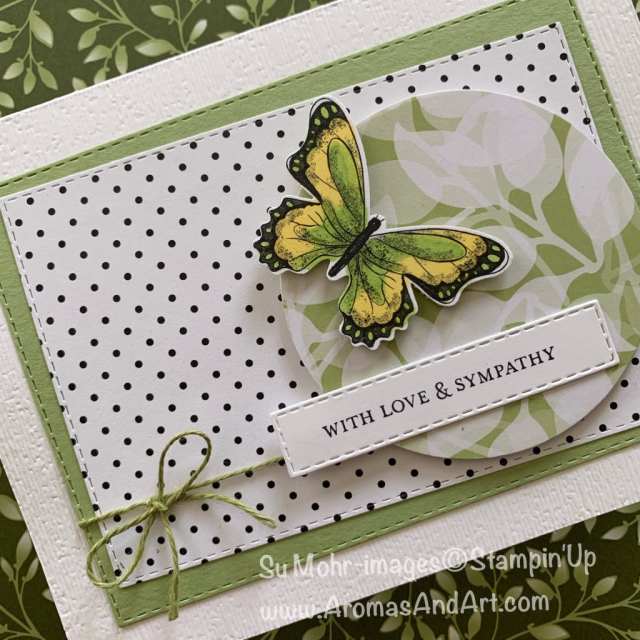
Butterfly Sympathy
My inspiration was from the sketch at TGIF.

I began with a Thick Whisper White card base, a “when-in-doubt-go-to” choice. There was some experimentation, though, by embossing the entire, folded card base with the Subtle Textured embossing folder. It turned out nicely with front, back, and inside texture.
Then, using the Rectangle Stitched dies, I cut a rectangle from Pear Pizzazz cardstock, and a slightly smaller rectangle from dotted, Botanical Butterfly DSP. I tied our Occasions Old Olive Linen Thread around the bottom, according to the TGIF sketch, and glued these layers to the card base.

My leafy circle was cut from the beautiful, Floral Romance DSP with a Layering Circle die. It was layered for thickness, and placed on dimensionals.
Isn’t my butterfly pretty? It was cut with the Butterfly Duet Punch from Botanical Butterfly DSP that is black and white. I colored the butterfly with two Stampin’ Blends: Light Granny Apple Green and Daffodil Delight. The shadowing is there, so it’s very easy to color. The butterfly was happy to be popped on dimensionals on the leafy, green circle.

Last but not least, the sentiment. The smallest Rectangle Stitched die was the perfect size for the sketch, and the sentiment from Itty Bitty Greetings fit the space and mood of the card. I like having sympathy cards on hand when needed, rather than making them at a sad time.
I appreciate you taking the time to visit my blog. Thank you! May you have a wonderful day!

Product List
Jan 15, 2019 | Gallery, Hand-Crafted Cards |
I often create with my favorite, little, Petal Palette bird, and today she is paired with a gorgeous piece of All My Love Designer Series Paper. So, I’m sharing a combination of items from the New Occasions Catalog with the Annual Catalog.

Close at Heart
Monday morning is when we get to see the new challenge at Global Design project. This week, the challenge is to case Shawn De Oliveira, and this is his card. Can you understand why I grabbed the Petal Palette stamp set, with my little bird, as fast as I could? Thank you, Shawn!

I wanted to create a new setting for my bird, so I looked through All My Love DSP, and chose my favorite, mini print, with a Crumb Cake background. This made the decision for a Crumb Cake card base easy, and I highlighted the red in the print with a layer of Lovely Lipstick cardstock.
Before gluing, I used the scalloped edge, Be Mine Stitched die, on all four sides of the Lovely Lipstick layer.
TIP: Place the scalloped edge along the side you are cutting, as close as possible, without going over. I find it cuts easily, and is very cooperative.

Next, I stamped the bird in Lovely Lipstick ink on the whitest piece of Wood Textures DSP, and used her Petals & More die for cutting. I used the same Wood Textures DSP for the foliage behind the bird, which was cut with a Well Written die.

For the band, I decided on Linen Thread which I attached with Tear & Tape. It took six strands, which was a bit tedious, but I had committed, and there was no turning back.
Instead of a square, for the sentiment, I used a heart from the Be Mine Stitched die set. I really like how the sentiment, from the Well Said stamp set, ties it all together, “Far apart but close at heart.”
I stamped the sentiment in Lovely Lipstick ink on Petal Palette DSP. (If you’re wondering why, I ran out of the Wood Textures DSP, and this color was the closest match).
After cutting the heart with a be Mine Stitched die, I gave it some texture with the Subtle Texture embossing folder. The Lovely Lipstick trim around the heart was made with the same heart die.
After gluing the heart in place, I tied a Linen Thread bow, and attached it with a Glue Dot. My Petal Palette bird hopped on, atop Dimensionals, and my project was complete.

Thanks for stopping by today. I hope you were inspired! Keep scrolling to see my Product List, where all is available at my online store. Just click on the pictures to go shopping.
Product List
Jan 14, 2019 | Gallery, Hand-Crafted Cards |
Beautiful Promenade is a great stamp set, and was chosen for this week’s What Will You Stamp? challenge.

Today, I’m sharing with you a “quick & easy” card using this stamp set. How do you like my yellow hibiscus?

PS. You are Loved
There’s a stamp for the outline of the flower, which I stamped in Pineapple Punch ink on Thick Whisper White cardstock. A second stamp was used for the detailed lines, with Daffodil Delight ink. I stamped the leaves with Granny Apple Green ink, and then used two of the Beautiful Layers dies for cutting the flower and the leaves.

Yellow and purple make a pretty combination, so Highland Heather cardstock is the card base, topped with a piece of Highland Heather Gingham Gala 6X6 DSP. I added texture to it with the Dot To Dot embossing folder. This was an experiment, and I was really pleased how the horizontal lines matched up.

The rectangle behind my hibiscus is Thick Whisper White cardstock, cut with a Rectangle Stitched die. A Beautiful Promenade stamp was used to create the detailed edge with Gorgeous Grape ink.
“PS,” and “You are loved,” are also from the stamp set, and stamped in Highland Heather ink. I really like this sentiment!

Sometimes, you just need a “quick & easy” way to tell someone they are loved. I think this would do the trick!
I’d love to see how you were inspired, so won’t you please post your creation in the What Will You Stamp gallery? Thank you!
Product List
Jan 13, 2019 | Gallery, Hand-Crafted Cards |

Welcome to the Kre8tors first Blog Hop in 2019, where we are excited to share projects using supplies from the new Occasions Catalog and Sale-A-Bration brochure.

Butterfly Dream
There was an added challenge of playing Tic Tac Toe for our designs. Can you see that I chose the diagonal row, sequins, punch, ribbon?

This “dream” began with the new, 2019 Occasions teacup, from the Tea Together stamp set. I stamped the teacup in Black ink on Thick Whisper White cardstock, and used the Tea Time, Sale-A-Bration die, for cutting. I’ve seen flowers in cups, but not butterflies flying from one, so this seemed like a fun, dream-like, idea.
I turned to the Butterfly Gala stamp set, along with the Butterfly Duet Punch, to make my five butterflies. These two items are also in the the new Occasions 2019 Catalog, and can be purchased together in a Bundle for a 10% discount.

How were the butterfly colors chosen? By a challenge at Fab Friday.

First, I stamped the butterflies in Black ink on dotted Subtles 6X6 DSP: Mint Macaron, Pear Pizzazz, and Highland Heather. Next, on dotted In Colors 6X6 DSP: Lemon Lime Twist, and Tranquil Tide. The butterflies were easily cut with the Butterfly Duet Punch.
TIP: The large butterflies come attached to their matching small butterflies in the stamp set. I simply snipped them apart, because that’s the way I’ll be using them.
For the background, I stamped the Buffalo Checks in Highland Heather ink on Whisper White cardstock, using the Stamparatus to get a nice, solid impression.
TIP: I stamped on a piece of paper that was 5 1/2 X 4 1/4. This allowed me enough room to line up the Rectangle Stitched die (second to largest) perfectly.
I layered the Buffalo Checks on Basic Black cardstock, giving it a nice 1/16th” border.
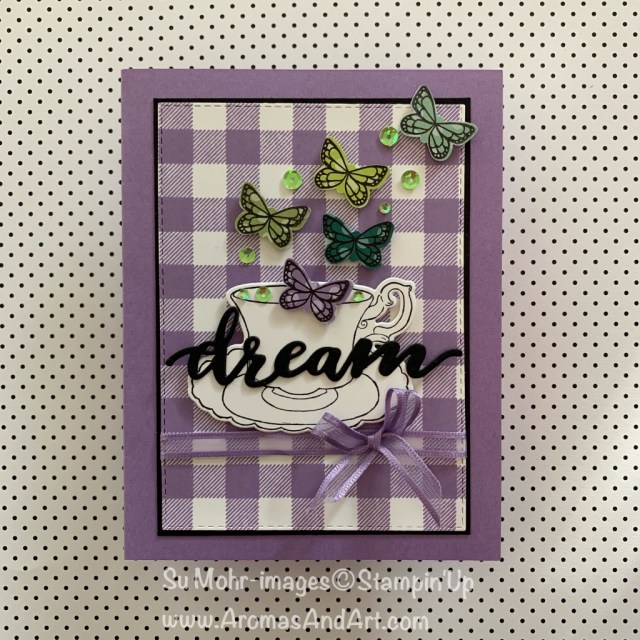
Before adhering the Buffalo Check panel to the Highland Heather card base, I tied a strand of Organdy Ribbon beneath the teacup, and added a bow with a Glue Dot.
Highland Heather is one of the five, gorgeous, colors of Organdy Ribbon in the Sale-A-Bration brochure, and is FREE with a $50 qualifying order.
Next, I cut the word “dream,” from Basic Black cardstock, with a Chase Your Dreams die. I layered it, so it would be sturdy, resting on the teacup.
The teacup and butterflies were arranged on Dimensionals, and the Irridescent Sequins were the final detail.

Keep scrolling to see my exciting, new, Product List below. Clicking on the pictures will take you to my online store for purchasing. Thank you so much!
Continue hopping to see all of the fun, Occasions and Sale-A-Bration projects the Kre8tors want to share with you. We love to read your comments. Please click to leave a COMMENT HERE.
You can see the name list below, or click the “next” button to go to Janey Backer’s blog. Happy New Year everyone!

Melissa Tennison
Sharon Dalton
Sandra Roberts
Su Mohr
Janey Backer
Tricia Butts
Linda Handford
Jacqueline Schilder
Pia Gerhardt
Eva Potts
Sue McDonald
Rebecca-Jo Unwin
Tracy Marie Lewis
Laura Kate Mackie
Jacqui Lawrence
Cheryl Taylor
Dorothee Buhn
Jan Musselman
Sandra Mastello
Kathy Maurer
Kirsteen Gill
Deb Naylor
Jo Blackman
Cheryl Hamilton
Product List
Jan 13, 2019 | Gallery, Hand-Crafted Cards |
When I saw the colors of the Paper Players challenge, my immediate thought was the 2019 Sale-A-Bration Organdy Ribbon Combo Pack.

The Organdy Ribbon, in these gorgeous colors, is one of the FREE Sale-A-Bration items with a $50 qualifying order. How fun is that!

I enjoy making Valentines in traditional and non-traditional colors, so today’s project would be a Valentine.

Be Mine
Did you notice the picture of ribbon flowers on the card next to the ribbon in the brochure above? I experimented with making ribbon flowers for a while, and wasn’t too successful. Needle and thread are not my friends, so I settled for a “runner” of Grapefruit Grove ribbon attached with Tear & Tape. It was easy enough to place a strip of Tear & Tape across the Whisper White panel, and then attach the ribbon up and down in a row.

Growing from the ribbon is a heart, made with a die from the Be Mine Stitched die set. It’s one of the unique dies in the set that perforates the paper without cutting entirely through the paper. At this point, I decided that Pool Party cardstock would make a nice border, and therefore, the card base.
Next, I used Pool Party cardstock to cut the words “love you” and a floral sprig from the Well Written die set. I attached the floral sprig to the “l” in “love,” so they would flow together. This made the little, Daffodil Delight, bird very happy, who is also from the Well Written die set. Her color is duplicated with Daffodil Delight Enamel Dots in the flower centers.
I wanted to add a bit more Grapefruit Grove, so die cut a second floral sprig, using just the cut out leaves to fill in the Pool Party sprig.

Knowing this would be a Valentine, I completed the inside with “Happy Valentine’s Day,” a sentiment from the Meant To Be stamp set. I stamped it in Pool Party ink on Whisper White cardstock. You’ll see I couldn’t resist adding another floral sprig, for a white on white decoration.
The envelope flap got some decoration too, with a piece of Nature’s Poem DSP in Grapefruit Grove.

Thanks so much for stopping by. You’ll find the supplies I used in my Product List below.
I hope you were inspired by Anne Marie’s colors, and you’ll check out the rest of the Design Team for inspiration. I’m looking forward to seeing your entries in our gallery. Please join!
The Paper Players Design Team
Product List
Jan 12, 2019 | Gallery, Hand-Crafted Cards |
I’ve been wanting to use this interesting sheet of Petal Promenade DSP, and today was the day! For some reason, it reminds me of the beautiful Red Rock mountains in Sedona, Arizona, and it was begging to be combined with The Sale-A-Bration, Iridescent, Foil Paper.

Iridescent Celebrate
Deciding on the colors, I placed the Petal Promenade Designer Series Paper on a layer of Petal Pink cardstock, and a Whisper White card base.

For the layout, I needed to have two distinct angles, to satisfy the challenge at this week’s CAS(E) this sketch:

The Sale-A-Bration Foil Paper would blend, yet show beautiful, iridescent, shine at the same time. The word, “celebrate,” from the Celebrate You die set would be perfect for the lower angle.
I had a harder time finding the solution for the upper angle, until I ran into an Eclectic Layer friend I hadn’t used for a while. This die seemed just right for the mood of the card.

With the sprinkling of a few assorted sequins, my card to celebrate an important occasion was complete.

Thanks so much for stopping by. May you have something to celebrate!
Product List