Oct 15, 2018 | Gallery, Hand-Crafted Cards |
I’ve been wanting to design a Punch Art Santa, and when the new White Velvet Paper arrived for his beard and mustache, I knew it was time. This Santa card is 100% Stampin’ Up! I’ll share my instructions, however, some elements have retired, so you may have to improvise. I hope you will view it as inspiration.

Punch Art Santa
Use the 2” scalloped, Layering Circles die to cut the beard from White Velvet Paper. This paper is brand new in the “limited time” Snowflake Showcase, and perfect for giving Santa’s beard a “fuzzy” touch. Emboss the beard with the Curls and Swirls embossing folder.

Use the 1 7/8″ Layering Circles die to cut Santa’s face from Petal Pink cardstock. Then, cut the circle in half.

Use the 1/2″ Circle Punch with Petal Pink cardstock to make Santa’s nose.

Punch two leaves (without the stem) using the Lemon Builder punch. You get to use the White Velvet paper again, for the “fuzzy” feel.

Here’s where you might need to improvise. Use the largest Paisley die (retired) to cut Santa’s cap from Real Red cardstock. Then, using the 2″ scalloped Layering Circles die, cut a section as pictured.
For the border of Santa’s cap, use the scalloped 2″ Layering Circles die to cut a circle from Sahara Sand cardstock. Then, using the same die, cut a section as pictured.

Now for assembling. You’ll want to put all the pieces together to make sure they fit before gluing. The cap is tricky, because it depends on where you placed the scalloped circle cut.
Glue the Beard to the face. This is showing the backside, where you can see the small space left on the sides. It’s important to have the right amount of his face showing.

Turn him over, and glue his mustache and nose.

Glue the border of Santa’s cap.

Glue Santa’s cap, and here’s a view of the backside.

The last detail is the tassel on Santa’s cap. I used a die from the retired Quilt Builder die set, but it would be easy to improvise here.
The Punch Art Santa is complete, and this picture with the sunlight shows the fuzziness of the White Velvet paper.

I wanted to place Santa on a Christmas card, so I chose Real Red cardstock for the card base, layered with Sahara Sand cardstock. The Real Red word, “jolly,” is from the retired Christmas Greetings die set.
The horizontal cut-outs were made with a current, Beautiful Layers die.

All of the current items are listed below, and available in my store.The new “limited time” White Velvet paper is available to demonstrators in October, and customers in November.
I hope you’ve been inspired to give some punch art a try. Thanks for stopping by, see you soon!

Product List
Oct 14, 2018 | Gallery, Hand-Crafted Cards |

Welcome to the Kre8tors October 2018 Blog Hop, featuring Fall colors. This photo is gorgeous, and it certainly inspired me!

I used all five colors, plus Very Vanilla. The first stamp set that came to mind was Rooted in Nature, and the tree ring was the first element I stamped. I used Pumpkin Pie ink, with Soft Suede for the sentiment, “Thinking of You.”

Fall Colors
Next, I began stamping the leaves on vellum cardstock, using two stamps from Rooted in Nature. The ink colors for the leaves: Soft Suede, Granny Apple Green, Real Red, Pumpkin Pie and Gray Granite. After letting the ink dry, I used Nature’s Roots dies for cutting the leaves. Then, I attached the leaves to the back of my tree ring with Mini-Dimensionals, adding regular Dimensionals for support.

I may have “gone overboard” with the dimensionals. LOL

For the background, I used the Corrugated embossing folder on Very Vanilla cardstock. I bordered this with Granny Apple Green cardstock, and glued it to a Soft Suede card base.
My favorite tree branch from Seasonal Layers was calling to me, so I die cut the branch from Wood Textures DSP. This Designer Series Paper also provided the smaller tree ring, which I fussy cut.

Now, all I needed was a little bird. I found him in the Botanical Tags die set, and cut him from Soft Suede cardstock.

Thank you so much for visiting my blog today! The supplies I used for today’s project are listed below. I love reading your comments. Please click to leave a COMMENT HERE.

Fall provides such beautiful colors. I can’t wait to see how the other Kre8tors were inspired by the photo. The Blog Hop name list is below, or you can click the “next” button to go to Ilonka’s page.

Melissa Tennison
Laura Mackie
Sandra Roberts
Tracy Marie Lewis
Su Mohr
Ilonka Schneider
Sharon Dalton
Jo Blackman
Sue McDonald
Pia Gerhardt
Jackie Lawless
Linda Handford
Deb Naylor
Rebecca-Jo Unwin
Sandra Mastello
Kathy Maurer
Anastasia Radloff
Jan Musselman
Eva Potts
Alexandra Rauf
Cheryl Hamilton
Tricia Butts
Cheryl Taylor
Becky Browning
Product List
Oct 13, 2018 | Gallery, Hand-Crafted Cards |
The Joyous Noel Designer Series Paper is so pretty with its copper accents. This deer print is one of my favorites. I bordered it with Copper Foil, and placed it on a Gray Granite card base.

Joyous Noel Deer
It was fun discovering that a deer from the Dashing Deer bundle matches the deer on the DSP. Since the deer wanted to be camouflaged, I stamped him in Gray Granite ink on Thick Whisper White cardstock. There’s a die in the Detailed Deer set that made for easy cutting.
The deer is standing on a sentiment from the Merry Christmas To All stamp set, which was cut with a Merry Christmas label die.

The Gray Granite circle behind the deer was made with a Layering Circles die, and plays an important role in the layout. My inspiration for today’s project is from the challenge at CAS(E) this sketch.

For the horizontal strip, I used Polka Dot Tulle Ribbon, and couldn’t resist adding a bow.
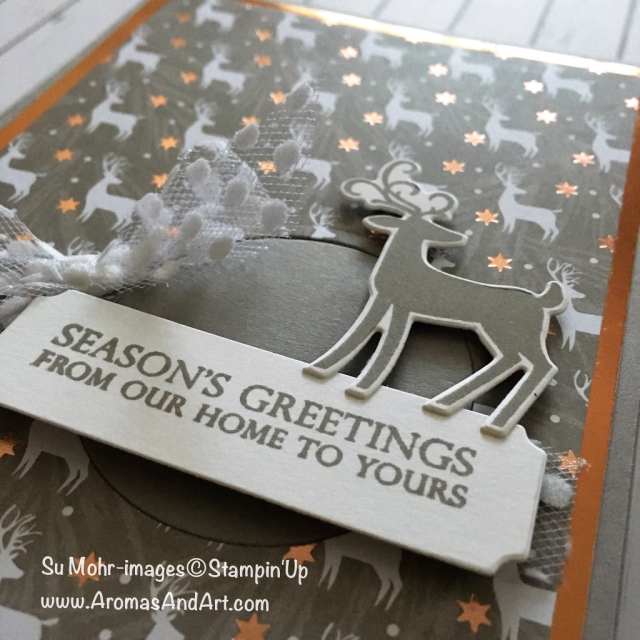
I hope you were inspired by seeing today’s Joyous Noel DSP. It’s definitely a “Specialty” paper! You can take a closer look at all of the patterns by clicking on the picture in my Product List below.
Thanks for visiting me. Have a great day!
Product List
Oct 12, 2018 | Gallery, Hand-Crafted Cards |
This little, sparrow (Crumb Cake ink) was stamped and die cut using the Petal Palette Bundle.

Sparrow on a branch
The branch was made from Wood Textures Designer Series Paper, cut with a die from the Night Owl die set, and layered for thickness. The two white pine boughs are cut with dies from the same Night Owl die set.

I stamped the sentiment in Crumb Cake ink on Thick Whisper White cardstock. “Season’s Greetings,” from the Wishing You Well stamp set, fit nicely on the Stitched Shapes oval die. It was an added bonus, and surprise, that the oval fit perfectly within the curve of the bottom branch.
I punched holes on the sides of the oval, threaded it with Linen Thread, anchored it with dimensionals, and taped it to the back of the Thick Whisper White cardstock layer.
If you need a tiny hole punch, it happens to be in the Clearance Rack right now. (10/11/18). Look for the 1/16” Hand-Held Punch.

The Subtle Textured embossing folder was used for the background. It adds so much, without detracting from the focal point. Don’t you agree?
Finally, I glued my art piece to a Thick Whisper White card base, and my clean and simple card was complete.

My inspiration for today’s project was the challenge at Freshly Made Sketches. The branch is the large circle, and my three elements are the sparrow, the sentiment, and the pine boughs. The sparrow is supposed to be to the left of the sentiment, but he hopped up on the branch. Sorry!

Keep scrolling to see my supply list for today’s project. Thanks for stopping by!
Product List

Petal Palette Clear-Mount Bundle
[145974]
$62.00
Oct 10, 2018 | Gallery, Hand-Crafted Cards |
The theme this month is “sorry.”
The Rhino
I’ve chosen the adorable rhino from the Animal Expedition Designer Series Paper for my “Sorry” card. I was able to crop him with a die (Animal Friends die set) right from the Designer Series Paper. He was layered, so he’d be sturdy for placing on dimensionals.

I’m Sorry Big Time
The Words
I stamped “Thank You Big Time,” from the Animal Outing stamp set, in Black ink on Whisper White cardstock. Not wanting to say “thank you,” I fussy cut the “Big Time.”
The Pick a Pennant stamp set provided the letters for the word’s, “I’m Sorry.” I first cut the pennant (Playful Pennants die set) from Thick Whisper White cardstock. Then, I carefully stamped each letter in Black ink across the pennant. I placed a Mini-Dimensional behind each flag, so it would be ready to pop up.

The Background
The oval was made by using a piece of the Delightfully Detailed Laser-Cut Paper as a stencil. Placing my stencil on Whisper White cardstock, I used a Sponge Dauber with Pool Party ink, and daubed all around the edge to create the pattern.
To create the clouds I used a technique from a recent card; sponge daubing with a “cloud” from the Pretty Label Punch. TIP: Rather than just stamping with the dauber, which makes a round spot, I used a twisting motion.

The Foliage
There’s a cute, little, branch of leaves in the Animal Friends die set that was just what was needed. I used this die to cut four branches from Granny Apple Green cardstock, and four from Garden Green cardstock. Then, I used tiny dots of Tombow Liquid Glue to adhere the branches in pairs around the stenciled oval.

The Tear
Rhino is truly sorry, and even has a tear to show it. I’m truly sorry that the tear is from a retired pack of Glitter & Clear Epoxy Shapes, but I had to use it. Everything else is current, and available for your shopping pleasure at my store.

Product List
Oct 10, 2018 | Gallery, Hand-Crafted Cards |

Welcome to the Pals October, 2018 Blog Hop. It’s a spooky time of year so watch out for “Wicked Folds” while you hop from blog to blog. We promise not to be too scary.
You may be starting the hop here or coming from a previous Pal’s blog. Either way, you’ve come to the right place. You’ll find the the full line-up below to help you move, or “hop” along from Pal to Pal.
The wonderful, and not so scary, owl from the Still Night stamp set is featured on my Double Z Fold Card today.

Night Owl~ Double Z Fold Card
I’ll go step by step, so, hopefully you can follow along.
The Owl

Stamp the owl in Memento Black Ink on Thick Whisper White cardstock.
Color with four Stampin’ Blends: Light and Dark Crumb Cake, Ivory, and Bronze.
Cut with his die in the Night Owl die set, place him on dimensionals, and set him aside to watch.
The Card Base

Cut Gray Granite card stock in half, lengthwise. This gives you two pieces 4 1/4 X 11.
Score the half you’ll use for your card base at 5 1/2 and 8 1/4.
Place the two shorter sections in the Woodland embossing folder, and run it through the Big Shot. TIP: Be sure the trees are “growing” in the right direction.
Cut a piece of regular Whisper White cardstock, 5 1/4 X 4, and emboss it with the Woodland embossing folder. Glue this to the 5 1/2 X 4 1/4 section of the card base.
The Band
Use the other half of the Gray Granite cardstock to cut the band 1 1/4 X 11.
Score the band at 5 1/2 and 8 1/4.
Decorate the band with Festive Farmhouse Designer Series Paper. The long section is 5 1/4 X 1, and the two shorter sections are 2 1/2 X 1.
Attaching the band is the trickiest part. Glue the long section first, gluing just the left half, because the right half of this section remains open. The middle section remains open, while the end section is glued entirely. TIP: Before the glue is set, close the card to make sure everything is lined up properly.
The Branch

Using the die from the Night Owl die set, cut 6 branches: 4 Thick Whisper White, 1 Gray Granite and 1 Wood Textures Designer Series Paper. Glue three branches onto Thick Whisper White. This gives the branches durability and dimension.
Glue the white branch on the card front. Glue the Wood Textures branch on the end of the long, card base, section. You may now place the owl on his branch. Lastly, glue the Gray Granite branch on the end of the long, band, section, making sure it’s positioned correctly for the owl.
The Sentiment

The sentiment, “Sending warm wishes your way,” is in the Still Night stamp set. Stamp it in Crumb Cake ink on Whisper White cardstock.
Cut with its die from the Night Owl die set. Add dimensionals, and place in the curve of the white branch.
The Details
Cut three pine boughs from the Night Owl die set in Shaded Spruce cardstock. Add Frost White Shimmer Paint with a toothpick.
Tie a Linen Thread bow, and glue to the top of the sentiment.
Use a Botanical Tag die to cut two Whisper White birds, and glue to the white branch.
And, finally, my closed card, with Owl peeking through the branches.

If anything is unclear, please refer to the pictures. You know what they say…”worth a thousand words.” I’ve given instructions for this exact card, but this “wicked fold” has limitless possibilities. Thanks so much for visiting my blog.
Now it’s time to use the Blog Hop Line-up below to see what the rest of my Pals have created to inspire you.. Don’t forget to show us some love by commenting on our creations.
Please click to leave a COMMENT HERE.
Mark your calendars for Wednesday, November 14, 2018 for the next Pals Blog Hop. November is time for “Anything But a Card” where the Pals will feature creations suitable for holiday gifting. Don’t miss the fun.
- Mary Fish at Stampin’ Pretty
- Stesha Bloodhart at Stampin’ Hoot!
- Mary Hanson at Up North Stampin’
- Linda Suarez at All Night Stamping
- Katy McGloin at Just Fun Stamping
- Jennifer Michalski at Stamping Serenity
- Rae Harper Burnet at Wild West Paper Arts
- Jill Killeen at The Killeen House Studio
- Su Mohr at Aromas And Art
- Lori Pinto at LollyPop Paper and Ink
- Terri George at Stamp Me Crafty
- Leah O’Brien at Stamping By The Bay
- Denise Hoepfner at The Mountain Magpie
- Beth McCullough at Stamping Mom
- Wendy Klein at Doggone Delightful Stampin’
- Lisa Ann Bernard at Queen B Creations
- Pamela Sadler at Stampin Pink Rose
- Tricia Chuba at ButterDish Designs
- Maggie at Maggie Made Cards
- Rachael Shedeed at Bluebonnet Stampin’
The supplies for today’s project are listed below, and available at my store.
Product List





