Aug 13, 2018 | Gallery, Hand-Crafted Cards |
Hi! and welcome to a sneak peek of the Stampin’ Up 2018 Holiday Catalog. I love designing cards with birds, so Owl (his name) from the Still Night Bundle was in my pre-order. Isn’t Owl grand, sitting on his branch?

Still Night Owl
Owl was really quite easy to color with Stampin’ Blends, because his stamp has so many lines of detail. I stamped him in Tuxedo Black ink on Thick Whisper White cardstock, and used four Stampin’ Blends for coloring: Light and Dark Crumb Cake, Ivory and Bronze.

I was able to cut Owl with his die from the Night Owl Dies set, along with the branch he is perched on, and the Garden Green pine boughs. As I was die cutting the branch in Soft Suede and Whisper White, I noticed how much it looked like the branches in the Woodland embossing folder.

I thought Owl would be happy in this setting, so I embossed Whisper White cardstock with the Woodland embossing folder, and glued it to a Thick Whisper White card base.

The sentiment, “Season’s Greetings From Our Home To Yours,” is in the Merry Christmas to All bundle. The striped edge on the label is Cherry Cobbler, and I used the Stamparatus to make sure the Soft Suede words stamped in the middle. The label has a die for cutting. Yay!

Owl is quite proud of his image, and wants to be entered in the CAS(E) this sketch challenge.

Just one more detail, decorating the envelope flap. This Designer Series Paper is the reverse side of the plaid paper Owl chose for photographing. It’s part of the Festive Farmhouse collection.

I hope you enjoyed this sneak peek of the 2018 Holiday Catalog. Most of the products are listed below, and I think I named the ones that aren’t pictured. All will be available September 1st. Start making your lists!

Product List
Aug 12, 2018 | Gallery, Hand-Crafted Cards |

Welcome to the Kre8tors August 2018 Blog Hop. This month’s theme is all about water, and I get to re-live my happy times of playing in the warm Hawaiian ocean. Snorkeling was a favorite activity; getting up close and personal with colorful, unusual fish. It was like swimming in an aquarium. I didn’t have an underwater camera, but here are some fish surfacing for bread crumbs.

Can you see why I chose Coastal Cabana cardstock to make my ocean?
To add motion to my ocean, I stamped it with Balmy Blue ink using the “swoosh” from the Star of Light stamp set. Next, I embossed it with the Seaside embossing folder. And, the final wave was cut with a Swirly Scribbles die. After gluing the Whisper White wave in place, I trimmed the top of the Coastal Cabana cardstock, conforming to the shape of the white wave.

You Are One of a Kind
You might recognize my fish. He’s from the Jar of Love stamp set, and was easy to cut out with his die from the Everyday Jars die set.
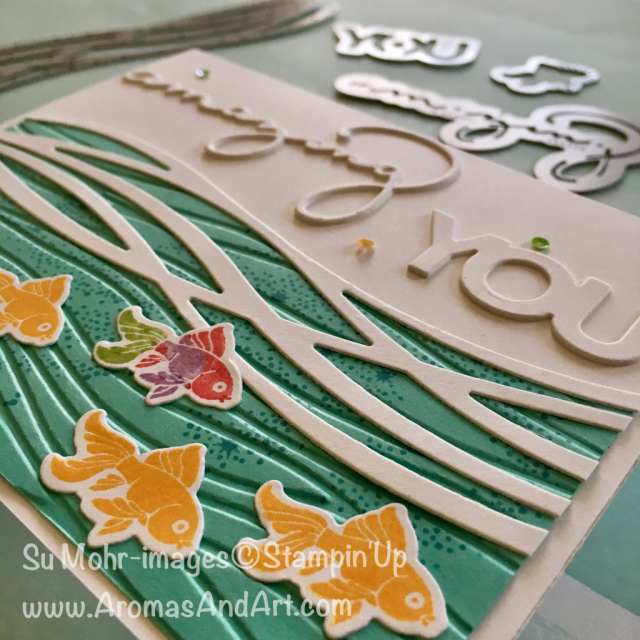
I stamped four “plain” fish using Mango Melody ink, and one “special” fish using three colors of Stampin’ Writes.
TIP: Color directly on the stamp before stamping. This is a great technique for making multi-colored images.

I used the words “amazing” and “you” from the Celebrate You die set to make the colorful fish feel special. You can think of the words as clouds in the sky.
I knew from the beginning what I would say on the inside, “You are one of a kind.” This sentiment is perfectly followed by “Happy Birthday, and I couldn’t help but notice that the Seize the Birthday challenge also has a “water” theme.

I added a “swoosh” inside, some fish on the envelope flap, and a few Iridescent Sequins on the front. I hope you enjoyed my ocean adventure. Thanks so much for stopping by.

Below, you will find the Blog Hop Line-Up, or you can just click the “next” button to go to Anastasia’s blog. You won’t want to miss any of the “cool” projects on this warm, summer day.
You can keep scrolling to see the supplies I used in today’s project. And, we love to read your comments. Please click to leave a COMMENT HERE.

August 2018 Kre8tors Blog Hop Roll Call
Melissa Tennison
Lisa Kmiec
Su Mohr
Anastasia Radloff
Tracy Marie Lewis
Sue McDonald
Linda Handford
Jan Musselman
Cheryl Taylor
Alexandra Rauf
Kirsteen Gill
Laura Kate Mackie
Tricia Butts
Rebecca-Jo Unwin
Diana Tillery
Jo Blackman
Maria Calia
Product List
Aug 10, 2018 | Gallery, Hand-Crafted Cards |
Welcome to my first Christmas card blog post for the 2018 holiday season, a 3-D Pink Poinsettia. First of all, I want to give credit to Shannean Moncrieff for her brilliant idea of using the Rooted in Nature leaf to build a poinsettia. It was so inspiring, I had to try it!

Pink Poinsettia Christmas Card
I began by stamping six leaves from the Rooted in Nature stamp set in Cherry Cobbler ink on Whisper White cardstock. The matching die from the Nature’s Roots die set cut them out perfectly. Next, I used a Stampin’ Spritzer to wet the back of the leaves, and a stylus to roll around the back of the leaves to give them shape. While they were drying, I continued with other parts of the card.
My poinsettia would need “real” leaves, so I stamped three more leaves in Garden Green, and left these flat.

My pink poinsettia would also need a background, and Whisper White is always a good choice. The card base is Thick Whisper White cardstock, which is topped with a regular weight piece that I embossed with the Subtle Textured embossing folder. I used this folder to decorate the envelope flap also.

Before gluing the embossed piece to the card base, I added a strip of Polka Dot Tulle ribbon, and some strands of Gold Metallic thread.
The “Merry Christmas” sentiment (Garden Green) is from the Star of Light stamp set, fitting perfectly in in the Bunch of Banners die cut.

My poinsettia needed a center, so I asked Siri to show me an image of pink poinsettias. Good thing I had some gold Epoxy Shapes!

My lay-out was inspired by this week’s FAB FRI challenge, turned sideways.


I hope you enjoyed Christmas in August. I’ll be receiving my first Holiday catalog order soon, so sneak peeks to come. As always, thanks for stopping by my blog. I really appreciate you!
Product List
Aug 9, 2018 | Gallery, Hand-Crafted Cards |
Hi! Yes, HI is what I saw when looking at this week’s Global Design Project.

So, I got out my Letters for You stamp set, and my Large Letters Dies, and created the word in Call Me Clover green. I like the mottled look the stamp set gives the letters, like watercoloring. Let’s call it, uneven perfection.

Large Letters Hi little hello
I wanted to tie this in with the challenge at Paper Players where the theme is “humorous.”

This lead to the exclamation point in Lemon Lime Twist ink, the funny, little frog from the Animal Expedition DSP, and the Itty Bitty Greeting, “a little hello.” I hope you can see the humor in this. If not, no worries, I’m kinda weird when it comes to things I think are funny.
Everything was double layered for thickness and dimension.

I added texture to the background by embossing a layer of Whisper White cardstock with the Layered Leaves embossing folder. This was layered on Call me Clover cardstock, on a Lemon Lime Twist card base.

I decorated the envelope flap with an additional piece of Animal Expedition Designer Series paper, 5 3/4″ X 2 1/4″, and trimmed to shape.

Wishing you a wonderful day with lots of things to make you laugh!
Product List
Aug 8, 2018 | Gallery, Hand-Crafted Cards |

Welcome to the Pals August, 2018 Blog Hop. We love to cut it out, so this month our creations feature our favorite “cuts” using punches, Framelits and Thinlits from the current Stampin’ Up! catalog.
You may be starting the hop here or coming from a previous Pal’s blog. Either way, you’ve come to the right place. You’ll find the the full line-up below to help you move, or “hop” along from Pal to Pal.
Cutting paper has always been an activity I enjoyed. When I was a child, I had boxes of paper dolls. I didn’t particularly want to play with the dolls, but I loved cutting out their clothes. I also loved putting together jigsaw puzzles, and today’s project combines the two.

Love You to Pieces
Until joining Stampin’ Up! two and a half years ago, I had no idea what cutting tools I’d been missing. Scissors, I knew, but the Stampin’ Trimmer and Big Shot opened up a whole new world.
The first step for today’s project was using the Stampin’ Trimmer to cut a piece of 8 1/2 X 11″ Thick Very Vanilla cardstock in half. Folding one of the halves in half, gave me my 4 1/4 X 5 1/2″ card base.
Second, I used the Stampin’ Trimmer to cut a layer of Regular Very Vanilla cardstock, measuring 4 X 5 1/4″. I rolled this layer through the Big Shot with the Quilt Top embossing folder to give it some nice texture.

The focal point of my card is the beautiful, jig saw puzzle heart. When I saw the Puzzle Pieces die set in the new annual catalog in April, it was an instant favorite. I couldn’t wait to start cutting with it!
The floral paper I used for the heart is Petal Promenade. The full 12 X 12″ sheets are absolutely gorgeous. But, as you can see, I didn’t hesitate to start chopping it up. I sliced a section with the Stampin’ Trimmer, and then ran this through the Big Shot with the heart die from Puzzle Pieces.
The die cuts a heart into four puzzle pieces. Isn’t that amazing? I triple layered the pieces, so they have the thickness of a real jig saw puzzle.

I wanted the heart to stand out, so I continued surrounding it with Very Vanilla. A Stitched Shapes die was used to cut the square where the heart is resting. I know I have many favorites, but the Stitched Shapes dies (4 Squares, 4 Circles and 4 Ovals) are the ones that get the most use. Everyone seems to adore how they cut those perforations.
“We just fit” is one of the creative, puzzle appropriate, sentiments in the Love You To Pieces stamp set, and I stamped it in Crumb Cake ink.
Before Gluing everything in place, I tied Linen Thread around the embossed panel. I’d already cut into this paper, so I decorated the envelope flap with a piece that’s 5 3/4 X 2 1/4″.

Thanks for stopping by today! I hope you like how this turned out, and remember to have fun cutting!
Now it’s time to use the Blog Hop Line-up below to see what the rest of my Pals have created to inspire you.. Don’t forget to show us some love by commenting on our creations. Please click to leave a COMMENT HERE.
Mark your calendars for September 12, 2018 for the next Pals Blog Hop. We’ll inspire you with projects for the upcoming holidays and seasons including Autumn, Winter, Halloween, Thanksgiving or Christmas. . Don’t miss the fun.
- Mary Fish at Stampin’ Pretty
- Sara Stuart at Sentiments by Sara
- Jennifer Michalski at Stamping Serenity
- Lisa Ann Bernard at Queen B Creations
- Terri George at Stamp Me Crafty
- Peggy Noe at Pretty Paper Cards
- Beth McCullough at Stamping Mom
- Jackie Beers at Blue Line Stamping
- Debbie Crowley at expressively deb…
- Karen Hallam at Karen’s Stamping Habit
- Denise at The Mountain Magpie
- Su Mohr at Aromas And Art
- Stesha Bloodhart at Stampin’ Hoot!
- Lori Pinto at LollyPop Paper and Ink
- Wendy Klein at Doggone Delightful Stampin’
- Rachael Shedeed at Bluebonnet Stampin
- Jeanie Stark at Just Stampin’
- Pamela Sadler at Stampin Pink Rose
- Lisa Milligan at Stamp Create Share
- Mary Hanson at Up North Stampin’
Product List
Aug 7, 2018 | Gallery, Hand-Crafted Cards |
Here it is August, and “Back-to-School” time has arrived. Teachers have already been hard at work preparing for the new school year. Stampin’ Up! has the perfect products for making handcrafted cards and small gifts. I’ve chosen to make a thank you card using the Hand Delivered stamp set and the Thank You die.

Hand Delivered Thank You
I knew I wanted to use the teacher with her books, and the words Thank You, but I needed a background. Since lined notebook paper screams “school,” I devised an easy way to create it. Using the Stampin’ Up grid pad paper (p.206, #130148) and a ruler, I used a Night of Navy Stampin’ Blends marker to draw straight lines across a piece of 5 1/4″X 4″ Whisper White cardstock.
TIP: Starting your line to the left of the cardstock prevents a blob of ink on the edge.

Next, I used the Thank You die to cut the word from my newly created “notebook paper.”
Then, I glued this to a piece of Whisper White cardstock with identical measurements.
For the eclipse effect, I triple layered “Thank You,” and placed it back in its hole. Also, I saved the three largest cut-out pieces and returned them to their places, trashing the smaller bits. I used a stylus to press the three pieces into place.


Coloring the teacher and her stack of books with Stampin’ Blends was next. I used 13 colors, so didn’t list them individually in my supply list, but they are available at my store. After coloring, the books were hand cut, and raised on dimensionals. The teacher is framed in Night of Navy cardstock, matching the card base.
My teacher is put on a pedestal using Foam Adhesive strips.

The sentiment inside saying, “You are wonderful” matches the cursive in “Thank You,” and expresses how I feel. It’s from the Rooted in Nature stamp set.
For more love, I added three Real Red hearts on the inside, and Real Red heart DSP to decorate the envelope flap.

Thanks so much for visiting my blog today, showing a teacher some love. Have a great day!
Product List