Jun 17, 2018 | Gallery, Hand-Crafted Cards |
The inspiration for this project begins with two things: the sketch challenge at Fab Friday, and my new stash of Stampin’ Up! product delivered by UPS.
Here is the sketch:
Searching for a circle in my newly delivered stash, I find a good one in the Chase Your Dreams die set. This will represent the doily. The set also has feathers, which I can hang from it. I’ve missed out on feathers from previous years, so this is one of my reasons for purchasing this bundle. Another reason is the word, “dream,” because I’m a lover of paper words!

Chase Your Dreams
Tranquil Textures Designer Series Paper has the perfect color palette for the subject of dreams: Mint Macaron, Tranquil Tide and Balmy Blue. A Thick Whisper White card base will keep the look soft and dreamy.

The background for my card is staring me in the face; the new Bokeh Dots stamp set. I’m anxious to ink it up in Mint Macaron, and delightfully surprised by the results. When first seeing this stamp set in the catalog, I assumed it would cover an entire card front. Wrong! It’s the size of an ink pad.
TIP: The Stamparatus is used to center it, and make sure it stamps evenly.

The circle and feathers are die cut from Tranquil Textures DSP, and “dream” is die cut from Thick Whisper White. “Dream” has two layers for thickness.
The feathers are popped up on Mini-Dimensionals, and “tied together” with a Glitter Enamel Dot.

I hope you’re enjoying the new products as much as I am. You can scroll down to see what I used in this project. Clicking on the pictures takes you to my store for easy shopping.
Thanks for visiting!

Product List
Jun 15, 2018 | Gallery, Hand-Crafted Cards |
Today I’m going to share with you a “quick and easy” thank you card. Believe it, or not, it requires few supplies, and no ink.

Wood Textures Thank You
Beginning with the new Thank You die, I make it into wood by using the Wood Textures Designer Series Paper. It’s made to look, and feel, like real wood by layering it three times with cardstock.
TIP: I make use of the retired Chocolate Chip color cardstock for layering.

Sticking with the woodsy theme, I select the log print from the same Wood Textures DSP pack. Using my Paper Snips, I cut a section of logs to slant like the sketch at Global Design Project. And, the largest, round log is my circle in the sketch.

I decide on a Crumb Cake card base, layered with Basic Black cardstock, and layered with patterned, Crumb Cake, Tranquil Textures Designer Series Paper. See how I’m letting the DSP do the work? I glue it all together, and my masculine, thank you card is complete.

Scroll down to see the short supply list. I was impressed by the small mess I made!
Thank you Global Design Project Team for the inspiration.
Product List
Jun 13, 2018 | Gallery, Hand-Crafted Cards |
May I begin by saying, I LOVE jigsaw puzzles! My grandmother always had a card table set up with an ongoing jigsaw puzzle. We would sit for hours putting these puzzles together. It was so exciting to see this bundle in the new Stampin’ Up! catalog. Imagine all of the pretty pictures you could die cut apart, and assemble on a card.
This is my first one:

Love You to Pieces
The colors were inspired by this week’s Paper Players challenge.

The layout is from CAS(E) this sketch.

My first decision was the leaf print from Nature’s Poem Designer Series Paper. The pretty print would blend nicely with a Crumb Cake card base, and a 1/16″ border of Lemon Lime Twist would add just enough brightness. Can you see there is some texture on the Crumb Cake card base? That’s from the new Subtle Dynamic embossing folder, which I couldn’t wait to use!
To mimic the sketch, I found the right size Layering Circle die to cut into the panel. Then, I placed the square Puzzle Pieces die over my circle to cut the puzzle pieces.

To introduce the Grapefruit Grove (Calypso Coral) color, I die cut a second circle to fill in the hole. I glued four of the puzzle pieces in place, and raised two pieces on dimensionals. There is also a larger puzzle piece die in the set which I used to cut the Crumb Cake piece holding the sentiment, “One piece at a time.” How clever the sentiments are!

I added a touch more Grapefruit Grove with a bit of Nature’s Twine tucked under the puzzle piece, attached with a Glue Dot.
TIP: I rolled the Glue Dot between my fingers to make it narrow like the twine.
The envelope flap is embossed with the Layered Leaves embossing folder.
Be on the lookout for more of my cards using this Love You to Pieces bundle, because I know it will be a favorite of mine. If you’d like to start making your own jigsaw puzzles, scroll on down to shop in my store.
  Product List
Jun 13, 2018 | Gallery, Hand-Crafted Cards |

Welcome to the Pals June, 2018 Blog Hop. This month we’re going to Pick a “B”. Projects for Babies, Birthdays or Brides, that is. Be on the look out for creations using new products from Stampin’ Up!
You may be starting the hop here or coming from a previous Pal’s blog. Either way, you’ve come to the right place. You’ll find the the full line-up below to help you move, or “hop” along from Pal to Pal.
June is the number one month for weddings, so I chose “B for Bride.” Picture in your mind a beautiful garden wedding. I’m excited to share with you the Serene Garden Stamp Set from the new 2018-2019 Catalog.

Serene Garden Wedding Card
The Serene Garden Bundle was at the top of my list when I saw it in the new catalog for the first time in April. I was thrilled when it was on the pre-order list in May. Now, in June, it’s available to everyone. The graceful lines, and the bird are sensational. I couldn’t wait to see how the images would look stamped with Gold Stampin’ Emboss Powder. This picture shows how it shines.

I started by stamping the large corner floral, and the top corner leaf in Versamark. The bird, butterfly and flowers were stamped in Versamark on a separate piece of Whisper White cardstock. After sprinkling all the images with Gold Stampin’ Emboss Powder, and tapping the excess free, I used the Heat Tool to melt the powder.
The gold embossed lines made coloring with Stampin’ Blends easy. The leaves are Light Old Olive, the stems are Bronze, the flowers are Light and Dark Pink Pirouette, the butterfly is Light Daffodil Delight & Light Pumpkin Pie, and the bird is Light Pool Party.

The bird, flowers and butterfly have dies for cutting, making it easy to add dimension to the garden scene.
The sentiment, “Wedding Wishes,” is from the Floral Phrases Stamp Set. I used the smallest Stitched Shape Ovals die for cutting.

For the inside, I completed the sentiment from the Floral Phrases Stamp Set. The words received the Gold Embossing treatment as well, and I duplicated the hand-cut corner leaf. The decorative, horizontal line from the Serene Garden stamp set is stamped in Powder Pink ink.

Back to the card front, and the finishing touch, the Iridescent Sequins! Aren’t they gorgeous? This card wouldn’t be the same without them.
I decorated the envelope flap with a piece of Pool Party cardstock, matching the color of the bird, and embossed it with a Petal Pair Embossing Folder for texture.

Now it’s time to use the Blog Hop Line-up below to see which “B” the rest of my Pals are using. Don’t forget to show us some love by commenting on our creations. Please click to leave a COMMENT HERE.
- Mary Fish at Stampin’ Pretty
- Lisa Ann Bernard at Queen B Creations
- Lori Pinto at LollyPop Paper and Ink
- Jackie Beers at Blue Line Stamping
- Sara Hicks Stuart at Sentiments by Sara
- Stesha Bloodhart at Stampin’ Hoot!
- Mary Hanson at Up North Stampin’
- Su Mohr at AromasAndArt
- Jackie Diediker at Stampin’ Jackie
- Peggy Noe at Pretty Paper Cards
- Nina King at Ink Paper Sequins
- Jennifer Michalski at Stamping Serenity
- Wendy Klein at Doggone Delightful Stampin’
- Beth McCullough at Stamping Mom
- Karen Hallam at Karen’s Stamping Habit
- Brian King at Stamp with Brian
- Leah O’Brien at Stamping By The Bay
- Pamela Sadler at Stampin Pink Rose
- Denise Hoepfner at The Mountain Magpie
- Terri George at Stamp Me Crafty
Mark your calendars for July 11, 2018 for our annual Pattern Party featuring projects using favorite Stampin’ Up! Designer Series Papers and coordinating embellishments.. Don’t miss it!
Continue scrolling to see the products I used in this project. Everything is available at my store!
Product List
Jun 12, 2018 | Gallery, Hand-Crafted Cards |
Welcome! This month’s theme is “friendship.”
I always enjoyed shopping for cards to send to my loved ones. Now, I make cards, and it’s even more enjoyable! Creativity is back in my life, and sharing it adds to the pleasure.
Today’s card was made with a few of my favorite products from the new 2018-2019 Stampin’ Up catalog.

Serene Garden Bird Celebrates You
The center of attraction of this scene is the bird from the Serene Garden stamp set. I stamped her in Basic Black ink on vellum cardstock.
TIP: It takes longer for ink to dry on Vellum, so be patient.
After drying, I colored the backside with Stampin’ Blends in the colors of Bermuda Bay, Pool Party and Old Olive. My beautiful bird was then die cut from the Vellum, glued to a Thick Whisper White die cut bird, and placed on dimensionals.

The “window” was made with Graceful Glass Designer Vellum, glued to Whisper White cardstock, and layered on Basic Black cardstock.
TIP: To keep the glue from showing, use the tiniest pin dots of glue on the black lines.
The “window” was then glued to a Bermuda Bay card base.

The bird wanted to write “amazing YOU,” and found the words in the Celebrate You die set. “Amazing” is in Basic Black to match the window frame, and “YOU” is in Blushing Bride pink, which matches the flowers.
The flowers (Blushing Bride) and leaves (Pear Pizzazz) are from the Bouquet Bunch die set. I die cut three flower bunches, six leaves, and glued everything in place.
Five Artisan Pearls complete the card front. Can you see them?

The sentiment inside, “Life is so much better with you in it,” is from the Petal Palette stamp set. It was stamped in Basic Black ink on Whisper White cardstock, layered on Blushing Bride cardstock.
I added one more flower bunch and leaves to the inside, and decorated the envelope flap with a piece of Designer Series Paper.

Thank you for visiting!
Product List
Jun 10, 2018 | Gallery, Hand-Crafted Cards |

Welcome to the Kre8tors June 2018 Blog Hop. We are excited to share lots of inspiration from our brand new Stampin’ Up! 2018-2019 Annual Catalog. I can’t wait to see what everyone has chosen to feature. At the bottom of my post you’ll find the Blog Hop Line-Up, or you can just click the “next” button. It will take you to the next fabulous project.
The stamp set I’m featuring was offered in the pre-order when I was at On-Stage in April. Enjoy Life is on page 58 in the catalog. It has two wonderful silhouettes, which can be used so creatively, I knew right away I would order it. The stamp set has a hip vibe to it, which is appealing to younger folks. Though I’m not in that category, we need that!

Enjoy Life silhouette cyclist birthday card
We also need color in our lives, and Stampin’ Up’s color re-vamp has given us lots of fun, new colors. Call Me Clover and Blueberry Bushel are the two colors I chose for this cycle riding birthday card.

To make the Call Me Clover background, I stamped the entire ink pad on a piece of Whisper White cardstock. I was careful not to press down, so it would leave some white in the middle. This open white space is where I stamped the cyclist in Blueberry Bushel. I used my Stampin’ Trimmer to cut the rectangle 2 1/2 X 3 1/2 inches. This is slightly smaller than an ink pad. A layer of Blueberry Bushel cardstock provides a 1/8 inch border.

I used the Hexagon Embossing Folder to make the background on Whisper White cardstock, atop the Thick Whisper White card base. I like the contrast of bright and white, don’t you?
“Happy Birthday” is from the Itty Bitty Greetings Stamp Set. I used the Stamparatus to stamp the sentiment prior to attaching the art piece to the hexagon card front with dimensionals.
Check out the inside sentiment. Very appropriate for a young guy!

Once I had the idea, this card was very simple to make, and here’s the girl version:

Two more new colors are featured here, Pineapple Punch and Grapefruit Grove. The other difference is the Garden Trellis embossing. The sentiment on the inside is the same, and works for a young gal too.
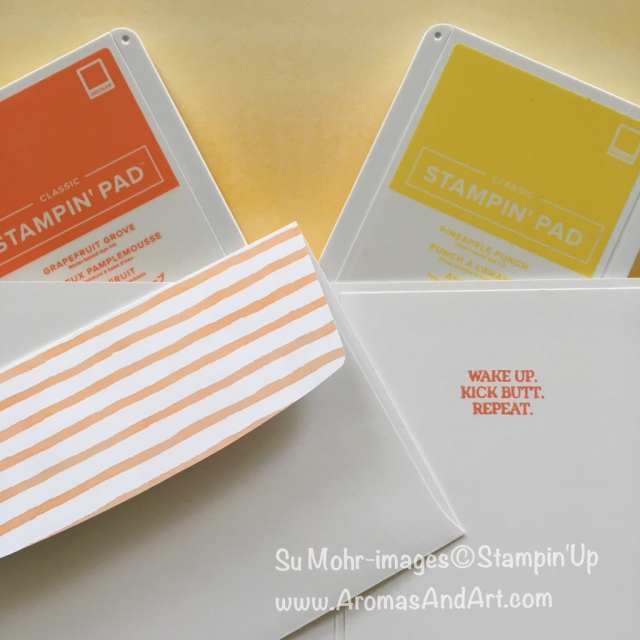
I made use of retired Designer Paper for the envelope flaps, because I didn’t have the new Designer Series Paper that matches the colors perfectly. The new paper is on page 191 in the catalog, 6 X 6 inch, and comes in 4 patterns. Can’t wait to order it!

Enjoy Life silhouette girl birthday card
Thanking you for hopping with me today! Now, head on over to see more fantastic projects from the new catalog.

Melissa Tennison
Su Mohr
Tricia Butts
Jacqui Lawrence
Jackie Lawless
Lisa Kmiec
Kathy Maurer
Maria Calia
Tracy Marie Lewis
Linda Handford
Jan Musselman
Diana Core Tillery
Becky Browning
Sandra Roberts
Jo Blackman
Laura Kate Mackie
Cheryl Taylor
Rebecca-Jo Unwin
Anastasia Radloff
Product List