May 1, 2018 | Gallery, Hand-Crafted Cards |
For May’s project, I had a brainstorm while I was out of town. I envisioned see-through baby blocks with the letters, A, B, C, on them. I was excited to return home, and put my idea into action. It turned out, pretty much, like I imagined.

A B C Card Welcomes Baby to the World
The Letters for You Stamp Set provided the A (stamped in Mint Macaron ink,) the B (stamped in Blushing Bride ink,) and the C (stamped in Daffodil Delight ink.) The stamps give the letters a hand painted look, which is very artistic. Don’t you agree? I used the Large Letters Dies for cutting, and doubled the three letters for thickness.

To make the blocks, I used the Layering Squares Die Set. I fiddled around with the sizes to find the two that would give me the right fit for the letters. The outside needed to be scalloped, and there had to be enough width to hold the Mini-Dimensionals. After cutting my three frames, I put glue on the tips of the letters, and placed them on the blocks. I used a dozen Mini-Dimensionals on the back of each block for fastening to the card base.
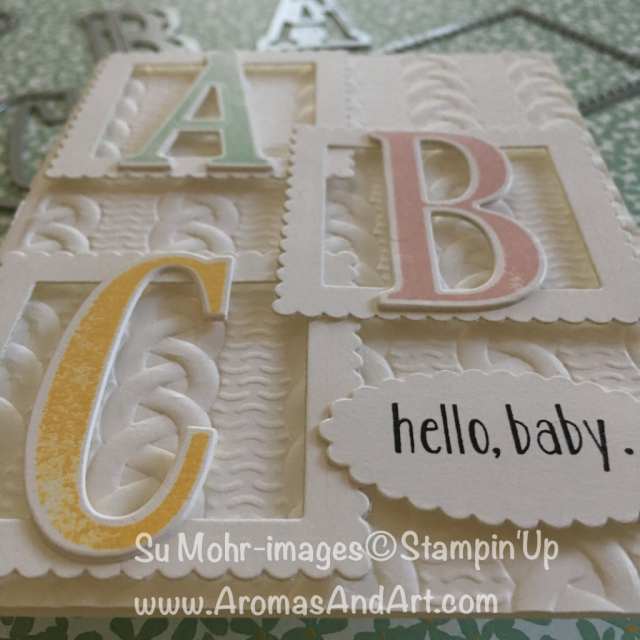
The card base is Thick Whisper White, embossed with the Cable Knit Embossing Folder. Keeping it white lets the letters stand out, and the Cable Knit adds a nice, baby blanket texture. I tried other colors, but this was my favorite.

“Hello Baby…” is from the Baby Bear Stamp Set. I stamped it in Basic Black Ink, and used an Oval Layering Die for cutting. See how it matches the scalloped edge of the squares?
The completed sentiment is on the inside, “Welcome to the world.” I remember this being my favorite thing that was said in cards to my babies.

I stamped the three small flowers from the Sweet Little Something Stamp Set in the colors of the A, B, C, inks. I like how the Cable Knit Embossing Folder decorates the other side.
The envelope needed some color, so I added a piece of yellow striped Designer Series Paper. Now my card is ready for a boy or girl baby.

Thank you for visiting my blog! Have a great day!

Product List
Apr 30, 2018 | Gallery, Hand-Crafted Cards |
The inspiration for today’s card is the Paper Player’s Tic Tac Toe challenge. I’m choosing the right row down, because I like the idea of a masculine, bird card with twine.

I had previously colored (Stampin’ Blends) my bird (Best Birds Stamp Set), and cut him out (Birds & Blooms Die Set), so he is ready to go. He had been waiting to make an appearance, and today is his day.

Best Birds Birthday Card for a Man
My bird will blend nicely with Tranquil Tide, so I’m selecting that color for the card base. The True Gentleman Designer Series Paper is especially for men, and I’m choosing a piece of it for the bird’s background. And, nothing says “masculine” more than Wood Textures, which I’m layering on the Tranquil Tide card base.

I’m using the same Wood Textures DSP for the bird’s branch, which I’m cutting with a Seasonal Layers Die.
TIP: The branch is thin, so I’m triple layering it with Thick Cardstock, so it will be sturdy over the opening I’m planning.
I get a thrill from dimension on my cards. It’s one thing that really separates us hand crafters from Hallmark, don’t you think? So, I’m layering the True Gentleman DSP on Thick Cardstock, cutting a hole with a Layering Squares Die, and placing it on Adhesive Strips.
TIP: Adhesive Strips are twice as thick as regular Dimensionals, so I use them when I want extra elevation.

The twine is Night of Navy, which I’m winding around two times, and knotting. “Happy Birthday” is in the Sweet Cupcake Stamp Set, and I’m choosing it, because it’s the right font (masculine) and size to cut with the Classic Label Punch. I’m attaching it to the twine with Tombow Glue.
By the way, I’m photographing on top of another sheet of True Gentleman DSP. It will be retiring May 31st, so if you like it, scoop the pack up now.

I hope you enjoyed making this masculine, bird card with me today. I wouldn’t have thought of it without inspiration from the Paper Players, so thank you to their design team!
Tomorrow (Tues May 1), I’m honored to be in a Blog Hop with Kylie Bertucci’s Top Ten Winners, all about babies. It goes live at 2PM Pacific Time. I hope you get a chance to hop along!
Apr 29, 2018 | Gallery, Hand-Crafted Cards |
I was in a monotone mood when I created this card yesterday. This is a good thing, because it’s very peaceful and relaxing. I was thinking about what I would do with the CAS(E) this sketch challenge. What would I put on the two corners with a sentiment in the middle?

I actually thought of the background first, and stamped the Post Script Background Stamp in Sahara Sand Ink on Whisper White cardstock. I knew I wanted the sentiment to involve “sending” (as in mailing across the miles), so I looked through my stamp sets for something with that message.
My stamp sets are separated into several categories, now that I’ve been with Stampin’ Up for 2 1/2 years. I found the perfect stamp set in my “soon to retire” stack. It’s the Butterfly Basics Stamp Set, which has been one of my favorites. Here’s my finished card:

Butterflies Sending Wishes Your Way
“Sending Wishes Your Way” is just what I wanted to say on the Post Script background. I stamped the words in Crumb Cake ink on Thick Whisper White cardstock, and used the square, Stitched Shapes Die for cutting. I made it a rectangle by turning the die around and doing a second cut. Does that make sense?

And, you guessed it! Butterflies would adorn the corners. They are wonderful, little, well-wishers, flying across the miles. I stamped the large, lacey butterfly, and the three small butterflies in Crumb Cake ink. Remember, I’m thinking monotone. The large butterfly has a die in the Butterflies Die Set, which I used for cutting. I used a punch for the three, small butterflies, making it very easy. If you look closely, you can see words are written on the butterflies. So cute!

I wanted some foliage around the large butterfly, and found a stem in the Petals & More Die Set, which I used for cutting five in Whisper White.

I had my parts, and it was time to assemble. I began with the Crumb Cake card base, followed by the Post Script Background. Next, I used Tear Tape to place a piece of Burlap Ribbon across the middle, and popped up the sentiment on top of it by using Dimensionals.
I used Tombow Glue to fasten the white stems, and Dimensionals for the large, and three, smaller butterflies.

Before photographing this morning, I added the tiny pearls to the foliage. And, my monotone, butterfly card was complete.
Thanks for visiting, and I’m sending good wishes your way!
Apr 27, 2018 | Gallery, Hand-Crafted Cards |
I’m often singing “Oh Happy Day,” and Cat must have picked up on it. For those of you who know my Cat (Punch), this won’t come as a surprise. To make a long story short, I’ve been out of town, and Cat was waiting for me in my craft room, sitting in an “O” on my work table. I happen to know this “O” was cut with a Large Letters Die. The “O” was covered with a green and white leafy paper (Whole Lot of Lovely), so I found more of this paper to layer on a Pear Pizzazz colored card base.
Next to him, was an “H” die that he wanted to cut into a sunny, yellow piece of DSP, so the “OH” in the song title would be correct. I’ll go ahead and show you Cat’s design. He’s pretty proud of it, and wanted to show it off in some challenges.

“Oh Happy Day” Sunshine Cat
He admitted using yellow wasn’t his idea. There’s a challenge at the Global Design Project with a theme, “Show Me the Sunshine.”
He said this cheery song and yellow paper was as sunny as you could get!

The sunny, yellow paper had to be thick, because he wanted to sit on it, so I glued it to Thick Whisper White cardstock, before cutting the “H.” It was my idea to round the corners with our new Triple Punch, and raise it on Adhesive Strips. Cat was very happy with this idea of elevation. Before attaching his perch, he asked if I could add some grey Gingham Ribbon to match his fur. Why fight the craziness at this point? As you see, he got his way.

To complete the cheery song, I found “Happy Day” in an older stamp set, Perfect Pairings. The die from the Petals & More Die Set was just the right size.

Another confession, the layout wasn’t his idea either. There’s also a challenge going on at Paper Players, and Cat thought this sketch was puuurfect.
We need to hurry and get Cat’s entry posted, because it’s closing soon.

Before I took the photos, Cat wanted to add four yellow Enamel Dots, just to make sure it was sunny enough.

What would I do without my Cat? Looks like he’ll be around a while, because he’s in the new catalog.

I’d better get back to my craft room before Cat gets into all of my ribbon!
Apr 26, 2018 | Gallery, Hand-Crafted Cards |
My grandson plays the bass guitar, so this musical birthday card is perfect for him. The guitar (Epic Celebrations stamp set) is the first thing I created for this collage. I stamped it in Basic Black Ink on Cherry Cobbler cardstock, and added Versamark to make it shine. After fussy cutting, I ran it through the Big Shot with the Hexagon Embossing Folder. It’s quite an instrument!

The words, “celebrate” and “you” are from the Celebrate You Die Set. The Sheet Music Background Stamp made the paper I used for cutting the words.
The card base is Thick Whisper White, layered with Wood Textures Designer Series Paper, and Cherry Cobbler cardstock that I embossed with the Simple Stripes Embossing folder.
I used two Stitched Shapes dies to cut one square from Wood Textures DSP, and one square from Tutti-Frutti DSP. The Treble Clef is from the Musical Seasons Die Set, and cut from Silver Foil.
I glued the strand of Silver Sequin Trim to the Cherry Cobbler layer, before gluing everything else down. The three Cherry Cobbler, Enamel Shape Stars were the final touch.

This will be my entry for the Tic Tac Toe Challenge. I chose the middle row down: Metallic (treble clef and Silver Sequin Trim,) Stripes (Simple Stripes embossing,) Free (everything else.)

For the inside, I repeated the Wood Textures Designer Series Paper. And, I cut more musical words from Sheet Music with the Happy Birthday Die. I dotted the “i” with a Cherry Cobbler Enamel Dot.
At the last minute, I decided to add a piece of Cherry Cobbler DSP to the envelope flap, so it’ll be ready to mail.

I had fun making this musical Birthday Card for my grandson. I hope you enjoyed my process!
Apr 24, 2018 | Gallery, Hand-Crafted Cards |
The Share What You Love Specialty Designer Series Paper is extraordinary! One of my favorite sheets is predominately Mint Macaron, a popular returning color. You can’t imagine how happy I am that it is back!

Share What You Love with Celebrate You
Mint Macaron is such a beautiful shade of green, I bought a pack of it when I knew it was retiring last year. So, I was prepared with plenty, and cut a piece in half (5 1/2 X 4 1/4) for this card base. Next, I cut a piece of this gorgeous designer paper (5 1/4 X 4), and used Snail Glue to adhere it to the card base.
The rest of the lay-out was determined by the challenge at Fab Friday. Here is their sketch:

I used another piece of Mint Macaron for the center rectangle. After contemplating different embossing folders, I decided on the Scattered Sequins. Now I have a shower of Mint Macaron sequins. Don’t they look real?
For the banner underneath the rectangle, I used the Banner Triple Punch with a piece of Pear Pizzazz. I embossed it with the Petal pair Embossing Folder.
The bow in the sketch was an easy choice, because I was dying to use our new Mint Macaron Nature’s Twine. I attached it with a Mini Glue Dot, and it is holding fast.

For the sentiment, I wanted to use paper words from the Celebrate You Die Set. I cut the word, “amazing” from the color, Old Olive, double layered it, and used Tombow for gluing.
If you haven’t heard, Old Olive is moving from the “Brights Collection” to the “Regals Collection.” I’m all about green, so as long as it’s in there, I’m happy.

I got carried away on the inside of the card, wanting to use another piece of the DSP. I cut a second banner, the same size as the one on the front. Don’t you love this designer paper? And, I cut “You” with a Celebrate You die, double layered, and Tombow glued.
“Happy Birthday” is from the Better Together Stamp Set, which I stamped in Tranquil Tide. I recently purchased Better Together, a two part set. It has many great sentiments, and will be put to good use. The question is, why did I wait so long?

Thank you for visiting me in my happy, Share What You Love, Mint Macaron world.





