Sep 20, 2019 | Gallery, Hand-Crafted Cards |
I just can’t stop punching the daisies! Today’s daisies are on a Happy Birthday card.

Birthday Daisies
This card began with that pretty strip of daisies on the burlap background from Pressed Petals Designer Paper. Can you see where I found it? This wonderful, piece of 12X12 paper has great sections that can be cut apart for simple card making. Plus, the paper pack has 24 sheets, so it’s a great deal. Click on the picture in my Product List for details.

I attached the daisy strip to Whisper White Cardstock, which I embossed with the Script Embossing Folder. Then, this layer was glued to a Thick Whisper White card base.

The two daisies were made with Whisper White Cardstock and the Medium Daisy Punch. I punched two rounds of petals in plain white, and two that I first stamped (Daisy Lane Stamp Set) in Rococo Rose Ink.
Next, the centers were made by stamping the daisy in Crushed Curry Ink, then punching the centers with the 1/2″ Circle Punch. You need to cut some of the petals to make it fit in the punch.
My example is with DSP, and not the daisy I used on this card, but now you can see how I made the notches.


Finally, “Happy” was made with a die from the Merry Christmas Die Set, and burlap paper from Pressed Petals DSP. To complete the sentiment, I stamped “birthday,” from the Well Said Stamp Set, in Rococo Rose Ink, on Whisper White Cardstock, and used a Merry Christmas Label Die for cutting. Happily, it was a perfect fit.

I’m sharing this birthday card with Seize the Birthday, a great place for inspiration.

Thank you for stopping by! Please enjoy shopping at my store!

Product List
Sep 19, 2019 | Gallery, Hand-Crafted Cards |
“Hey, friend,” how about a clean & simple card for today?

“Hey, friend”
As soon as I saw this week’s Freshly Made Sketches challenge, I was excited to participate.

I began by choosing three papers for my rectangles: the floral print and script are Pressed Petals DSP, and the check is In-Color 6X6 DSP. Using the smallest Stitched Rectangles Die made cutting a breeze.
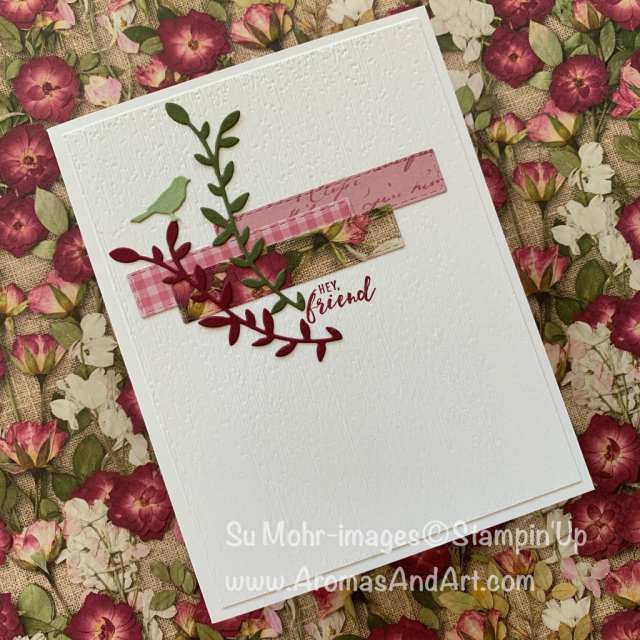
The design called for a small sentiment, and Itty Bitty Greetings provided “hey, friend.” I stamped it in Merry Merlot Ink on the Whisper White background, and embossed this layer with Subtle Texture.
I followed the sketch, adding two sprigs to the design. They were made with a Botanical Tags Die, and two colors from the Pressed Petals DSP; Mossy Meadow Cardstock, and Merry Merlot Cardstock.

My favorite, little, bird from the same Botanical Tags Die Set, completed today’s friendship card. I simply snipped him from the tag, after die-cutting from Pear Pizzazz Cardstock.
You can click on the Botanical Tags Dies in my Product List for details, and put it in your shopping cart for purchase.

Thank you for visiting today. This was such a fun challenge, you may want to give it a try. Happy stamping!
Product List
Sep 18, 2019 | Gallery, Global Design Project, Hand-Crafted Cards |
Today’s card features mums, in all their Fall glory!

Mums for you
It was fun stamping the mums from the Daisy Lane Stamp Set, and cutting them with the Medium Daisy Punch. I used Crushed Curry and Daffodil Delight Cardstock with Real Red Ink for my Fall colors.
My fern for the mums is from the Tropical Die Set, cut from Pear Pizzazz Cardstock.
The word “mums” was made with the Hand-Lettered Prose Dies, and a retired piece of dotted, Subtles 6X6 DSP. I gave several layers to the letters with Pear Pizzazz Cardstock.
TIP: The retired Subtles 6X6 DSP is in the Clearance Rack. Just click on my “shop” button, and you’ll see “Clearance Rack” on the left side of the page.
The current checked, Subtles 6X6 DSP is pictured in my Product List.

To complete the sentiment, I added “for you” from the Itty Bitty Greetings Stamp Set. I stamped it in Old Olive Ink on Whisper White Cardstock, and cut with a Stitched Nested Label Die.

For the background, I embossed Whisper White Cardstock with the backside of the Basket Weave Embossing Folder, and I adhered this to a Thick Whisper White card base.
I decorated the envelope flap with Pressed Petals Designer Paper, which you can see in the top photo.

My inspiration for today’s project was the Global Design Project’s challenge theme.

I appreciate you following my blog. Sharing with you keeps me creating, which is truly a joy! Thank you! I hope you’ve been inspired!
Product List
Sep 17, 2019 | Gallery, Hand-Crafted Cards, TGIF |
It’s always exciting to use new product, and today I’m using the Mercury Glass Designer Acetate for the second time.
I began with a Thick Whisper White card base, topped with Feels Like Frost Designer Paper (the silver foil side) that I bordered with Noble Peacock Foil in Old Olive. The papers are in my Product List for a closer look.
Before gluing the two papers together, I used a Beautiful Boughs Die to cut a bough from the Feels Like Frost DSP. Then, I used the same die to cut a bough from the Noble Peacock Foil, filling in the hole, making it inlaid.

Glass Ornament
I rounded the corners to mimic the TGIF challenge sketch.

It’s wonderful how the Detailed Trio Punch makes it so easy. You can see the other capabilities of the punch by clicking on the picture in my Product List below.

For the circle in the sketch, I took it literally, and used a Layering Circles Die to cut a circle from the Mercury Glass Acetate. My circle needed a top to look like an ornament, and here’s the fun part; I used the Snowman Builder Punch! Doesn’t the snowman’s hat make a great ornament topper?

“Happy Holidays” is from the Itty Bitty Christmas Stamp Set, stamped in Memento Black Ink, and fitting perfectly within the Classic Label Punch.
There’s plenty of shine on this card, but I had to add a few green-toned Iridescent Sequins.

If you’re wondering how I used the Mercury Glass Acetate the first time, here it is. You can click on the picture for details.

Sip Sip Hooray
Thank you for paying me a visit today! I hope I inspired you with the punches and new, gorgeous papers! My store is open for business!
Product List
Sep 16, 2019 | Gallery, Hand-Crafted Cards |
Creating scenes, observed through a window, is not a new idea, but one that I love. I was missing the retired, Hearth & Home Die Set, until I realized the Stained Glass Die Set was right under my nose!

Christmas Window
Beginning with a Thick Whisper White card base, I trimmed a layer of regular Whisper White Cardstock to 4″ X 5 1/4″. Then, I embossed the layer with the Brick & Mortar Embossing Folder.
Next, I positioned the Stained Glass Die where I wanted the window, which was easy, because the straight lines of the bricks provided a guide. After my two holes were cut for the windows, I used the same Stained Glass Die to cut the frames from Sahara Sand Cardstock.

Now, back to the Thick Whisper White card front, where I stamped the tree. Using the Stamparatus, I positioned the tree stamp from the Winter Woods Stamp Set. I stamped it twice; first with Garden Green Ink, and second with Shaded Spruce Ink.
Next, I glued the brick “house” to the card front, followed by the window frames.
Now, the window needed a ledge, which I cut from Thick Whisper White Cardstock, using the smallest Rectangles Stitched Die.
The sentiment, “Blessed Christmas Wishes,” is from the Itty Bitty Christmas Stamp Set, stamped in Crumb Cake Ink on the ledge. I attached it with four Mini Dimensionals.

My inspiration for today’s card was CAS(E) this sketch.

Last, but not least, is the pop of red, created by a “cardinal” from the Botanical Tags Die. Set. I simply used the die to cut the birdcage from Real Red Cardstock, then cropped the bird, so he could sit on the window ledge.
This is a Christmas card I will make in quantity to send to family and friends. It speaks to me, and yet, it is simple enough to duplicate. Mass production has begun!

Thank you for visiting today. If you need a window, remember the Stained Glass Dies. You can see details by clicking on the picture in my Product List below. Have a wonderful day!
Product List
Sep 15, 2019 | Gallery, Hand-Crafted Cards |
When I learned that the Paper Players challenge was a “metallics/foil” theme, I grabbed my new Pine Tree Punch and a Gold Foil Sheet, and voila!

Gold Foil Christmas
There are lines of gold running through some of the Wrapped In Plaid 6X6 Designer Paper, so it was a perfect choice to combine with my Gold Foil pine tree.
I used a Stitched Rectangle Die for cutting, and glued it to Whisper White Cardstock that was embossed with the Eyelet Lace embossing folder. Even though this is a “clean & simple” challenge, I embossed. I can’t help myself! The card base is Thick Whisper White.

There’s more Gold Foil for the sentiment, cutting “Merry,” with a die from the Merry Christmas die set. To complete the sentiment, I stamped “Christmas,” from the Merry Christmas To All stamp set in Cherry Cobbler Ink on Whisper White Cardstock. It fit nicely within the smallest Stitched Rectangle die-cut.
A few, shiny, gold sequins, completed my project. Thanks so much for checking out my Christmas card. You can see today’s supplies in my Product List below.

Now, continue being inspired by checking out the blogs of the Paper Players Design Team:
Product List





