Stenciling has always fascinated me, and a technique I use continually. Today’s card is in one of my favorite colors, Mint Macaron.
Stenciling
I was inspired by this week’s Fusion challenge; the color mint, and the sketch with circles.
The pattern for stenciling is from the Delightfully Detailed DSP, which I placed over a piece of 4″ X 5 1/4″ Whisper White cardstock. The stencil was held in place on four corners with Washi Tape. Then, I inked a Sponge Dauber with Mint Macaron ink, and daubed over the pattern. Once satisfied with the coverage, I lifted the stencil, and voila!
I used a Rectangle Stitched die to cut my art piece to size, and glued it to a Mint Macaron card base.
The sentiment, “Congratulations,” is from the Well Said stamp set, which fit perfectly within a Rectangle Stitched die.
I stamped the sentiment in Tranquil Tide ink on Whisper White cardstock, and positioned it on Mini-Dimensionals, as in the Fusion sketch.
For a touch of sparkle, I added some Iridescent Sequins.
If you haven’t tried stenciling, you should! I hope my project has inspired you. You’ll find my supplies in the Product List below, where clicking on the pictures will take you to my store for purchasing.
For Jaydee’s Clean and Simple challenge, I used minimal supplies to make it a #simplestamping project.
You can follow along with my video recording below.
#simplestamping
I selected the “Distinktive” succulent stamp from the Painted Seasons stamp set, and six colors of ink for stamping: Poppy Parade, Grapefruit Grove, Daffodil Delight, Pear Pizzazz, Pool Party, and Highland Heather. I stamped the succulent, forming a rainbow, across Whisper White cardstock, cleaning the stamp on my Stampin’ Scrub between colors. The dots were added with a second stamp from Painted Seasons.
“You are wonderful” is from the Rooted in Nature stamp set, which I stamped in Black ink.
My “one layer” was adhered to its Thick Whisper White card base with Snail Adhesive, and was the fastest card I’ve made in a long time. But, I like the results, and it would be great for a beginner.
Here goes my embarrassing video. I promise to work on my camera placement!
I appreciate you visiting! The supplies I used today are in my Product List below. Clicking on the pictures will take you to my store for purchasing. The Painted Seasons stamp set is a FREE item with a 50.00 order. Don’t wait, because it’s no longer available after March 31st.
For more ideas on “clean and simple” cards, stop by the Paper Players Design Team blogs.
Welcome to the Pals’ March Blog Hop. We’re so glad you’re here because ”Spring has Sprung” – at least on our blog hop if not outside! Our Design Team created beautiful projects to inspire you. You may be starting the hop here or coming from a previous Pal’s blog. Either way, you’ve come to the right place. You’ll find the full line-up below to help you move, or “hop” along from Pal to Pal.
When thinking of Spring, I think of Easter, and the opportunity to send loved ones some handmade Easter cards. For today’s project, I’m using one of my favorite fancy-fold cards, the Double Z-Fold.
Easter Blessings
The Gray Granite card base is 4 1/4″ x 11″, and scored at 5 1/2″ and 8 1/4”. The band is 1 1/2″ X 11″, scored at 5 1/2”and 8 1/4”. The frame attached to the front of the card is 4 1/4″ X 3″, made with two Rectangle Stitched dies, doubled for sturdiness.
Easter Blessings
I thought it would be fun to combine the photographed, foliage and flowers from Petal Promenade DSP, with the cute, punched, Best Bunny. The Designer Series Paper was trimmed to fit the spaces on the card base and band.
The Easter bunny was punched from Thick Whisper White cardstock, using the Bunny Builder Punch. I punched two Easter bunnies, and used a Sponge Dauber to add a touch of Blushing Bride ink to the fur. His face, from the Best Bunny stamp set, can be seen through the frame.
The cross is from the Cross of Hope die set, and cut from Gray Granite cardstock. I fussy cut additional flowers from Petal Promenade DSP, as well as “He Is Risen,” from His Grace stamp set.
“Easter Blessings,” on the card front, is from Itty Bitty Greetings, cut with a Bunch of Banners die, and placed on Mini-Dimensionals. The sign is held with a stamped tie from the At Home With You stamp set.
When folded, this Double Z Fold card fits right into our standard size, medium envelope.
Thanks so much for hopping over to see my Easter card! The supplies I used can be seen in my Product List below.
More inspiration awaits! Use the Blog Hop Line-up below to visit the rest of this month’s Design Team. My fellow Pals are excited to show you what they’ve created! Don’t forget to show us some love by commenting on our creations.
Toads and toadstools for What Will You Stamp? Design Team. Rather than make our So Hoppy Together frogs green, they became lumpy, brown toads.
Toads & Toadstools
My idea began when I saw the toadstool design from our new Painted Seasons Designer Series Paper I just received. The recent order also included the Hop Around dies that coordinate with the frogs from the So Hoppy Together stamp set. This made me think of the Love You To Pieces stamp set with the sentiment, “let’s get together soon.” So, one thing led to the next, and I ended up with today’s card for What Will You Stamp?
To begin, I stamped two of the toads in Soft Suede ink on Sahara Sand cardstock, and colored with Stampin’ Blends. The colors are listed in my Product List below.
It was so much fun using the dies from the Hop Around set for cutting the toads. I snipped the one that’s jumping on the lily pad free from its unicycle.
The two puzzle pieces, in the Painted Seasons, toadstool pattern, were cut with a Puzzle Pieces die, and layered three times for thickness. The lily pad was made with Pear Pizzazz cardstock, embossed by the Subtle Textured folder, and cut with a Hop Around die.
The card base is Soft Suede, with a layer of Sahara Sand cardstock, embossed with the Dot To Dot embossing folder. Doesn’t it look like lumpy toad skin?
I created the scalloped, Whisper White cardstock border, with a Be Mine Stitched die. I love the detail, and this die is very easy to use.
“Let’s get together soon” is from the Love You To Pieces stamp set, stamped in Soft Suede ink on Whisper White cardstock. I used the Classic Label Punch for cutting, and layered it to be the same thickness as the puzzle pieces.
After gluing everything in place, the toads hopped on with dimensionals on their backs.
The So Hoppy Together frogs have been given much love. We’re here to say, toads are cute too!
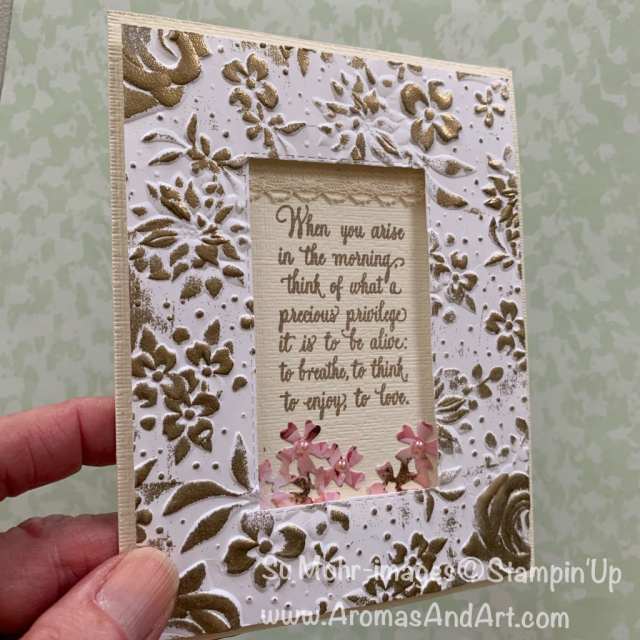
Welcome to the Kre8tors March 2019 Blog Hop. Today, we are getting ready to say “bye bye” to our wonderful Stampin’ Up! Sale-A-Bration items. I hope your favorites are still available, because they are offered only as long as supplies last, through March 31st. The Country Floral embossing folder is one of my favorites, so that is what I chose to highlight today.
Antique Frame
This antique frame was made with Thick Whisper White cardstock, trimmed to 4″ X 5 1/4″. After cutting out the middle with a Rectangle Stitched die, I embossed it with the Country Floral embossing folder. Then, I rubbed the VersaMark pad over the top of it, sprinkled it with Gold embossing powder, and set the powder with the Heat Tool. My mother had an antique frame that looked just like this!
The frame has a sturdy foundation of Foam Adhesive Strips. Wanting to achieve an antique look, I used Thick Very Vanilla for the card base.
Looking for a sentiment appropriate for framing, I found one with a beautiful font in the Enjoy Life stamp set:
“When you arise in the morning, think of what a precious privilege it is to be alive; to breathe, to think, to enjoy, to love.”
I stamped the sentiment in Crumb Cake ink in the middle of the Very Vanilla card base, and gave the entire card base some Subtle Texture embossing.
To enhance the antique look, I placed some Lace Trim at the top of the sentiment with Tear & Tape. For a bit of color, I used a small flower die, from the Bouquet Bunch Die set, to cut flowers from Petal Promenade Designer Series Paper.
Share What You Love Artisan Pearls, added to the flower centers, was the final touch.
Thank you for joining me on the Kre8tors Hop today. We love reading your comments.
A rainbow of balloons “for you on your birthday.” The sunlight in my craft room this morning is creating the shadows.
Rainbow of Balloons
The rainbow idea began with Claire’s challenge at this week’s Paper Players.
Since it’s a birthday card, I’m sharing it with Seize the Birthday.
I applied a fun technique of painting a rainbow of color on Thick Whisper White cardstock, prior to die cutting. In this case, I used the brush end of Stampin’ Blends, starting in the corner, as you see in the picture. The colors are overlapped, so they blend together. Then, I used the die from Candles & Confetti to cut nine colored balloons, and three plain white. I love this balloon die with the string attached!
I painted the colors in this order: Light Cherry Cobbler, Light Poppy Parade, Dark Pumpkin Pie, Dark Mango Melody, Light Old Olive, Dark Pool Party.
After deciding on the balloon’s placement, I glued them to a Thick Whisper White background, which was glued to a Thick Whisper White card base. Four of the balloons were “popped” (laughing out loud) on dimensionals.
The sentiment, “For you on your birthday,” is from the coordinating stamp set, Blow Out the Candles. I stamped the sentiment in Black ink on Thick Whisper White cardstock, cut it with a Layering Ovals die, and placed it on dimensionals.
Thanks so much for visiting me today! I hope you enjoyed my rainbow technique. Give it a try, and join us in the Paper Player’s gallery!
Get more inspiration from all of the Paper Players Design Team!
Enter your email below to receive each of my new posts by email!
Archives
Categories
Disclaimer
My name is Su Mohr, Independent Stampin' Up! Demonstrator. I am responsible for the content on this site. Stampin' Up! does not endorse the use of or contents of the classes, services, or non-Stampin' Up! products I may offer here.