Jul 18, 2018 | Gallery, Hand-Crafted Cards |
The Sunshine Wishes die set has been a favorite of mine. The dies are, well, “to die for.” The die I’m using today is a butterfly, at least, that’s what it looks like to me. Or, do you think it’s a flower? Either way, I like it in these sunshiny colors.

Sunshine Wishes Butterflies
The three colors are Pineapple Punch, Mango Melody, and Lemon Lime Twist. I used the die to cut the butterflies from cardstock in these colors.

To add a bit more color, I snipped pieces of Delightfully Detailed Laser-Cut DSP, and used Sponge Daubers with ink pads for coloring. These were lined up on Whisper White cardstock, embossed with the Simple Stripes embossing folder.

My inspiration for the lay-out is this week’s CAS(E) this sketch.

To complete the card front, I stamped “Happy Day” from the Itty Bitty Greetings stamp set. And, I added three Glitter Enamel Dots to the butterflies, making them extra happy.

Sunshine Wishes Butterfly
For the inside, I stamped “Happy Birthday” from the Better Together stamp set. The rainbow effect was achieved by applying the three ink colors to the stamp before stamping. The cute do-dad is also from Better Together.

You can see the supplies I used for today’s card by continuing to scroll. It’s a bit difficult to read the words backwards in the Sunshine Wishes die set, but you get the idea.
Thanks for stopping by. I’m sending you sunshine wishes!

Product List
Jul 17, 2018 | Gallery, Hand-Crafted Cards |
Today’s inspiration is from my yard, blooming Agapanthus.

Botanical Press Agapanthus
Here they are in my yard two weeks ago. The height of their blooming period is July 4th, which is nice, but I wish they’d last forever.

It was once popular to preserve flowers by pressing them. Since the Big Shot is a pressing tool, I wanted to put it to work. I’ve tried this with Bird of Paradise, and a few others, so I was ready to see what would happen with my beautiful agapanthus.
I tried it first with just the stems. Neat, huh?

Next, the flower.
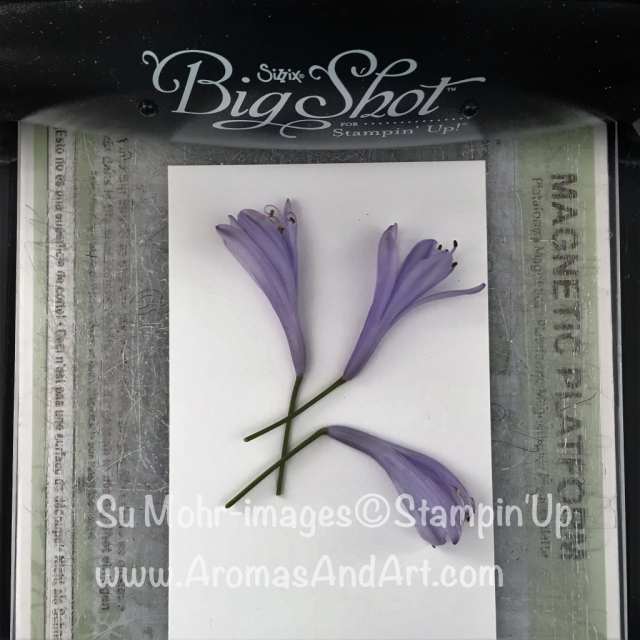
I peeled off the part that was loose, leaving some portion with real flower, and some with imprint.

I came up with the idea for the Stitched Shapes circle dies, because of the challenge at TGIF. I thought it was a great lay-out for my botanical press agapanthus.
I added a panel of Crumb Cake cardstock, which I embossed with the Subtle Texture embossing folder. And, I added a thin strip of Old Olive cardstock along the left side of the panel.
The sentiment, “With love and sympathy,” is from the Itty Bitty Greetings stamp set. It is resting on Burlap Ribbon, fastened with Tear & Tape.

Now, off to see what needs pressing, hopefully, not clothes! Other than the flowers, my supply list is below, and clicking on the pictures takes you to my store. Please keep in mind, I’d love to be your demonstrator!
Product List
Jul 16, 2018 | Gallery, Hand-Crafted Cards |
It’s always fun to break out a new stamp set. This is the first time I’ve designed a card with the Pick a Pennant stamp set, and the Playful Pennant dies. I received the stamp set as a gift at On Stage in April, and I was waiting for the dies I received in my last order.

Playful Pennants Strung on a Fence
It’s also fun using NEW colors, and this is a perfect example why I need ALL of them. Paper Players is having a color challenge this week, using Lovely Lipstick, Highland Heather, and Granny Apple Green, and I’m prepared.

I stamped each of the beautiful, new colors on Thick Whisper White cardstock using a Pick a Pennant stamp. I “stamped-off” one time, creating a lighter shade. At the same time, I stamped three tassels. The tassels are full strength, so you can see the difference “stamping-off” makes.
Next, I figured out what I wanted to say, and stamped the letters in Basic Black ink. The alphabet comes in the Pick a Pennant stamp set, and made for easy stamping. I didn’t even need the Stamparatus this time.

The next step was cutting. Happiness is having dies to cut the pennants and those cute, little tassels. Talk about easy!
I imagine I’ll find clever ways to hang the pennants, but today I strung them across a fence, made with the Wood Grain embossing folder.

For the card base, I chose Highland Heather, and used Highland Heather ink for the sentiment. The sentiment, “Today we celebrate wonderful brilliant fabulous you,” is from the Picture Perfect stamp set.
The Oh My Stars embossing folder decorated the envelope flap, and that’s a wrap.

I hope you were inspired by the the colors, the pennants, or both. Thanks for visiting!
P.S. The embossing folder for the fence is Pinewood Planks, not Woodgrain.
Product List

Woodgrain Textured Impressions Embossing Folder
[127821]
$7.50
Jul 15, 2018 | Gallery, Hand-Crafted Cards |
I’ve been thinking about the Global Design Project sketch since Monday, and now it’s Saturday night. My husband is at a Pares game with some friends, so I’ve had time to play. Here is the sketch I’ve been pondering:

I needed to decide what my three objects would be and chose the precious, little bird from the Painted Glass stamp set. I stamped three birds on Whisper White cardstock, and colored them with Stampin’ Blends. For the sake of time, I didn’t list the colors I used, but all of the Stampin’ Blends are now available at my store. Yay!

Graceful Glass Birds
The birds are resting on a branch from the Petals & More die set. It was cut from Soft Sea Foam cardstock, making a nice resting place for the birds. Did you notice they landed in a “square-like” fashion, mimicking the sketch?

I was anxious to use the new Stitched Seasons dies, and determined to work that into the design somehow. I used the largest die in the set to cut a frame from Soft Sea Foam cardstock, matching the branch. This fabulous die set is available to demonstrators in July, and will be available to everyone in August. You can check it out in my product list below.

My favorite, little sign from the At Home set is tied to the branch, enabling the birds to say “hello.” I embossed the Whisper White cardstock layer with the Subtle embossing folder after stamping the string in Basic Black ink.

I placed the birds and sign on Mini-Dimensionals, and that’s all there was to it. Now, off to post this to meet the deadline at the Global Design Project challenge.
Product List
Jul 12, 2018 | Gallery, Hand-Crafted Cards |
Gina the giraffe has been waiting patiently to make an appearance. Well, maybe not so patiently, but today is her day. She brought along two friends in all their black and white glory. They politely declined to be colored, considering the color challenge they wanted to enter.

Animal Outing giraffe named Gina
The color challenge is at TGIF, using the colors of Grapefruit Grove, Lemon Lime Twist, and Pineapple Punch.

Gina thought that black and white would make a nice contrast, showing off the three colors. Her friends agreed, and who am I to argue?

Going along with the giraffe’s desire for white, I gave them a Thick Whisper White card base. I also added a layer of white, embossed with the Layered Leaves embossing folder, so they would have plenty to eat.
Between the card base and embossed leaves is a layer of the first challenge color, Grapefruit Grove. The second color is Lemon Lime Twist, which I used to make branches, cut with a die from the Animal Friends die set. And, the third color is Gina’s favorite, Pineapple Punch. There is a giraffe print die in the Animal Friends die set, which I used to cut this piece from Pineapple Punch cardstock. It is oh, so, cute!

Before gluing everything down, Gina wanted me to look at a lay-out she saw at Fab Friday. This would be perfect!

For the sentiment, they decided on “You’re the Best” from the Label Me Pretty stamp set. I stamped it with Lemon Lime Twist ink on Whisper White, and cut it with a Layering Circles die.
We used a piece of Grapefruit Grove from Nature’s Poem DSP to decorate the envelope, and Gina feels her card is ready to send.

If you would like supplies to make this card, keep scrolling, and click on the pictures. We appreciate you stopping by. Have a great day!
Product List
Jul 11, 2018 | Gallery, Hand-Crafted Cards |

Welcome to the Pals July 2018 Blog Hop. We’re having a “Pattern Party”. This month our creations will feature our favorite Designer Series Papers and coordinating embellishments from the new annual catalog from Stampin’ Up!
You may be starting the hop here or coming from a previous Pal’s blog. Either way, you’ve come to the right place. You’ll find the full line-up below to help you move, or “hop” along from Pal to Pal.
It was next to impossible to choose my favorite Designer Series Paper for this Blog Hop. But, I decided to go with the one I think is most unusual. Drum roll……………..it’s the Delightfully Detailed Laser-Cut Specialty Paper! When I first saw this paper at On Stage in April, I could hardly believe my eyes. I started imagining all kinds of possibilities for this unique paper. The first card I want to share today is using the Laser-Cut Paper as a stencil.

Delightfully Detailed Laser-Cut Paper as a stencil
Beginning this project, I placed a piece of the floral pattern on Whisper White cardstock, and used a Sponge Dauber with Powder Pink Ink. I held the “stencil” in place with my left hand, and daubed away with my right hand.

It would have been pretty as an entire card front, but I got carried away with the Detailed Trio Punch that’s in the Delightfully Detailed Suite (pp 38-39 in the catalog). So, I rounded the four corners of my stenciled piece, as well as the corners of my Thick Whisper White card base.
I was “delighted” to discover the flower shape in the stencil was very similar to the Eclectic Layers flower. See what I mean?

So, I die cut three Whisper White flowers, and lined them up on the left side.
The Thank You die was used to cut the words from Whisper White cardstock, blending in with the pattern.

My second card developed from left-overs. Remember how I sponge daubed on top of the Laser-Cut paper? Well, that Powder Pink pattern was too pretty to toss. So, with a snip, snip here, and a snip, snip there, it became my card front.

I used tiny dots of Liquid Glue to adhere it to Whisper White cardstock that I embossed with the Subtle embossing folder. Sahara Sand cardstock is the card base, and I tied the color in with the sentiment from Enjoy Life. The two smallest Layering Oval dies were used for “Thank you kindly.”

The cards could almost be twins, except I put the Detailed Trio Punch away, and left the corners square on the second card.

If you’d like to see more ideas on how to use the Laser-Cut Paper, just click on the pictures for details.

Laser-Cut Paper Pretty in Pink

Laser-Cut Specialty Paper with Brusho Crystal Color

How to Color Delightfully Detailed Laser-Cut Specialty Paper

Magical Mermaid
Thanks so much for stopping by my blog! I hope I’ve inspired you to have fun with the Delightfully Detailed Laser-Cut DSP.
Now it’s time to use the Blog Hop Line-up below to see what the rest of my Pals have chosen as their “favorite”. Don’t forget to show us some love by commenting on our creations.
Please click to leave a COMMENT HERE.
Mark your calendars for August 8, 2018 when we Cut it Out! Participants will showcase projects featuring “cuts” from punches, Framelits, Edgelits, or Thinlits. . Don’t miss the fun.
Blog Hop Line-up:
- Mary Fish at Stampin’ Pretty
- Su Mohr at Aromas And Art
- Peggy Noe at Pretty Paper Cards
- Karen Hallam at Karen’s Stamping Habit
- Beth McCullough at Stamping Mom
- Jennifer Michalski at Stamping Serenity
- Lori Pinto at LollyPop Paper and Ink
- Terri George at Stamp Me Crafty
- Mary Hanson at Up North Stampin’
- Lisa Ann Bernard at Queen B Creations
- Stesha Bloodhart at Stampin’ Hoot!
- Wendy Klein at Doggone Delightful Stampin’
- Leah O’Brien at Stamping By The Bay
- Nina King at InkPaperSequins
- Jackie Diediker at Stampin’ Jackie
- Rachael at Bluebonnet Stampin
- Lisa Milligan at Stamp Create Share
- Pamela Sadler at Stampin Pink Rose
- Susan Itell at Simple Stampin’
- Denise Hoepfner at The Mountain Magpie
Product List