Mar 20, 2018 | Gallery, Hand-Crafted Cards |
The idea for this Easter card began while I was on vacation. The song, Amazing Grace, kept running through my mind, and I thought of using the word “amazing” from our Celebrate You Die Set. And, guess where I would find the word, “grace.” Yep, the Labeler Alphabet Stamp Set!

Amazing Grace Easter Card with Cross of Hope
I really liked my wooden cross from a recent card I made, so I grabbed my brand new pack of Wood Textures DS Paper, and cut a cross using a cross from the Cross of Hope Die Set. I cut several and layered it, so it would look like a real piece of wood. I just read in our Stampin’ Up Success magazine that the Wood Textures DSP is carrying over to the new catalog. Yay! It will be available for another year! Since I was out of conservation mode, I used it as a layer on the Thick Whisper White card base.
The top layer would be Whisper White, and I stamped the beam of light from the Amazing You Stamp Set in Daffodil Delight. For some texture, I used the Simple Stripes Embossing Folder, which is also carrying over to the new catalog. Double Yay!

Are you curious about my rainbow words? This was inspired by the Paper Players challenge.

I used the Aqua Painter with five colors of ink, and painted across a piece of Glossy White cardstock. After it dried, I used the die from the Celebrate You Die Set (also carrying over to the new catalog, triple Yay!) to cut the word “amazing.” I layered it for thickness, and glued it over the cross. I really like the way it shines.
Next, the Labeler Alphabet Stamp Set comes into play. If you missed my tips on making it easy to use, here you go.
Tips on Using the Labeler Alphabet While Vacation Continues
I used a slightly different method this time, because I wanted each letter to be a different color. I left them on the sheet, but just pressed the letter I was using onto the ink pad. I needed to be careful when stamping on the cardstock to leave enough space for unwanted ink. Then, I cut them out individually.
I thought it was rather remarkable that the letters, G-R-A-C-E, fit perfectly between the stripes. God is full of surprises!
I used a piece of Painted Autumn DSP to decorate the envelope flap, stamped Happy Easter on the inside, and other than writing a personal note, my card is ready to send.

I hope you’ve been inspired by my Easter card. Have a wonderful day!

Mar 19, 2018 | Gallery, Hand-Crafted Cards |
I’m home from vacation, and I’ll be busy making Easter cards. I had wonderful grass on the brain (maybe because of golfing), so I pulled out last year’s Basket Builder die set, and cut three pieces from vellum. Then, I colored it with Light and Dark Old Olive Stampin’ Blends, and happily, it turned out like I imagined.
This card will be going to someone who is “egg-stra” special. Giggle, I just love puns!

You’re Egg-Stra Special
I adhered the sections of grass on a strip of Tear Tape, leaving the top of the blades free. I decided afterwards to emboss the background with The Pinewood Planks Embossing Folder, which probably should have been done first. But, I like the added texture, and it looks like a fence.
I made the cute basket with Wood Textures Designer Series Paper, and the eggs from Gold Foil. The Crumb Cake bunny and bow were stamped from the Basket Bunch Stamp Set. All of these were die cut with dies from the Basket Builder Set.
I colored the bunny with Light and Dark Crumb Cake Stampin’ Blends. Can you tell he’s chocolate candy? And, the eggs in the basket are chocolate candy, covered in Gold Foil.
I accented the grass with pretty, little flowers (Iridescent Sequins), and some strands of Gold Thread along the bottom.

I knew I wanted to say Happy Easter on the inside, but decided to take it a step further by using the oval Stitched Shape Die, and stamping it on an egg. Then, the little chick from the Basket Bunch Set hopped on top. For a touch more color, I added a strip of dotted DSP that matches the envelope flap.

Inspiration for this project was from two challenges:
I used Case this sketch!, inside and out.

I used the diagonal row: Metallics-Any type of Accents-Use Puns. How could I resist using a pun!?!

Thank you for stopping by my blog. On to making more Easter cards. I have a shipment of new things from Stampin’ Up! arriving tomorrow!
Mar 18, 2018 | Gallery, Hand-Crafted Cards |

Welcome to the Remarkable InkBig Blog Hop for March 2018. This month our theme is “Last Call for Sale-A-Bration,” and I couldn’t wait to get my hands on the new Springtime Foils Specialty Paper.
You may just be starting the blog hop here at my blog, Su Mohr, or may have come from the person previous to me in the list. If you get off track at any time, the full lineup below will help you move along from blog to blog so you see all the projects.
The UPS man showed up today with my most recent Sale-A-Bration order. The second release of Sale-A-Bration items included some gorgeous Foils, and I’ve been seeing some fabulous projects using these papers. It didn’t take long for me to put my project together.

Springtime Foils, Birds and Babies
I love the way this Springtime Foil looks with Smoky Slate cardstock, so that was my beginning. Then, the branches seemed to call for some birds, and I found them in the Birds & Blooms die set.

I cut Mama bird from Silver Glimmer Paper, and Baby bird from Gold Foil. Thoughts of mamas and babies turned this into an elegant baby card.
“Hello Baby” is from the Teeny Tiny Wishes stamp set, and I stamped it in Basic Black ink on the Springtime Foil Paper. I used the Classic Punch for cutting, and popped it up on Mini Dimensionals.

I’m really liking my shiny birds. Mama bird is reminding me of a Swarovski piece of jewelry. Baby bird needed to match the gold leaves.
Now that this was a baby card, it called for Gingham Ribbon in the matching Smoky Slate. How about that! I photographed this last picture with the Copper dotted Springtime Foil.

The last thing I did was decorate the envelope flap with dotted Smoky Slate Designer Series Paper. The envelope is showing in the first picture with the Silver Striped Springtime Foil in the background.
I want to thank you for taking part in our blog hop. Now hop along, because there are many amazing ideas and inspiration you don’t want to miss. Remember that currently, you are on my blog – Su Mohr at Aromas And Art, so check the blog hop line up list to see who is next on the list.
Mar 15, 2018 | Gallery, Hand-Crafted Cards |

I know you crafters understand when I tell you I’m anxious to get back to my paper and tools. I have an idea for an Easter card formulating in my mind, and it involves the Labeler Alphabet stamp set.
I posted on Facebook about this stamp set before I started my blog, so I thought it would be good to repeat my discovery here. If you aren’t familiar with it, this is what it looks like:

I love using the Labeler Alphabet, because I can create words for my cards that wouldn’t be available otherwise.
By trial and error, I came up with ways that make the stamp set easier to use.

I leave all of the letters in their neat, little rows on the clear plastic sheet. I turn the entire sheet of stamps onto the ink pad color of choice and gently press. I double press on top of the letters I’ll be using.
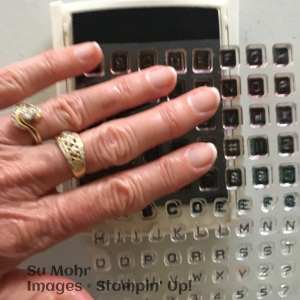
I carefully lift the sheet of stamps, and admire my cute little letters for a few seconds while they dry. 
Stampin’ Up! has fast drying ink, so the letters are ready for the next step almost immediately. I use my Stampin’ Snips to cut rows; top, bottom, and sides of the letters I’ll be using.

The Labeler Alphabet allows you to arrange words vertically, horizontally, or purposely crooked. I’ve even popped the letters up on Mini Dimensionals. Here is a recent project where I glued them horizontally.
“Thank You Sew Much” Thank You Card

I’m still having a fun vacation. I was sitting courtside to watch my favorite player, Feliciano Lopez. Not bad, huh?

I hope my tips have been helpful for you who have this stamp set. If you’d like to order it, you can go to my online store by clicking the shop button. The Labeler Alphabet is number 141936.
Have a great day!
Mar 14, 2018 | Gallery, Hand-Crafted Cards |

Welcome to the Pals March 2018 Blog Hop. Our theme this month is “Spring has Sprung”. The Stampin’ Pretty Pals will inspire you with Spring or Spring-related projects. You may see floral, Easter or other general Spring-inspired designs. You may be just starting or hopped over from another Pal. In either case you’ll find the line-up toward the end of my post to help you move along.
The Petal Palette Bundle is good for all seasons, but this project is saying “Spring Has Sprung.”

Spring has Sprung with the Petal Palette Bundle
I remember the first time I caught a glimpse of the Petal Passion Designer Series Paper. This fabulous black and white print was a backdrop at the Stampin Up! November OnStage. I couldn’t wait to see the entire collection revealed, and I wasn’t disappointed. The Petal Palette Stamp Set, the Petals & More Dies, and Petal Passion DSP were an instant favorite.
For today’s project, I used the Light Pool Party Stampin’ Blend to color the white background of the Petal Passion DSP in the square. The square was cut with a Layering Square Die, and the Crumb Cake frame was cut with a Stitched Shape Die. Doesn’t the stitching make it look like leather?

I used the branch die from from the Petals & More Die Set to cut the branch from Whisper White cardstock. I lifted the white branch, leaving the negative space against the Crumb Cake card base.
The sentiment and my favorite little bird are both from the Petal Palette stamp set. I stamped the sentiment in Crumb Cake Ink to match the card base. I used Thick Whisper White for the bird (Crumb Cake Ink and Pool Party Stampin’ Blend), so it could perch sturdily on the Linen Thread. It’s actually popped up on dimensionals. And, no fussy cutting, because the bird has a die in the Petals & More Die set.

I added a touch of sparkle with the Iridescent Sequins, which I just received in my last order. I picked out the bluish ones for this project, but they come multi-colored, and they are gorgeous in person.
The last detail was stamping the envelope flap with a branch from the same, wonderful, Petal Palette stamp set.

My family has numerous Spring birthdays, and “Life is so much better with you in it” is a perfect birthday sentiment, don’t you think?
Thank you so much for hopping with the Stampin’ Pretty Pals today. Please take a minute to mark your calendar for our next hop on April 11, 2018 for our Family First Hop. Now hop along using the Blog Hop Line-up below. Don’t forget to leave us a comment. We really like that.
Please click to leave a COMMENT HERE.
- Mary Fish at Stampin’ Pretty
- Rae Harper-Burnet at Wild West Paper Arts
- Wendy Klein at Doggone Delightful Stampin’
- Corinne Blake at The Creative Compendium
- Linda Suarez at All Night Stamping
- Jackie Beers at Blue Line Stamping
- Debbie Mageed at Secret Stamper
- Brian King at Stamp with Brian
- Stesha Bloodhart at Stampin’ Hoot!
- Su Mohr at Aromas And Art YOU ARE HERE
- Lori Pinto at LollyPop Paper and Ink
- Peggy Noe at Pretty Paper Cards
- Beth McCullough at Stamping Mom
- Jennifer Spiller at Westside Paper Creations
- Nina King at Ink Paper Sequins
- Rosanne Mulhern at Heartfelt Stamping
- Karen Hallam at Karen’s Stampin’ Habit!
- Sara Hicks Stuart at Sentiments by Sara
- Lisa Ann Bernard at Queen B Creations
- Pamela Sadler at Stampin Pink Rose
Mar 11, 2018 | Gallery, Hand-Crafted Cards |

Welcome to the Kre8tors March 2018 Blog Hop. This month we are featuring “birthdays,” which is the number one reason to send a card. Since about 50% of those having birthdays are men, I made a card that I believe a man would like, featuring the Lovely as a Tree stamp set.

Lovely as a Tree Birthday Card
Men seem to gravitate towards browns and greens, so I chose Always Artichoke cardstock for the card base. Then, I selected a piece of Wood Textures Designer Series Paper that was rather light and smooth, so the trees I stamped in Chocolate Chip ink would show nicely. The row of trees from Stampin’ Up’s Lovely as a Tree stamp set, is one that has been around a long time. The scene could be bordered in many different ways, but I used a die from the Card Front Builder Set.
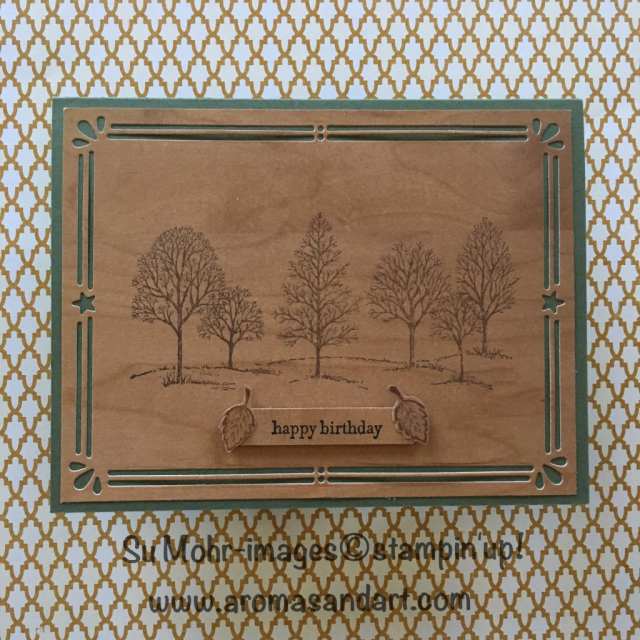
“Happy Birthday” from the Treeny Tiny Wishes stamp set was stamped on Wood Textures DSP, cut with the Classic Punch, and popped up on dimensionals. I stamped and fussy cut the two small leaves on the ends. This leaf is also in the Lovely as a Tree stamp set. I completed the inside with a sentiment, “Hoping Your Day Is Perfect, and stamped more leaves from Lovely as a Tree.

I decorated the envelope flap by embossing it with the Woodland embossing folder.

I recently completed another masculine card with Wood Textures DSP, and the Lovely as a Tree stamp set.

Lovely As A Tree
I received my second order of Wood Textures Designer Series Paper, so I’ll be making more of these much needed masculine birthday cards.
Thank you for visiting my blog, Su Mohr at Aromas And Art. I hope I’ve given you some inspiration.
Now hop along to see all of the fabulous ideas for birthday cards. You can click on the “next” button, and also see the complete list of participants below.

Melissa Tennison
Amy Grendel
Lisa Kmiec
Sandra Roberts
Jacqui Lawrence
Deb Naylor
Laura Kate Mackie
Kathy Maurer
Linda Handford
Alexandra Rauf
Su Mohr YOU ARE HERE
Jan Musselman
Shannon Cole
Rebecca-Jo Unwin
Tricia Butts
Hiske MacKay
Jackie Lawless
Maria Calia
Mary Trautner
Nichole Loe
Becky Browning





