Nov 7, 2025 | Gallery, Hand-Crafted Cards, Paper Pumpkin |
To see photos correctly, please click “read on blog.”
This month’s Paper Pumpkin “surprise” makes 9 cards: 3 each of 3 designs. The holiday cards have soft, flocked details that look like stitching.

Cozy Christmas
These timeless cards showcase traditional holiday style. With printed card bases, coordinating envelopes, pre-cut paper pieces, and twinkling red sequins, this all-inclusive crafting kit has the materials you need to continue making classic holiday cards.
Become a Paper Pumpkin subscriber, so you can order the refill. And, while we’re thinking about Christmas, Paper Pumpkin makes a great gift. It’s so much fun receiving a “surprise” in the mailbox!
Click to see Online Exclusives

Stampin’ Up! Craft Class coming November 20. Order the Brushed With Beauty Suite, and the class to craft along!

Happy Holidays!


Dec 26, 2024 | Artisan Projects, Gallery, Hand-Crafted Cards, Paper Pumpkin |
It was such fun creating alternative projects with the December Paper Pumpkin Kit, Notes From The Heart. I have instructions below, as well as products I used in addition to the kit.

#1 Project

Notes From The Heart
Instructions:
1. Use a card base from the kit. Emboss it with the Fern 3D Embossing Folder, and use a Blending Brush to color it with Mossy Meadow Ink.
2. Cut Basic White Cardstock, 3 1⁄2” X 4 1⁄2”. Make a stencil with the fern die from Merry Tags & More Dies. Use a Blending Brush with Mossy Meadow Ink to color three ferns on the Basic White Cardstock. Glue this to Blackberry Bliss Cardstock, 3 5⁄8” X 4 5⁄8”.
3. Attach the stenciled piece to the embossed card front with Dimensionals.
4. Use a Blending Brush to color a circular, sentiment label. Stamp “Just A Note” in Blackberry Bliss Ink on the label, and attach it with Dimensionals.
5. Attach three jewels from the kit.
#2 Project

Instructions:
1. Use the tag die from Merry Tags & More Add-On Dies to cut Blackberry Bliss Cardstock.
2. Color a rectangular sentiment label from the kit with a Blending Brush and the Blackberry Bliss Ink Spot from the kit. Then, stamp “Thank You” in Blackberry Bliss Ink, and glue it to the front of the tag.
3. Glue the floral arrangement from the kit to the front of the tag, and add gems from the kit to the flowers.
4. Glue a sentiment label to the back of the tag for a personal message, and tie Gold Trim through the hole at the top of the tag.
My December Host Code Gift
Place an order of $75.00 or more, before tax and shipping, and I will send you Iridescent Foil Gems in January. Please add my 8 digit Host Code to your order (found beneath my profile picture).

Last Chance products are now available; only while supplies last.

Special Release: Designer Series paper that has been recolored!

Click the picture to see the exciting, new, Online Exclusives! You can sort the list, so all of the new products will be first. And, don’t forget to check out the two new kits!

Thank you for stopping by.

Product List
Sep 29, 2024 | Gallery, Hand-Crafted Cards, Paper Pumpkin |
Today I am sharing Paper Pumpkin Artisan alternatives for the September Kit, Autumn Abundance. My cards are featured in a video below.

Autumn Abundance Fun Fold
Card #1 Instructions:
To create the fun fold, cut Cajun Craze Cardstock 8 1/2” X 5 1/2”. Score on the long side, 3″, 6″, 7 1/4″, and fold (mountain-valley).
Cut a 5 1/4″ X 2 /3″ piece from the timber card base in the kit, and glue it to the middle section of the fun fold card base. Cut a 5 1/4″ X 2 3/4″ piece of Very Vanilla Cardstock, and glue it to the inside of the fun fold. Decorate this with leaves from the kit, leaving space for a personal note.
For the top piece, use the 4″ X 8″ card base from the kit, cut the same size Cajun Craze Cardstock. Glue them together, and burnish the fold at 4″. Glue the bottom of the front, and the majority of the back to center of the fun fold card base. Be careful not to glue where there is open space.
Stamp “sending Autumn wishes your way,” from the kit, with the Cajun Craze Ink Spot, on Very Vanilla Cardstock. Use a Spotlight On Nature Die to cut the sentiment, and glue in the center of the circle.
Attach the snail, mushroom, and leaves (ephemera from the kit) with Dimensionals. For some sparkle, add three Adhesive-Backed Shiny Sequins.

For the inside, cut Very Vanilla Cardstock, 5 1/4″ X 2 3/4″. Glue in place, and decorate with ephemera from the kit.

Card #2 Instructions:

Begin with a card base of Pecan Pie Cardstock, 8 1/2″ X 5 1/2″, folded at 4 1/4″. Layer with Basic White Cardstock, cut with the largest Deckled Rectangles Die.
Prior to gluing, use kit ephemera as a stencil, coloring randomly with Blending Brushes and four colors of ink: Pecan Pie, Cajun Craze, Wild Wheat, and Copper Clay. Use the “throw away” border pieces from the kit as stencils, as well as stamps from the kit to add leaves and sprigs.
The sentiment, “with thanks,” is from the kit, stamped in Pecan Pie Ink on Basic White Cardstock. Use a Deckled Rectangles Die for cutting, and attach it with Dimensionals.
For the inside, glue Basic White Cardstock, cut with the largest Deckled Rectangles Die. Stamp two leaves from the kit, with Cajun Craze Ink from the kit, and your card is complete.

Click on the picture to see this Instagram video by @paperpumpkin:
My September Host Code Gift
Place an order of $75.00 or more, before tax and shipping, and I will send you Real Red & White Adhesive-Backed Peppermints in October. Please add my 8 digit Host Code to your order.

Take advantage of the Paper Pumpkin SALE, only until October 10. Click the picture for details!

Clearance Rack Refresh is going on now! Click this picture, then “specials,” to shop for the best selection.

Neil and Lily join with me in saying thank you for visiting.

Product List
Sep 12, 2024 | Gallery, Hand-Crafted Cards, Paper Pumpkin |
A holiday Paper Pumpkin sale is HERE! Starting September 11, 2024, at 12:01 a.m. (MT) until October 10, 2024, at 11:50 p.m. (MT), anyone who signs up for a monthly Paper Pumpkin subscription as a new subscriber will receive 40% off their first kit. That’s right, 40% OFF!
This discount will be applied to one kit in the first kit shipment of the Paper Pumpkin subscription, which means new subscribers will get 40% off the October Nests of Christmas Paper Pumpkin Kit. After that, each month’s kit will return to the regular price of $25.00. IMPORTANT! USE COUPON CODE: HOLIDAY 40
Paper Pumpkin is now giving us sneak peeks of upcoming kits for three months.
OCTOBER: Nests of Christmas
Subscribe September 11–October 10
Spread Christmas cheer with this cozy, all-inclusive crafting kit!
• Makes 10 cards: 5 each of 2 designs with 10 coordinating envelopes
• Tri-fold card bases and precut grosgrain ribbon
• Precut labels with specialty green foil
• Coordinating colors: Basic Black, Coastal Cabana, Granny Apple Green, Night
of Navy, Real Red, Shaded Spruce (Classic Stampin’ Spot)
Coordinates with the Nests of Winter Suite Collection (item 164072)!
NOVEMBER: Filled with Joy
Subscribe October 11–November 10
Celebrate Christmas with adorable stockings and gift tags!
• Makes 8 projects: 8 stockings with 8 gift tags
• Precut paper pieces
• Safety pins and specialty gold foil
• Coordinating colors: Flirty Flamingo, Pool Party, Poppy Parade
(Classic Stampin’ Spot), Shaded Spruce, Very Vanilla
Fabric stockings and paper tags come in a unique box!

DECEMBER: Notes from the Heart
Subscribe November 11–December 10
Create cards with hand-sketched botanical designs.
• Makes 9 projects: 3 each of 3 designs
• Precut vellum pieces and sparkling gems
• Scalloped card bases and coordinating envelopes
• Coordinating colors: Blackberry Bliss (Classic Stampin’ Spot), Flirty Flamingo,
Old Olive, Pecan Pie, Pretty in Pink, Very Vanilla
Includes hand-drawn designs and card bases with scalloped edges!


My September Host Code Gift
Place an order of $75.00 or more, before tax and shipping, and I will send you Real Red & White Adhesive-Backed Peppermints in October. Please add my 8 digit Host Code to your order.
Neil and Lily join with me in saying thank you for visiting.
Product List
Jun 26, 2024 | Artisan Projects, Gallery, Hand-Crafted Cards, Paper Pumpkin |
Today I am sharing Paper Pumpkin Artisan alternatives for the June Kit, Life Is Sweet.

Life Is Sweet Alternative

Instructions:
To create the fun fold, cut 8 ½” X 11” Thick Basic White Cardstock 8 1/2” X 5 1/2”. Score and fold at 4 ¼” and 6 ⅜”.
Cut 2024-2026 In Color 6”X 6” DSP, 2” X 5 ⅜”, and glue to the front fold. Cut a second pattern, 4 ⅛” X 5 ⅜”, and glue to the inside.
Glue green leaves from the kit to Thick Basic White Cardstock, 4 ¼” X 4 ¼”, and use the largest Spotlight On Nature Die to cut a circle. Cut a second circle of Thick Basic White Cardstock, and a third, smaller, circle from a kit card base in pink. Glue the pink circle to the white circle, and glue to the middle of the inside. Glue half of the front circle on the front flap, making sure it covers the inside circle evenly.
Adhere fruit from the kit: cherries to the front circle, and lemons to the inside circle
Stamp two sentiments from the kit, with the Shy Shamrock Ink Spot, on kit labels. Glue “sweet friend” to the bottom of “hello” from the kit, and attach with Mini Dimensionals from the kit. Glue “sending a big squeeze” on top of the lemons, and add a bow of Linen Thread, from the kit, to the lemon stem.


Instructions:
Begin with a card base from the kit. Layer with a card front from the kit, 5 ¼” X 4”, cut with six butterflies using a Thanks & Beyond add-on die.
Using a second Thanks & Beyond add-on die, cut “thanks” from kit envelope paper, backed with a Foam Adhesive Sheet. Peel the backing, and adhere in the middle of the card front.
Glue six Glimmer Paper ovals, from the kit, to the butterflies. These are punched “throw away” pieces from the Glimmer Paper words in the kit.
For the inside, glue a frame of leaves from the kit. Stamp “Life is so much sweeter with friends like you” from the kit, with the Shy Shamrock Ink Spot from the kit.
Decorate the envelope flap with 2024-2026 In Color DSP. Glue 5 ¾” X 2 ¼” DSP on the flap, then trim with Paper Snips Scissors, using the flap as a template.
My June Host Code Gift
Place an order of $75.00 or more, before tax and shipping, and I will send you the Eyelet 3D Embossing Folder, from the 2024-2025 Annual Catalog, in July. Please add my 8 digit Host Code to your order.

JUNE SALE 5-30

Get an additional 10% discount on stamp and die bundles (that’s a total of 20% discount!)
Save 10% on Stampin’ Cut & Emboss Machine and Mini Stampin’ Cut & Emboss Machine (white and Boho Blue).
Shop all qualifying bundles in my online store.
Thank you for visiting!

Products not in the kit. (The Thanks & Beyond Dies are a Paper Pumpkin Add-On).
Product List
Mar 27, 2024 | Gallery, Hand-Crafted Cards, Paper Pumpkin |
Today I am sharing Paper Pumpkin Artisan alternatives for the March Kit, Memorable Meadows.
Card #1
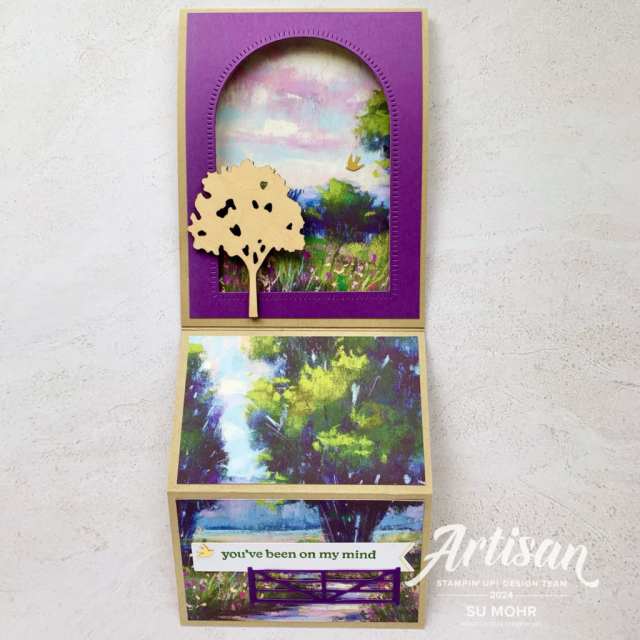
March Paper Pumpkin Alternative
Instructions:
1.To create the easel fold, cut 8 ½” X 11” Crumb Cake Cardstock in two pieces: 4 ¼” X 11”. Score and fold both at 5 ½”. Score additional 2 ¾” on piece #1, which is the front. Glue the 5 ½” side of piece #1 to a 5 ½” side of piece #2.
2. Use a Garden Meadows Die to Cut the arch on the front side of the 5 ½” card base. Use the same die to cut Gorgeous Grape Cardstock (4” X 5 ¼”) and glue in place. On the side of the arch, glue the edge of the “wood” tree.
3. Cut a Kit card base: one piece, 4” X 5 ¼”, and two pieces 4” X 2 ½”. Glue to the Crumb Cake card base. Stamp the sentiment from the kit, with the Garden Green Ink Spot, on a kit label, and glue in place.
4. Use a Garden Meadows Die to cut the fence from a kit label. Embellish with Adhesive-Backed Birds.
5. The easel back fold will fit into a kit envelope, but use extra postage.

Card #2

Instructions:
1.Cut card base from Crumb Cake Cardstock, 8 ½” X 5 ½”, folded at 4 ¼”. Layer with Basic White Cardstock, 5 ¼” X 4”.
2.Using a Love Of Spring add-on die, cut four daisies from the kit card base, and attach with Dimensionals.
3.Stamp the kit sentiment with the kit ink spot on a kit label, and attach with Dimensionals.
4.Use a Love of Spring kit add-on die to cut several layers of Crumb Cake Cardstock, to create the flower. Top it with Gold Foil, and glue it in place.
5.Using a kit stamp, stamp dots of Crumb Cake Ink. Embellish with kit sequins, and Adhesive-Backed Dragonflies.
6.Stamp a kit flower on the envelope in Crumb Cake Ink. Use Stampin’ Blends to color.

My March Host Code Gift
Place an order of $75.00 or more, before tax and shipping, and I will send you the Adhesive-Backed Dragonflies & Birds in April (90 pieces). Please add my 8 digit Host Code to your order.

Here is my Online Exclusives Link. Click now to see the current offerings, and beginning March 5th, you’ll see all of the new products.

Thank you for visiting!

Products not in the kit. (The Love Of Spring Dies are a Paper Pumpkin Add-On).
![Cozy Christmas Paper Pumpkin Refill [ 167841 ]](https://i0.wp.com/assets1.tamsnetwork.com/images/EC042017NF/167841s.jpg?w=140&ssl=1 "Cozy Christmas Paper Pumpkin Refill [ 167841 ]")
![Paper Pumpkin Subscription [ 166815 ]](https://i0.wp.com/assets1.tamsnetwork.com/images/EC042017NF/166815s.jpg?w=140&ssl=1 "Paper Pumpkin Subscription [ 166815 ]")
![Paper Pumpkin 3 Month Subscription [ 166816 ]](https://i0.wp.com/assets1.tamsnetwork.com/images/EC042017NF/166816s.jpg?w=140&ssl=1 "Paper Pumpkin 3 Month Subscription [ 166816 ]")
![Paper Pumpkin 6 Month Subscription [ 166817 ]](https://i0.wp.com/assets1.tamsnetwork.com/images/EC042017NF/166817s.jpg?w=140&ssl=1 "Paper Pumpkin 6 Month Subscription [ 166817 ]")
![Paper Pumpkin 12 Month Subscription [ 166818 ]](https://i0.wp.com/assets1.tamsnetwork.com/images/EC042017NF/166818s.jpg?w=140&ssl=1 "Paper Pumpkin 12 Month Subscription [ 166818 ]")


 Trim Combo Pack")


 Designer Series Paper")


