Feb 13, 2022 | Gallery, Hand-Crafted Cards |

For this month’s Stamping Sunday Blog Hop, we’re showing projects using Soft Pastels. You’ll find the line-up below to see what the other designers created. I designed two different cards, using the same coloring technique.
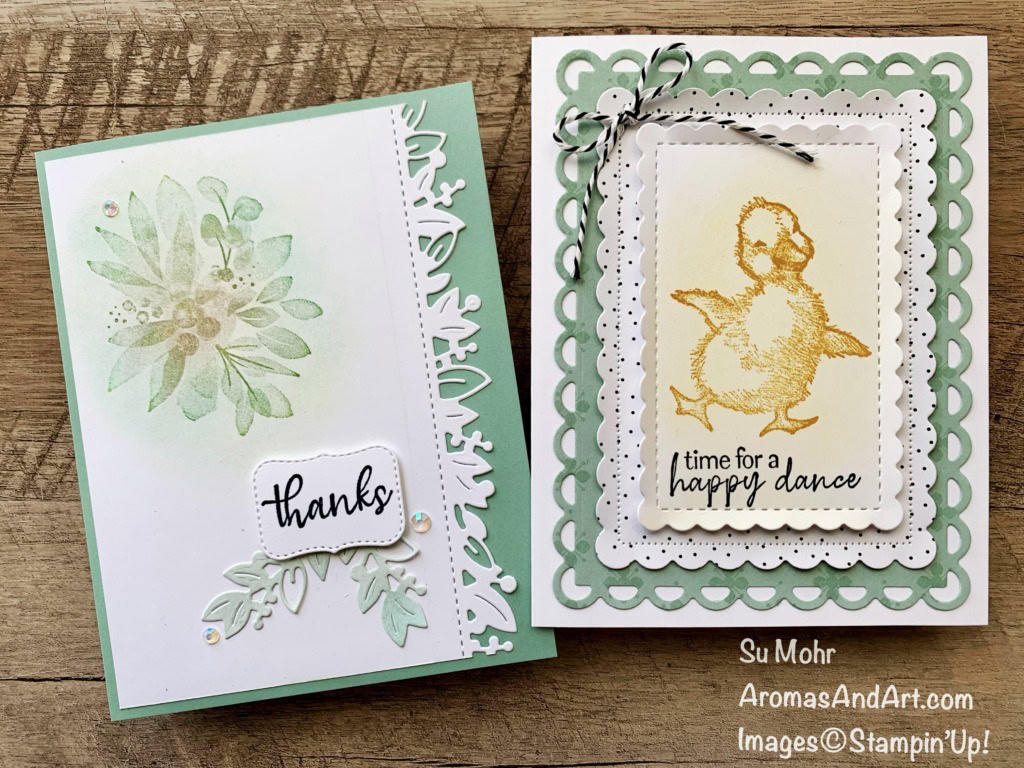
Coloring with Soft Pastels
Quack, from the Easter Friends Stamp Set, wanted to be first to share his card. He thought you would appreciate his happiness, and love of dancing.
First, I made him come to life by stamping him in VersaMark on Basic White Cardstock, while he was placed on the Stamparatus.
Second, I added Daffodil Delight powder from a Soft Pastel stick, using a Sponge Dauber. After wiping the loose powder free with a tissue, I stamped Quack in Bumblebee Ink, while he was still on the Stamparatus. Then, I stamped the sentiment in Memento Black Ink. “Time for a happy dance” is from the Flowing Flowers Stamp Set, and Quack said it was just what he wanted to say.
Finally, I used the third largest Scalloped Contours Die to cut him free, and placed him on Dimensionals.

Next, I used the second largest Scalloped Contours Die to cut Pattern Party Designer Paper, and the largest Scalloped Contours Die to cut Subtles (Mint Macaron) 6″ X 6″ Designer Paper.
Do you see the perforated edges on the second and third largest die cuts? You can bend them to give some added dimension.
After gluing, and attaching, the layers to the Basic White card base (8 1/2″ X 5 1/2″, folded at 4 1/4″), I added a bow of Playful Pets Trim, per Quack’s request. He is happy indeed!

For my second card, I stamped the pretty foliage from the Eden’s Garden Stamp Set in VersaMark on Basic White Cardstock, 4″ X 5 1/4″. Then, I used the powder from three Soft Pastels for coloring with Sponge Daubers: Granny Apple Green, Mossy Meadow, and Poppy Parade. After wiping away the excess powder with a tissue, I trimmed the right edge with an Eden’s Garden Die.
After cutting the edge, I glued the layer to a Mint Macaron card base, 8 1/2″ X 5 1/2″, folded at 4 1/4″.

Because the edge had stitching, I wanted the sentiment to have it also, and found this die in the the Potted Succulents Die Set. “Thanks” is from the Simply Succulents Stamp Set, which I stamped in Memento Black Ink.
The sprigs beneath the sentiment were cut with an Eden’s Garden Die, colored with Soft Pastel powder on a Sponge Dauber, and glued in place.
Iridescent Rhinestones were the final touch.

I’m excited to see how the other Stamping Sunday designers used Soft Pastels. Please join me by clicking on the names below.
My February Host Code Gift
Just type the current host code (found beneath my profile picture) in the box provided, on your order of $75.00 or more, and I will send you the Butterflies & Flowers Layering Decorative Masks in March.
Create textured and colored backgrounds with Butterflies & Flowers Layering Decorative Masks. These stencils are an easy way to blend colors on your cards and other paper crafting projects. You can use the background masks on their own. But your images will really pop when you layer the detailed masks over the backgrounds to get even more depth and dimension. Use with Classic Stampin’ Ink and coloring tools such as Blending Brushes and Sponge Daubers for beautiful color. You can also use them with Embossing Paste and Palette Knives for textured designs.

Would you like to join my team? Order the $99 Starter Kit and join Stampin’ Up! through me, CLICK HERE!
If you’re ready to say “yes,” you’ll be rewarded with an additional, TWO CURRENT STAMP SETS of your choice, during Sale-a-bration.
This offer ends February 28, 2022.

Thank you for stopping by! Stay warm!

Click here to shop today!

Product List
Feb 12, 2022 | Gallery, Hand-Crafted Cards |
Today’s card features the Calming Camellia Stamp Set (158117), which is the FREE Host Set from pg. 17 of the Sale-a-bration brochure. It can be earned for FREE with a qualifying order of $300 or more, from an individual order, or a group order with friends.
I began by stamping the Camellias in Soft Sea Foam on Basic White Cardstock, and cutting with a Nature’s Thoughts Die. The die is the right size for the flowers, and gives a pretty detailed border, don’t you think?

Calming Camellias
After stamping the flowers, I stamped a curlicue in Calypso Coral Ink, inspired by the colors in this week TGIF color challenge.
I stamped the sentiment from the stamp set, “Lovely you,” in Calypso Coral also, and used a Messages Die for cutting.
The Messages Die is unusual, because all of the labels are attached, and meant to be cut at the same time. I prefer using it with one sentiment at a time, and place my stamped sentiment on a small piece of paper beneath one label for cutting. It has a great variety of sizes, which you can see in my Product List below.

Next, I attached the sentiment with Dimesionals, as well as the camellias, to the card base.
The card base is Smoky Slate Cardstock, 8 1/2″ X 5 1/2″, folded at 4 1/4″. I used the Stitched Greenery Die to add interest, and texture, to the card front. This die is fun to use, because it acts like an embossing folder. I love the stitched pattern, don’t you?

My February Host Code Gift
Just type the current host code (found beneath my profile picture) in the box provided, on your order of $75.00 or more, and I will send you the Butterflies & Flowers Layering Decorative Masks in March.
Create textured and colored backgrounds with Butterflies & Flowers Layering Decorative Masks. These stencils are an easy way to blend colors on your cards and other paper crafting projects. You can use the background masks on their own. But your images will really pop when you layer the detailed masks over the backgrounds to get even more depth and dimension. Use with Classic Stampin’ Ink and coloring tools such as Blending Brushes and Sponge Daubers for beautiful color. You can also use them with Embossing Paste and Palette Knives for textured designs.
Would you like to join my team? Order the $99 Starter Kit and join Stampin’ Up! through me, CLICK HERE!
If you’re ready to say “yes,” you’ll be rewarded with an additional, TWO CURRENT STAMP SETS of your choice, during Sale-a-bration.
This offer ends February 28, 2022.
Thank you for stopping by! Stay warm!
Click here to shop today!
Product List
Feb 11, 2022 | Gallery, Hand-Crafted Cards |
I love Hawaii, and the reduced plane fares make it very inviting. But, for now, I’ll use my imagination with paper, and create a clean & simple card.
The first thing I did was cut two palm fronds from New Horizons Designer Paper, using a Palms Die. Love this die!
Second, I cut a square of New Horizons DSP in the colors of a yellow and pink sunset, 1 3/4″ X 1 3/4″. Then, I backed it with cardstock, and placed it on Dimensionals.

Hawaiian Color
Third, I cut “aloha” from blue, new Horizond DSP, with an In The Tropics Die. This die set is a favorite from the annual catalog, and can mix beautifully with the new set, don’t you think?
After cutting “aloha,” I glued it to and oval that was cut with the Double Oval Punch, from another piece of New Horizons DSP. Then, I backed it with cardstock, and placed it on Dimensionals.

Fourth, I cut the strip behind the sunset from wood textured, In Good Taste Designer Paper. This is also a Palms Die. You can see the entire set in my Product List below. You can buy it in a bundle with its coordinating stamp set, Paradise Palms, for a 10% savings. The bundle number is 157718.
The background is Basic White Cardstock, 4″ X 51/4″, layered on In Good Taste Designer Paper that is 1/8″ larger, giving a 1/16″ border. Before gluing, I embossed 2/3 of the white layer with the Gingham Embossing Folder. Then, I glued the wood textured strip along the top of the embossing, snipping an end to make it 4″.
The card base is Thick Basic White Cardstock, 8 1/2″ X 5 1/2″, folded at 4 1/4″.

For some Hawaiian sparkle, I added three Artistry Blooms Sequins. This card relaxes me, just looking at it.

I was inspired by Freshly Made Sketches.

My February Host Code Gift
Just type the current host code (found beneath my profile picture) in the box provided, on your order of $75.00 or more, and I will send you the Butterflies & Flowers Layering Decorative Masks in March.
Create textured and colored backgrounds with Butterflies & Flowers Layering Decorative Masks. These stencils are an easy way to blend colors on your cards and other paper crafting projects. You can use the background masks on their own. But your images will really pop when you layer the detailed masks over the backgrounds to get even more depth and dimension. Use with Classic Stampin’ Ink and coloring tools such as Blending Brushes and Sponge Daubers for beautiful color. You can also use them with Embossing Paste and Palette Knives for textured designs.
Would you like to join my team? Order the $99 Starter Kit and join Stampin’ Up! through me, CLICK HERE!
If you’re ready to say “yes,” you’ll be rewarded with an additional, TWO CURRENT STAMP SETS of your choice, during Sale-a-bration.
Thank you for stopping by! Stay warm!
Click here to shop today!
Product List
Feb 10, 2022 | Gallery, Hand-Crafted Cards |
The Friendly Hello Sale-a-bration Bundle is so pretty I keep gravitating towards it. The great news is, it’s FREE with a $100 order! You can see all of the paper and stamps in the bundle by clicking on the picture in my Product List below.
Today’s card spotlights the bird against a gorgeous background.
I began with a Fresh Freesia card base, 8 1/2″ X 5 1/2″, folded at 4 1/4″. Then, I used the largest Scalloped Contours Die to cut my favorite, Pool Party pattern.

Spotlighted Bird
The backside of the Pool Party pattern is the one I used to cut the bird with a Layering Circles Die, a 2 1/8″ circle. The circle is bordered with Fresh Freesia Cardstock, cut with a scalloped Layering Circles Die that is a spec larger than the plain circle.
Next, I decided on the sentiment from the Friendly Hello Stamp Set, “HELLO friend.” Appropriate, huh? I stamped it in Shaded Spruce Ink, using my Stamparatus so it would be nice and dark.

For a little something extra, I used a Birds & More Die to cut a branch from another pattern of Friendly Hello Designer Paper. It’s the one I’m using for photography.

Today’s card was also made for a monthly ZOOM meeting. This month we were given a Tic Tac Toe challenge, where everyone participated by making a card and presenting it to the group. I used the middle row down: Circle-FREE-SAB item. Join my team, and join the fun; click on the link below!

My February Host Code Gift
Just type the current host code (found beneath my profile picture) in the box provided, on your order of $75.00 or more, and I will send you the Butterflies & Flowers Layering Decorative Masks in March.
Create textured and colored backgrounds with Butterflies & Flowers Layering Decorative Masks. These stencils are an easy way to blend colors on your cards and other paper crafting projects. You can use the background masks on their own. But your images will really pop when you layer the detailed masks over the backgrounds to get even more depth and dimension. Use with Classic Stampin’ Ink and coloring tools such as Blending Brushes and Sponge Daubers for beautiful color. You can also use them with Embossing Paste and Palette Knives for textured designs.
Would you like to join my team? Order the $99 Starter Kit and join Stampin’ Up! through me, CLICK HERE!
If you’re ready to say “yes,” you’ll be rewarded with an additional, TWO CURRENT STAMP SETS of your choice, during Sale-a-bration.
This offer ends February 28, 2022.
Thank you for stopping by! Stay warm!
Click here to shop today!
Product List
Feb 9, 2022 | Gallery, Hand-Crafted Cards, Pals Blog Hop |
Welcome to the Stampin’ Pretty Pals’ Blog Hop! This month, the theme is Birthday Bash. We really hope that you enjoy and will be inspired by them! As you hop from blog to blog, we would appreciate your comments because we enjoy hearing from you. You will find the lineup at the end of my post to help you “hop” along from Pal to Pal.
Today’s birthday card uses the gorgeous, New Horizons Designer Paper, on one of my favorite fun fold cards, the Double Z-Fold. This could be a great birthday card for a special guy in your life. Hopefully, my instructions will be clear, and you’ll be inspired to give it a try.

Double Z-Fold
First, I cut a piece of 8 1/2″ X 11″ Evening Evergreen Cardstock in half, 4 1/4″ X 11″, and scored it at 2 3/4″ and 5 1/2″. You can use the other half to make a second card.
The two smaller panels were decorated with scenic, New Horizons Designer Paper, 2 1/2″ X 4″. For some added detail, I stamped birds, from the On The Horizon Stamp Set, in Night of Navy Ink on the front panel. And a sun, from the Paradise Palms Stamp Set, in Pale Papaya Ink on the inside panel.
I cut a fourth panel, 2 1/2″ X 4″, to glue to the backside for writing personal messages.
The large panel was created with a Grove Die and another pattern of New Horizons Designer Paper, 5 1/4″ X 4″.
After gluing the New Horizons DSP to the panels, I cut a band for the bottom, 11″ X 1 1/2,” scored at 5 1/2″ and 2 3/4″. I decorated the band with three strips from the same New Horizons DSP. The long strip is 5 1/4″ X 1″, and the two shorter strips are 2 1/2″ X 1″. This paper is wonderful, and you can see all of the patterns in my Product List below.

The trickiest part of the Double Z-Fold is fastening the band. It seems odd, but the long section of the band is glued to the short front section. I find it easiest to apply glue to the folded band, because this exposes only the part that should have glue. Then, fold the card while adhering the band in place. I suggest having a “dry” run before applying glue.
“Happy Birthday” is from the Artistically Inked Stamp Set, stamped in Evening Evergreen Ink on New Horizons DSP, and cut with a Stitched Rectangles Die. I layered it with cardstock for thickness prior to attaching it with Dimensionals.

To complete my card, the sweet deer were cut with Grove Dies from wood textured, In Good Taste Designer Paper. I layered them with cardstock, for thickness, before gluing them in place.
Incidentally, the Double Z-Fold card will fit right inside our Medium Envelopes. YAY!

Thanks for hopping by today! Stay warm!

More inspiration awaits, so use the lineup below to visit the rest of the Design Team. The Pals are excited to show you what they’ve created! Then, please mark your calendars for our next blog hop on March 9th. Our theme will be Cute Critters where our Design Team creates a project with any kind of animals, birds, butterflies or insects.
Until then, have fun in your craft space.
Stampin’ Pretty Pals Blog Hop
- Mary Fish at Stampin’ Pretty
- Karen Hallam at Karen’s Stamping Habit
- Su Mohr at Aromas And Art
- Jill Loveland at Simple Stamping
- Windy Ellard at Windy’s Wonderful Creations
- Terri George at Stamp Me Crafty
- Sue Jackson at Just Peachy Stamping
- Jeanie Stark at Just Stampin’
- Mary Hanson at Up North Stampin’
- Melissa Seplowitz at The Stamping Ninja
- Lori Pinto at LollyPop Paper and Ink
- Beth McCullough at Stamping Mom
- Stesha Bloodhart at Stampin’ Hoot!
- Debbie Mageed at Secrets to Stamping
- Megan Cooper at Lazy Daze Stampin’
- Tricia Chuba at ButterDish Designs
- Peggy Noe at Pretty Paper Cards
- Deb Walker at Deb Stamps Life
- Amanda Howard at Papercrafting With Amanda
- Debbie Crowley at expressively deb…
- Rae Burnet at Wild West Paper Arts
- Jackie Beers at Blue Line Stamping
- Ann Murray at Murray Stamps INK
- Pamela Sadler at Stampin Pink Rose
- Lisa Ann Bernard at Queen B Creations
Product List
Feb 8, 2022 | Gallery, Hand-Crafted Cards |
Today is my Mama’s birthday. She would have been 96, and I know she would like to hear me saying these words to her in Heaven. The Sale-a-bration, Sunshine & Rainbows Designer Paper, is “happy” paper, and perfect for today’s card.
The first thing I did was cut the colorful, dotted paper, with a Bouquet Of Love heart die. Then, I backed the heart with cardstock, and placed it on Dimensionals.

For Mama in Heaven
The striped paper beneath the heart is also Sunshine & Rainbows Designer paper, cut with an Ornate Layers Die. You can see all of the beautiful patterns in my Product List, where you’ll also see the price is $0.00, because it’s FREE with a qualifying order of $50!

Next, I used a second, Ornate Layers Die to cut the middle from the die-cut, striped paper. Then, I used that second die to cut from Basic White Cardstock, where I would stamp the sentiment in Memento Black Ink, and glue it inside the striped paper. This is known as the “inlaid technique.”
“You make my heart happy” is from the Sale-a-bration stamp set, Catching Butterflies. This is another FREE item with a qualifying purchase of $50, which is pictured in my Product List below.

The background is Basic White Cardstock, cut with the third, and largest, Ornate Frames Die. Then, I gave it texture with the Tasteful Textile Embossed Folder, and glued it to a Thick Basic White card base, 8 1/2″ X 5 1/2″, folded at 4 1/4″.
For a final touch, I added three Iridescent Rhinestones.

I was inspired by the sketch at Fusion.

And, the theme at Paper Players.

My February Host Code Gift
Just type the current host code (found beneath my profile picture) in the box provided, on your order of $75.00 or more, and I will send you the Butterflies & Flowers Layering Decorative Masks in March.
Create textured and colored backgrounds with Butterflies & Flowers Layering Decorative Masks. These stencils are an easy way to blend colors on your cards and other paper crafting projects. You can use the background masks on their own. But your images will really pop when you layer the detailed masks over the backgrounds to get even more depth and dimension. Use with Classic Stampin’ Ink and coloring tools such as Blending Brushes and Sponge Daubers for beautiful color. You can also use them with Embossing Paste and Palette Knives for textured designs.
Would you like to join my team? Order the $99 Starter Kit and join Stampin’ Up! through me, CLICK HERE!
If you’re ready to say “yes,” you’ll be rewarded with an additional, TWO CURRENT STAMP SETS of your choice, during Sale-a-bration.
Thank you for stopping by! Stay warm!
Click here to shop today!
Product List
")
")


 Designer Series Paper")


 Host Designer Series Paper")


")


 Designer Series Paper")

")


")

")


")


 Designer Series Paper")


