Feb 19, 2022 | Gallery, Hand-Crafted Cards, TGIF |
Have you gotten your FREE Sale-a-bration products? Better hurry, because the special deal ends February 28th. There are 9 products from which to choose, for every $50 or $100 order. You can click on the pictures, in my Product List below, to see the details on each one. You’ll recognize them, because the price is $0.00.
Today’s card features two of the Sale-a-bration products: Special Moments and Daffodil Afternoon.
I began with a Very Vanilla card base, 8 1/2″ X 5 1/2″, folded at 4 1/4″, topped with Polished Pink Cardstock, 3 3/4″ X 5″. This was layered with a beautiful pattern of Daffodil Afternoon Designer Paper, 1/8″ smaller, giving the pattern a 1/16″ pink border.

Next, I used my Paper Snips, and cut three daffodils from the Daffodil Afternoon DSP that matched three of the flowers on my card front. Before gluing the layers together, I attached the daffodils with Dimensionals, and trimmed the edges. They are visible in my last photo.

Daffodil Afternoon
For the sentiment, I stamped, “for someone who is wonderful in each and every way,” in Memento Black Ink on Very Vanilla Cardstock, and used an Ornate Frames Die for cutting. The frame was cut with an Ornate Frames Die from Polished Pink Cardstock. They were glued together, and attached to the card front with Dimensionals.

Now, you can see the dimension of the three daffodils I fussy cut; two on the lower right, and one at the top. They are much easier to see in person.

I was inspired by TGIF.

My February Host Code Gift
Just type the current host code (found beneath my profile picture) in the box provided, on your order of $75.00 or more, and I will send you the Butterflies & Flowers Layering Decorative Masks in March.
Create textured and colored backgrounds with Butterflies & Flowers Layering Decorative Masks. These stencils are an easy way to blend colors on your cards and other paper crafting projects. You can use the background masks on their own. But your images will really pop when you layer the detailed masks over the backgrounds to get even more depth and dimension. Use with Classic Stampin’ Ink and coloring tools such as Blending Brushes and Sponge Daubers for beautiful color. You can also use them with Embossing Paste and Palette Knives for textured designs.

Would you like to join my team? Order the $99 Starter Kit and join Stampin’ Up! through me, CLICK HERE!
If you’re ready to say “yes,” you’ll be rewarded with an additional, TWO CURRENT STAMP SETS of your choice, during Sale-a-bration.
This offer ends February 28, 2022.

Thank you for stopping by! Stay warm!

Click here to shop today!

Product List
Feb 18, 2022 | Gallery, Hand-Crafted Cards |
I can’t forget my favorite birds from the Birds & Branches Stamp Set. Aren’t they adorable sitting on their branch? The branch is from the coordinating set, Bird & More Dies, cut from Thick Basic White Cardstock, and embellished with Iridescent Rhinestones.

“just a little hi”
But, the first thing I did was stamp the birds in Early Espresso Ink on Basic White Cardstock, use their Birds & More Dies for cutting, and place them on Dimensionals. After experimenting with adding color, I decided they were best left alone.
Next, I cut the background from Basic White Cardstock, 4 ” X 5 1/4″, and used the third largest Layering Circles Die to make a 2 1/4″ hole.

To add foliage for the birds, I used the Stitched Greenery Die. If you haven’t heard me say this before, it’s a cool die that works like an embossing folder, when you run it through the Stampin’ Cut & Emboss Machine.
Next, to make the sky, I cut Simply Marbleous Designer Paper a sliver smaller than 4″ X 5 1/4″, and glued it to the Stitched Greenery layer. I do the “sliver cut” to insure the edges of the paper beneath aren’t showing.
The card base is Balmy Blue Cardstock, 8 1/2″ X 5 1/2″, folded at 4 1/4″.

“Just a little hi from me” is from the Sale-a-bration, Special Moments Stamp Set, FREE with a qualifying order of $100.00. You can see all 21 sentiments in my Product List below. It’s a great set!
I stamped the words in Early Espresso Ink, and used the smallest Layering Circles Die for cutting. Before gluing it in place, I backed it with Balmy Blue Cardstock, cut with the smallest, scalloped, Layering Circles Die.

I was inspired by Fusion.

My February Host Code Gift
Just type the current host code (found beneath my profile picture) in the box provided, on your order of $75.00 or more, and I will send you the Butterflies & Flowers Layering Decorative Masks in March.
Create textured and colored backgrounds with Butterflies & Flowers Layering Decorative Masks. These stencils are an easy way to blend colors on your cards and other paper crafting projects. You can use the background masks on their own. But your images will really pop when you layer the detailed masks over the backgrounds to get even more depth and dimension. Use with Classic Stampin’ Ink and coloring tools such as Blending Brushes and Sponge Daubers for beautiful color. You can also use them with Embossing Paste and Palette Knives for textured designs.
Would you like to join my team? Order the $99 Starter Kit and join Stampin’ Up! through me, CLICK HERE!
If you’re ready to say “yes,” you’ll be rewarded with an additional, TWO CURRENT STAMP SETS of your choice, during Sale-a-bration.
This offer ends February 28, 2022.
Thank you for stopping by! Stay warm!
Click here to shop today!
Product List
Feb 17, 2022 | Gallery, Hand-Crafted Cards |
Just when you think you don’t need another flower stamp set, one pops up that you have to have! Today’s card is featuring the Ranunculus Romance Bundle, with more to offer than just a pretty flower. You can see the entire bundle in my Product List below.

Softly Speaking
I began by stamping the ranunculus in Gray Granite Ink on Sale-a-bration, Simply Marbleous Designer Paper. This is one of the FREE items for a qualifying $50 purchase, and you’ll want to order right away, because Sale-a-bration ends February 28.
After stamping the flowers on the pink marble, I used a Stitched So Sweetly Die for cutting. And, I used a second, larger, die to cut a layer from Neutrals 6″X6″ DSP in Gray Granite.

Next, I stamped the French postmarks, from the Ranunculus Romance Stamp Set, in Gray Granite Ink on Basic White Cadstock. Then, I used the Ranunculus Die for cutting, and placed them on Dimensionals.

The background is Vellum Layering Designs, 4″ X 5 1/4″, glued to a Gray Granite card base, 8 1/2″ X 5 1/2″, folded at 4 1/4″. To keep the glue from showing through the Vellum, the glue is beneath the layers in the middle, and not on the outside border.
The sentiment, “with much love” is from the Through It Together Stamp Set, stamped in Gray Granite Ink on Basic White Cardstock. I used the Messages Die for cutting, glued it in place, and added a single Iridescent Rhinestone.

I was inspired by Freshly Made Sketches.

My February Host Code Gift
Just type the current host code (found beneath my profile picture) in the box provided, on your order of $75.00 or more, and I will send you the Butterflies & Flowers Layering Decorative Masks in March.
Create textured and colored backgrounds with Butterflies & Flowers Layering Decorative Masks. These stencils are an easy way to blend colors on your cards and other paper crafting projects. You can use the background masks on their own. But your images will really pop when you layer the detailed masks over the backgrounds to get even more depth and dimension. Use with Classic Stampin’ Ink and coloring tools such as Blending Brushes and Sponge Daubers for beautiful color. You can also use them with Embossing Paste and Palette Knives for textured designs.
Would you like to join my team? Order the $99 Starter Kit and join Stampin’ Up! through me, CLICK HERE!
If you’re ready to say “yes,” you’ll be rewarded with an additional, TWO CURRENT STAMP SETS of your choice, during Sale-a-bration.
This offer ends February 28, 2022.
Thank you for stopping by! Stay warm!
Click here to shop today!
Product List
Feb 16, 2022 | Gallery, Hand-Crafted Cards |
Color challenges are a great source of inspiration for card designing. Today, I needed to combine Bermuda Bay, So Saffron, and Mint Macaron, so started formulating an idea that would include these colors.
I began by using a Blending Brush and Bermuda Bay Ink to make a soft, blue background on Basic White Cardstock, 5 1/4″ X 3 1/2″.

Sunlight Through Trees
Next, I used the large, Grove Die to cut from Expressions In Ink Designer Paper in a Mint Macaron pattern, 5 1/4″ X 3 1/2″.
Before gluing the trees to the blue sky, I decided to incorporate So Saffron, by using a Blending Brush and ink, to create sunlight coming through the trees.

After making the sunlight, I glued my art piece to a Thick Basic White card base, 8 1/2″ X 5 1/2″, folded at 4 1/4″, giving it a 1/8″ border on the top and sides, leaving the bottom for the sentiment.
“You made my day!” is from the Ornate Thanks Stamp Set, stamped in Memento Black Ink, and cut with the Messages Die. This unusual die has wonderful labels for long, narrow, sentiments, which you can read about by clicking on its picture in my Product List below.

To complete my card, I couldn’t help but add a Brushed Brass Butterfly.

I was inspired by the Paper Players.

My February Host Code Gift
Just type the current host code (found beneath my profile picture) in the box provided, on your order of $75.00 or more, and I will send you the Butterflies & Flowers Layering Decorative Masks in March.
Create textured and colored backgrounds with Butterflies & Flowers Layering Decorative Masks. These stencils are an easy way to blend colors on your cards and other paper crafting projects. You can use the background masks on their own. But your images will really pop when you layer the detailed masks over the backgrounds to get even more depth and dimension. Use with Classic Stampin’ Ink and coloring tools such as Blending Brushes and Sponge Daubers for beautiful color. You can also use them with Embossing Paste and Palette Knives for textured designs.
Would you like to join my team? Order the $99 Starter Kit and join Stampin’ Up! through me, CLICK HERE!
If you’re ready to say “yes,” you’ll be rewarded with an additional, TWO CURRENT STAMP SETS of your choice, during Sale-a-bration.
This offer ends February 28, 2022.
Thank you for stopping by! Stay warm!
Click here to shop today!
Product List
Feb 15, 2022 | Gallery, Hand-Crafted Cards, TGIF |
I was asked to make a St. Patrick’s Day card, so I pulled out Garden Green Cardstock and Ink, and started thinking.
To make a four leaf clover, I used Regals 6X6 Designer Paper, and a Bouquet Of Love Die to cut four hearts. After folding the hearts in half, I placed them on Dimensionals, one on each side of the heart. The stem was cut from Garden Green Cardstock with a Daffodil Die, snipped to size.

Four Leaf Clover
The dotted paper was created with a Basic Pattern Decorative Mask, which I placed on Basic White Cardstock, and used a Sponge Dauber to apply Garden Green Ink. Then, I used an Ornate Layers Die for cutting.

The background is Basic White Cardstock, 5 1/4″ X 4″, embossed with the Gingham Embossing Folder. This was glued to a Garden Green card base, 8 1/2″ X 5 1/2″, folded at 4 1/4″.

I rarely use retired items, but I needed a small sentiment to say “happy st. patrick’s day.” I found it in the Teeny Tiny Wishes Stamp Set, used the Messages Die for cutting, and attached it with Dimensionals.
Thank you, Linda, for giving me the incentive to design this card.

The layout was inspired by TGIF.

My February Host Code Gift
Just type the current host code (found beneath my profile picture) in the box provided, on your order of $75.00 or more, and I will send you the Butterflies & Flowers Layering Decorative Masks in March.
Create textured and colored backgrounds with Butterflies & Flowers Layering Decorative Masks. These stencils are an easy way to blend colors on your cards and other paper crafting projects. You can use the background masks on their own. But your images will really pop when you layer the detailed masks over the backgrounds to get even more depth and dimension. Use with Classic Stampin’ Ink and coloring tools such as Blending Brushes and Sponge Daubers for beautiful color. You can also use them with Embossing Paste and Palette Knives for textured designs.
Would you like to join my team? Order the $99 Starter Kit and join Stampin’ Up! through me, CLICK HERE!
If you’re ready to say “yes,” you’ll be rewarded with an additional, TWO CURRENT STAMP SETS of your choice, during Sale-a-bration.
This offer ends February 28, 2022.
Thank you for stopping by! Stay warm!
Click here to shop today!
Product List

Teeny Tiny Wishes Clear Stamp Set
[127802]
$27.00
Feb 14, 2022 | Gallery, Global Design Project, Hand-Crafted Cards |
First of all, Happy Valentines Day! It’s appropriate that today’s Global Design Project is a sketch challenge that includes hearts. But, it’s my feeling that hearts are beautiful on cards year-round, so I made a “thank you” card.
I wanted the hearts to be the focus of my card, so I began by using two Sweet Hearts Dies to cut the hearts from Beauty Of The Earth Designer Paper. You wouldn’t believe the time I spent deciding the remaining parts of the card, so I’ll just tell you how the card was made.
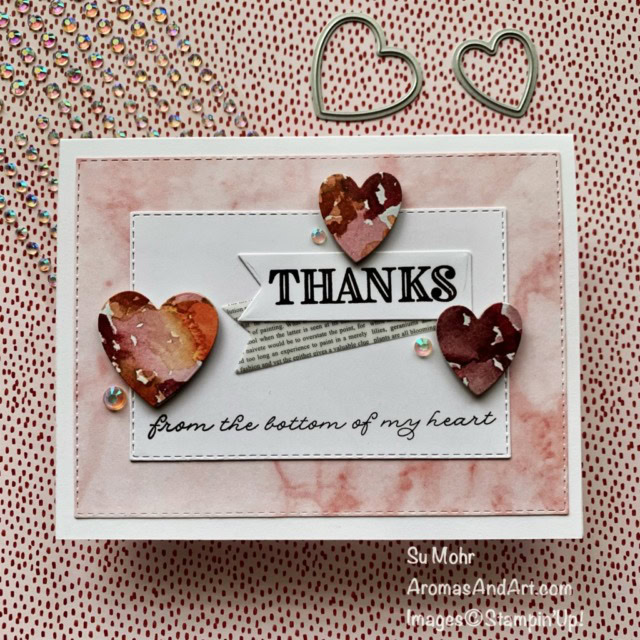
Thank you hearts
The card base is Basic White Cardstock, 8 1/2″ X 5 1/2″, folded at 4 1/4″. The first layer is Simply Marbleous Designer Paper, cut with the largest Stitched Rectangles Die. This paper is one of the FREE Sale-a-bration items you can choose for a qualify purchase of $50.
The second layer is Basic White Cardstock, cut with the fourth largest Stitched Rectangles Die. The Ornate Thanks Stamp Set provided the sentiment, “from the bottom of my heart,” stamped in Early Espresso Ink.

After gluing the layers together, I stamped, “THANKS,” in Early Espresso Ink, also from the Ornate Thanks Stamp Set. I used a Sweet Hearts Die for cutting “THANKS,” and paired it with Vellum Layering Designs, cut with the same die.

Finally, I attached the hearts with Dimensionals, and added three Iridescent Rhinestones for sparkle.

Clicking on the sketch will take you to the site where you can see all of the designer’s projects. Then, you can create a project from the sketch, and hang it in our gallery.

My February Host Code Gift
Just type the current host code (found beneath my profile picture) in the box provided, on your order of $75.00 or more, and I will send you the Butterflies & Flowers Layering Decorative Masks in March.
Create textured and colored backgrounds with Butterflies & Flowers Layering Decorative Masks. These stencils are an easy way to blend colors on your cards and other paper crafting projects. You can use the background masks on their own. But your images will really pop when you layer the detailed masks over the backgrounds to get even more depth and dimension. Use with Classic Stampin’ Ink and coloring tools such as Blending Brushes and Sponge Daubers for beautiful color. You can also use them with Embossing Paste and Palette Knives for textured designs.
Would you like to join my team? Order the $99 Starter Kit and join Stampin’ Up! through me, CLICK HERE!
If you’re ready to say “yes,” you’ll be rewarded with an additional, TWO CURRENT STAMP SETS of your choice, during Sale-a-bration.
This offer ends February 28, 2022.
Thank you for stopping by! Stay warm!
Click here to shop today!
Product List
")
 Designer Series Paper")

")
")
 Designer Series Paper")
")
 Designer Series Paper")
")


")
")


 Layering Designs")
 Designer Series Paper")
")

 Specialty Designer Series Paper")


 Designer Series Paper")

")


 Designer Series Paper")


