Nov 17, 2020 | Gallery, Hand-Crafted Cards |
I haven’t made a “gate fold” card for a while, but somehow, this triangle tree inspired me to do just that! Follow along, and I’ll describe how it was done.

“Gate Fold” Card
First, I cut Shaded Spruce Cardstock in half, lengthwise, 4 1/4″ X 11″, which will make two card bases. I scored each end of one card base at 2 3/4″, and folded to meet in the middle. Wasn’t that simple? You’ll need to give the folds a good burnishing with your bone folder, because they have a tendency to open (when you don’t want them to).
To decorate the sides, I cut two pieces of Whisper White Cardstock, 2 1/4″ X 3″, and two pieces of Regals 6″ X 6″ Designer Paper in dotted, Shaded Spruce, 1/8″ smaller. The Whisper White Cardstock serves as a frame. Then, I glued the panels as close to the middle as possible.
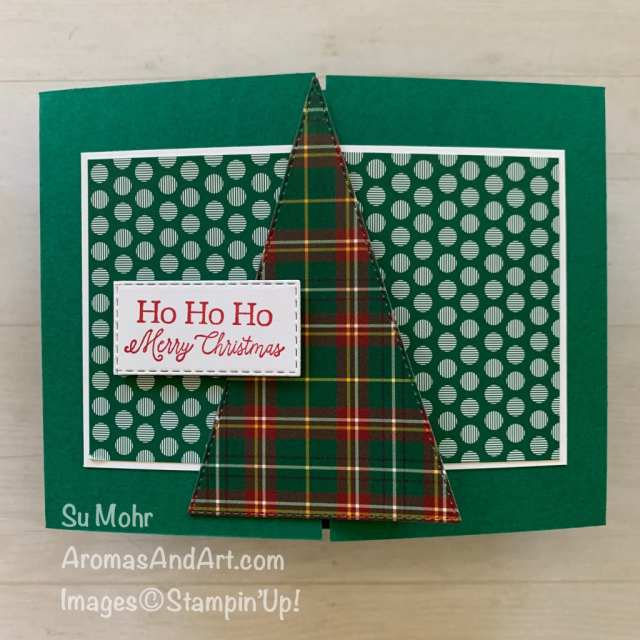
Next, I used the tallest Stitched Rectangles Die to cut my tree from Plaid Tidings Designer Paper, and glued a second tree of cardstock to it for thickness. I cut a third tree, and glued it to the inside, which you see when opened.
The sentiment is from the Little Treats Stamp Set, Stamped in Real Red Ink, cut with Stitched Rectangles Dies, and attached with Dimensionals. “Ho Ho Ho.”

Ta-da! I added Whisper White Cardstock to the inside for a Christmas greeting, and I had to include a Santa hat, because of the CAS(E) this sketch challenge. The hat is from the Little Treats Stamp Set, stamped in Real Red Ink, and cut with its Little Treat Box Die. I have the stamp set and dies in my Product List as a Bundle, which gives you a 10% savings.

Here is the CAS(E) this sketch challenge. See what I mean about the hat?

My November Host Code Gift
Add my Host Code ( AJWAJSNS ) in the box provided when you order a minimum of $50.00 in the month of November, and I will send the Winter Snow Embossing Folder to you in December.

My November Drawing Prize
This month’s drawing will be Stampin’ Up’s! Floral Notebook, plus, 2020-2022 In Color Enamel Dots. Your name will be entered in the drawing when you place a minimum $100 order in November.
You can click on my shop button, or the pictures in my Product List, to go to my store. Have fun filling your shopping cart! I’ll announce the winner December 1st.

If you’d like to join my Dream Makers Team, click here:
Thank you for stopping by. Blessings on your day!

Product List
Nov 16, 2020 | Gallery, Global Design Project, Hand-Crafted Cards |
Nothing’s Better Than Coffee, especially colorful cups of hot coffee displayed on a curve, perfect for Global Design Project’s theme; hot drinks.
I began by stamping the cups and saucers in four colors (Flirty Flamingo, Granny Apple Green, Bermuda Bay, and Daffodil Delight), and I used the Love You More Than Die for cutting.

A coffee kind of day.
After cutting, I used Stampin’ Blends in the same colors for coloring the cups and saucers, and placed them on Dimensionals. The background is a layer of Whisper White Cardstock, 5 1/4″ X 4″, on a Smoky Slate card base, 8 1/2″ X 5 1/2″, folded at 4 1/4″.

The Curvy Die is what makes this card unique. I used it to cut three strips of paper; the solid gray from In Good Taste Designer Paper, and the dots from Neutrals 6X6 Designer Paper. After planning the space I needed for the sentiment, I glued them in place.

“Today is a” and “kind of day” are from the Nothing’s Better Than Stamp Set, stamped in Basic Gray Ink. “Coffee” was made with a Love You More Than Die, Basic Gray Cardstock, and a piece of Foam Adhesive Sheet for dimension.
The final step was stamping the steam, showing that the coffee was really hot.

If you’d like to add more warmth to your day, check out the other designs at Global Design Project. Then, make a card and post it in our gallery.

My November Host Code Gift
Add my Host Code ( AJWAJSNS ) in the box provided when you order a minimum of $50.00 in the month of November, and I will send the Winter Snow Embossing Folder to you in December.
My November Drawing Prize
This month’s drawing will be Stampin’ Up’s! Floral Notebook, plus, 2020-2022 In Color Enamel Dots. Your name will be entered in the drawing when you place a minimum $100 order in November.
You can click on my shop button, or the pictures in my Product List, to go to my store. Have fun filling your shopping cart! I’ll announce the winner December 1st.
If you’d like to join my Dream Makers Team, click here:
Thank you for stopping by. Have a wonderful day!
Product List
Nov 15, 2020 | Gallery, Hand-Crafted Cards |
This is the third card I created from the Dragonfly Gardens Bundle that is in the 2021 January-June Mini Catalog, being released to customers January 5, 2021. It won’t be in my store, or Product List, until then.
If you can’t wait to get your hands on the new products, join my Dream Makers Team by clicking on the button below, and you’ll be able to order December 1.
For a unique look, I created today’s card using die-cuts and different colors, along with the Dragonfly Garden items used at On Stage. The current supplies are in my Product List below.

#onstage@home number 3
Today’s Dragonfly Garden card has a Smoky Slate card base, 8 1/2″ X 5 1/2″, folded at 4 1/4″, with a raised center panel. To make the panel, I began with Whisper White Cardstock, 3 1/4″ X 4 1/2″, and glued two pieces of designer paper to it. The Calypso Coral is from Dandy Gardens, 2″ wide, and the Smoky Slate is from Neutrals 6X6 DSP, 1″ wide, but cut them a little wider to fit the Whisper White Cardstock. Once glued, I used a Stitched Rectangles Die (close to 3 1/4″ X 4 1/2″) to give the panel a perfectly trimmed, and stitched, edge, which I attached to the card base with Dimensionals.

How do you like the Dandelions? This die is a current Sweet Silhouettes Die, and I was reminded to use it, because it looks like it could belong in the new Garden Wishes Bundle. I cut two dandelions from Thick Whisper White Cardstock, and attached with Mini Dimensionals at their centers, leaving the stems unglued.
The dragonfly was cut with the Dragonflies Punch from Dandy Garden Designer Paper, and layered for thickness.

The sentiment, “for a true friend” is from the Dragonfly Garden Stamp Set, stamped in Basic Gray Ink, and cut with an Ornate Frames Die.

My layout is from Freshly Made Sketches.

If you’d like to see my other Dragonfly Garden cards, click on the pictures to see the details.

Dragonfly Garden Alternative #2

1. Dragonfly Garden Alternative

Dandy Garden
My November Host Code Gift
Add my Host Code ( AJWAJSNS ) in the box provided when you order a minimum of $50.00 in the month of November, and I will send the Winter Snow Embossing Folder to you in December.
My November Drawing Prize
This month’s drawing will be Stampin’ Up’s! Floral Notebook, plus, 2020-2022 In Color Enamel Dots. Your name will be entered in the drawing when you place a minimum $100 order in November.
You can click on my shop button, or the pictures in my Product List, to go to my store. Have fun filling your shopping cart! I’ll announce the winner December 1st.
Join my Dream Makers Team, so you can order December 1!
Click Here:
Thank you for stopping by. Blessings on your day!
Product List
Nov 14, 2020 | Gallery, Hand-Crafted Cards |
This is the second card I created from the Dragonfly Gardens Bundle that is in the 2021 January-June Mini Catalog, being released to customers January 5, 2021. It won’t be in my store, or Product List, until then.
If you can’t wait to get your hands on the new products, join my Dream Makers Team by clicking on the button below, and you’ll be able to order December 1.
For a different look, I created today’s card using die-cuts, along with the Dragonfly Garden items used at On Stage.

Dragonfly Garden Alternative #2
I began with a Misty Moonlight card base, 8 1/2″ X 5 1/2″, folded at 4 1/4″. Then, I used the largest Ornate Layers Die for cutting a pretty pattern of the Dandy Garden Designer Paper, and I glued this to the card front.
Next, I stamped the dragonflies from the Dragonfly Garden Stamp Set in Bumblebee Ink on Whisper White Cardstock. After using another Ornate Layers Die for cutting, I glued this layer to the card front.

It was fun punching the dragonfly from the Dandy Garden Designer Paper, and I punched a second one from cardstock to add for thickness. This made the dragonfly nice and sturdy atop the Dimensionals.
The sentiment, “For a true friend,” was stamped in Misty Moonlight Ink, cut with an Ornate Frames Die, and attached with Dimensionals. I placed a Bumblebee Enamel Dot right over the tiny hole in the label.
Come back tomorrow to see my third Dragonfly Garden alternative card.

My November Host Code Gift
Add my Host Code ( AJWAJSNS ) in the box provided when you order a minimum of $50.00 in the month of November, and I will send the Winter Snow Embossing Folder to you in December.
My November Drawing Prize
This month’s drawing will be Stampin’ Up’s! Floral Notebook, plus, 2020-2022 In Color Enamel Dots. Your name will be entered in the drawing when you place a minimum $100 order in November.
You can click on my shop button, or the pictures in my Product List, to go to my store. Have fun filling your shopping cart! I’ll announce the winner December 1st.
Join my Dream Makers Team, so you can order December 1!
Click Here:
Thank you for stopping by. Blessings on your day!
Product List
Nov 13, 2020 | Gallery, Hand-Crafted Cards |
It was so much fun attending Stampin’ Up’s Virtual On Stage, November 5-7. Attendees were able to purchase the Dragonfly Garden Bundle ahead of time, so we could make cards together, as if we were “in person.”
This is one of the new bundles that is in the 2021 January-June Mini Catalog, being released to customers January 5, 2021. It won’t be in my store until then, however, the additional supplies are in my Product List below.
For a different look, I created today’s card using a die-cut sentiment and some embossing, along with the Dragonfly Garden items used at On Stage.

1. Dragonfly Garden Alternative
I began today’s card with a Blackberry Bliss card base, 8 1/2″ X 5 1/2″, folded at 4 1/4″. I remember when I first joined Stampin’ Up!, five years ago, Blackberry Bliss had been discontinued, and everyone was wishing it would return. Well, it did, and I’m happy it’s one of the featured colors in this Dandy Garden Suite.
The next layer is Mossy Meadow, 3 3/4″ X 5″, which I embossed with the Tasteful Textile Embossing Folder.

The colorful print and stripe are Dandy Garden Designer Paper. The print is 2 1/2″ X 4″, and the stripe is 1″ X 3″, which I glued together before gluing to the Mossy Meadow layer.
The dragonfly is also from Dandy Garden Designer Paper, which I cut using the Dragonflies Punch. I love it when Stampin’ Up! matches the paper to the punch.

The sentiment, “thanks” was cut from Blackberry Bliss Cardstock, cut with a Well Written Die. The dragonfly was layered for thickness, and attached with Dimensionals; “thanks” was layered, but glued flat.
It’s so much fun working with new products. I’ll be sharing more alternative cards with this bundle, already scheduled for Saturday the 14th and Sunday the 15th.

The sketch from Fab Friday was used for today’s card.

My November Host Code Gift
Add my Host Code ( AJWAJSNS ) in the box provided when you order a minimum of $50.00 in the month of November, and I will send the Winter Snow Embossing Folder to you in December.
My November Drawing Prize
This month’s drawing will be Stampin’ Up’s! Floral Notebook, plus, 2020-2022 In Color Enamel Dots. Your name will be entered in the drawing when you place a minimum $100 order in November.
You can click on my shop button, or the pictures in my Product List, to go to my store. Have fun filling your shopping cart! I’ll announce the winner December 1st.
If you can’t wait to get your hands on the new products, join my Dream Makers Team, so you can order December 1!
Click Here:
Thank you for stopping by. Blessings on your day!
Product List
Nov 12, 2020 | Gallery, Hand-Crafted Cards |
I delayed ordering the Peace & Joy Bundle, but it recently arrived, and I couldn’t wait to play with it. I can’t resist paper words! You can see the complete bundle in my Product List below.
The first thing I did was use a Joy Die to cut the word from Brushed Metallic Cardstock. By using a piece of Foam Adhesive Sheet, it was easy to add dimension to the thin font. Doesn’t it look pretty?

Wreath of Joy
Next, I used two Wreath Builder Dies to cut the wreath from Whisper White Cardstock, and Shaded Spruce Cardstock.
Before assembling the wreath, I cut a layer of Whisper White Cardstock for the background (4″ X 5 1/4″), and stamped berries (dots from In The Pines Stamp Set) in Real Red Ink. I stamped them in a circle, so they would show beneath the leaves of the wreath.

After stamping the berries, I embossed the white layer with the Pinewood Planks Embossing Folder, and glued it to a Shaded Spruce card base (8 1/2″ X 5 1/2″, folded at 4 1/4″).

To complete the sentiment, I added “to you and yours” from the Peace & Joy Stamp Set. Wanting to match the gold “Joy,” I stamped the words in VersaMark, sprinkled with Gold Embossing Powder, and set it with the Heat Tool. Then, I fussy cut the words, and attached with a thin “edge” from Dimensionals.

I was inspired by the Paper Players color challenge.

My November Host Code Gift
Add my Host Code ( AJWAJSNS ) in the box provided when you order a minimum of $50.00 in the month of November, and I will send the Winter Snow Embossing Folder to you in December.
My November Drawing Prize
This month’s drawing will be Stampin’ Up’s! Floral Notebook, plus, 2020-2022 In Color Enamel Dots. Your name will be entered in the drawing when you place a minimum $100 order in November.
You can click on my shop button, or the pictures in my Product List, to go to my store. Have fun filling your shopping cart! I’ll announce the winner December 1st.
If you’d like to join my Dream Makers Team, click here:
Thank you for stopping by. Have a wonderful day!
Product List





