Jan 24, 2020 | Gallery, Hand-Crafted Cards |
For today’s card I re-visited a favorite from the Annual Catalog, Hold On To Hope. The stamp set has wonderful images, plus coordinating, Cross of Hope Dies.

God Is Love
I began with a Purple Posy card base, layered with Whisper White Cardstock, embossed with the Subtle Textured Embossing Folder. Next, I cut a cross with a Cross of Hope die from gingham, Purple Posy 6X6 In Color Designer Paper, layered it for thickness, and glued it to the center of the card front.

Now for the pretty, floral vines. I thought it would be fun to use the “ink to stamp” technique for coloring, since it’s an easy way to color, using the Stamparatus.
First, I attached the red rubber stamp to the lid of the Stamaparatus, with Thick Whisper White Cardstock positioned to take the stamped image. Then, using Stampin’ Write Markers I colored the stamp with five different markers, one color at a time. So, I colored, stamped, colored, stamped, etc.
I repeated the process for the second vine, used a Cross of Hope die for cutting, and glued them above and below the cross.
TIP: As long as your Cardstock is secured with the magnet, it’s hard to make a mistake.

“God Is Love” is also in the stamp set, which I stamped in Highland Heather Ink, and cut with its coordinating, banner die. This would be a nice sympathy card, as well as an Easter card.

Thanks so much for visiting me today!
Just click on my “shop” button, or the pictures in my Product List, to start filling your shopping bag! As soon as your order hits 50.00, you can choose a FREE item from the Sale-A-Bration brochure!

Product List

Stampin Write Markers – Brights Collection
[119702]
$28.95
Jan 23, 2020 | Gallery, Hand-Crafted Cards |
Today’s blog post is special for me, because I was asked to be this week’s Guest Designer for CAS(E) this sketch. When I saw the sketch, I imagined sunny, yellow, beams of blooms.

Sunshine Blooms
See the sketch? Now, you can play along, and post your creation in our gallery.

In designing my card, I chose dark, medium and light shades of yellow ink for my blooms: Crushed Curry, Daffodil Delight, and So Saffron. Then, I stamped 17 blooms, and used the Small Bloom Punch for cutting. Punching made this fast and fun!

Next, I used a Bone Folder to curl the petals, and arranged them in three rows on a layer of Whisper White Cardstock. I placed some of the blooms on Mini-Dimensionals, and glued some flat for variation.
Finally, I glued the white layer to a Daffodil Delight card base to coordinate with the blooms.

I found the perfect sentiment, “Hello Sunshine,” in the new 2020 stamp set, Under My Umbrella.

Thoughtful Blooms is one of the 2020 Sale-A-Bration stamp sets, along with the Small Bloom Punch. I know how we all love punches, and both items are FREE with a qualifying order.
Contact me with any questions about ordering the Free products. If you really want to take advantage of all the deals, join Stampin’ Up! now.
CLICK HERE TO JOIN

Thanks, and have a wonderful day!
Product List
Jan 22, 2020 | Gallery, Hand-Crafted Cards |

Today’s card was a especially fun, because it’s the first one I designed as a new Design Team member of The Sisterhood of Crafters. I’m honored that I was selected, and looking forward to participating as a designer in the Wednesday, bi-weekly challenges.
The theme for this two-week period is “newly acquired stash,” and I couldn’t wait to get started!
But, this was one of those days when I had a design in mind, and it turned out completely different.

Mouse’s “thank you”
I was thinking of a card featuring beautiful, Poppy Parade poppies from the Painted Poppies Stamp Set. I managed to stamp one, before the mouse appeared from behind the Brick & Mortar embossed wall.
i have to take the blame, because I made the mouse from the Special Someone Stamp Set and Special Day Die Set, and set him aside. He was ready to jump on a card ASAP!

Mouse insisted on writing the sentiment with a large pen from the Crafting Forever Stamp Set. Therefore, I made the pen by stamping it in Memento Black Ink on Thick Whisper White Cardstock, coloring with Stampin’ Blends, and fussy cutting.
Other than the ink splatters, the mouse did a good job of writing “thank you,” don’t you agree?

To hide the hole in the brick wall that led to Mouse’s home, we added a raised rectangle. I cut this with one of the new Stitched So Sweetly Dies, which worked perfectly.

CAS(E) this sketch was the inspiration for my design.

Thank you for stopping by. I know Mouse is happy to show off his Thank You card. Keep scrolling to see the new supplies in my Product List. Just click on the pictures to go shopping at my store. Thanks!
P.S. The Special Day Dies are available now for Demonstrators, and Feb 4 for customers. And, they will be carrying-over to the new Annual Catalog!
Product List
Jan 20, 2020 | Gallery, Hand-Crafted Cards |
This fashionably dressed mother and daughter are from the Beautiful Moments Stamp Set.

Side by Side
I had fun dressing them, like paper dolls, using the “paper-piecing” technique with Tropical Oasis Designer Paper.
I first stamped the mother and daughter in Early Espresso Ink on Whisper White Cardstock. Then, I stamped the mother and daughter on the DSP, and fussy cut the dresses.
TIP: It feels weird cutting off their heads, arms and legs, but you have to do it!
After gluing the dresses in place, I colored their skin with the Ivory Stampin’ Blend, and their hair with several colors named in my Product List below.
I used the largest Stitched So Sweetly Die for cutting.

The background is a Soft Sea Foam card base, stamped with palm trees from the Timeless Tropical Stamp Set in Pear Pizzazz Ink.
“Side by Side” is from the Beautiful Bouquet Stamp Set, cut with another Stitched So Sweetly Die. This sentiment is perfect, don’t you think?

Today’s card was inspired by the Paper Player’s challenge, “Fashion Fun.”

Thank you for visiting me today. You can see my supplies in the Product List below. I appreciate you shopping at my store. Just click the shop button to start filling your shopping bag!
Product List
Jan 19, 2020 | Gallery, Hand-Crafted Cards |
Bzzzz, bzzzz, these bees are busy, making a card to be sent to someone endearingly named “Honey.”

Honeybees
The bees liked that I stamped them in Early Espresso Ink, rather than black, for a change. And, I appreciated how still they sat while I cut them with a Detailed Bee Die.
We made the see-through flower and leaves with Poppy Moments Dies, using Thick Whisper White Cardstock, and Pear Pizzazz Cardstock. I used the Subtle Textured Embossing Folder on the leaves to contrast with the smooth Whisper White background.

To make the honeycomb, I used a Detailed Bees metal die as a stencil, and applied Daffodil Delight Ink with a Sponge Dauber. The bees thought my method was crazy, but they liked the way it turned out.

Do you see how the honeycomb resembles the shape on the right side of this week’s Freshly Made Sketches challenge?

Finally, I needed the word “honey,” which I made using the letters from the Hand-Lettered Prose Die Set. To make the letters “soft” like the honeycomb, I applied Daffodil Delight Ink to Thick Whisper White Cardstock with a Sponge Dauber. That area beneath the “y” is what I used for the flower’s center.

This card makes the bees happy, and I hope it does the same for the “Honey” who receives it.

I’m also sharing this card with Seize the Birthday for the stenciled honeycomb.

Would you like to make this card? You can see my Product List below. But, why not get the Starter Kit with an additional Sale-A-Bration Bonus? Now is a great time to join Stampin’ Up!, and I’d love to have you on my team.
Click here for the details:
Thanks for stopping by. I hope I made you smile!
Product List
Jan 17, 2020 | Gallery, Hand-Crafted Cards |
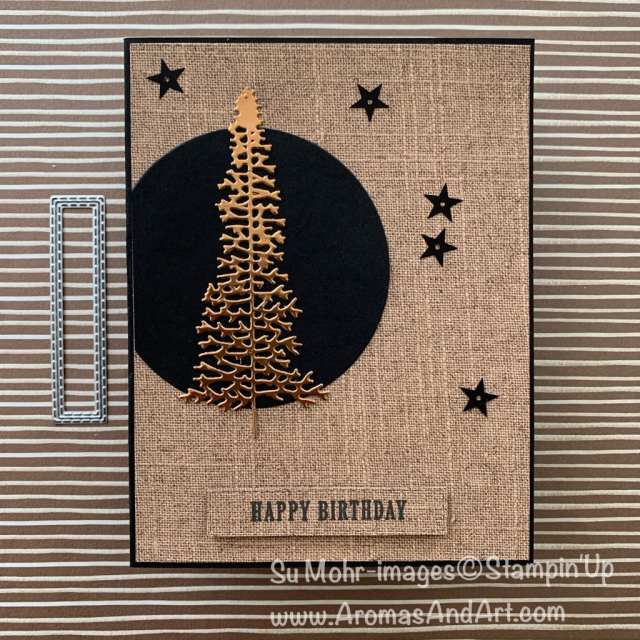
Today’s project is a winter time, masculine, birthday card.

Winter Birthday
It developed because of the parameters set by the Fusion challenge, where I used the theme, photo, and the sketch.

The first thing I did was use the Majestic Mountain Die to cut the tree from Copper Foil. After seeing the photo, how could I not use this tree?

Next, using the largest Layering Circles Die, I cut a circle from Basic Black Cardstock, keeping one edge straight, as it is in the sketch.
The background is the wonderful, burlap, Pressed Petals Designer Paper, which I glued to a Basic Black card base.

“Happy Birthday” is from the Clubhouse Stamp Set, stamped in Memento Black Ink on the burlap DSP, and cut with the smallest Stitched Rectangles Die. I layered the sentiment on Basic Black Cardstock for thickness, and placed it on Mini-Dimensionals.
Adding five, black, sequin, stars was the final touch.
Thank you for visiting me today. I hope I’ve inspired you with this masculine card. Clicking on the pictures in my Product List will take you to my store for shopping. Thanks!
Product List





