Jan 16, 2023 | Gallery, Global Design Project, Hand-Crafted Cards |
This week’s Global Design Project is a color combination: So Saffron, Balmy Blue, and Granny Apple Green. The colors inspired me to experiment with Around The Bend Dies from the January-April 2023 Mini Catalog. I began with a Granny Apple Green card base, 8 1/2″ X 5 1/2″, folded at 4 1/4″. The large, Around The Bend Die, was used to cut the card front, leaving half of the inside exposed.

Around The Bend
For the exposed inside, I used a pattern of Dandy Designs Designer Paper in Balmy Blue, 4″ X 5 1/4″. I also wanted to add white to the inside for writing a message. To do this, I used the same Around The Bend Die to cut Basic White Cardstock, 4″ X 5 1/4″. After cutting, I glued this to the back of the card front, careful to match the die-cuts.

The sentiment on the front is from the Something Fancy Stamp Set, also in the January-April 2023 Mini Catalog. I stamped “May the good you do come back to you” in Early Espresso Ink on Basic White Cardstock, and used a Something Fancy Die for cutting. Then, I used a Something Fancy Die, a size larger, to cut a frame from Dandy Delight Designer Paper in Granny Apple Green, and attached the glued labels on Dimensionals.

To complete the design, I used Dainty Delight Dies to cut two flowers from So Saffron Cardstock, with centers of Early Espresso Cardstock, and attached them with Dimensionals.

Isn’t this a fun color combination? Be inspired by all of the designer’s creations, then add your design to our gallery.
 My January Host Code Gift
Place an order of $75.00 or more, before tax and shipping, and I will send you the Faux Sea Glass Shapes in February, (150 adhesive-backed frosted shapes* 75 each size: 3 mm, 5 mm).
Clicking this shop button will take you to my store and automatically add my Host Code for January 2023.

Enjoy shopping the January-April 2023 Mini Catalog, and Free Sale-a-bration items! Click on the covers to see digital copies:


Thanks for stopping by! Have a great day!

Product List
Jan 15, 2023 | Gallery, Hand-Crafted Cards |
I grew up in San Diego, where avocados grow abundantly, and learned to love them as a child. When the avocados were mashed into guacamole, my brother called it green butter. Yum! All this to say, I was excited to create my first card using the Taco Fiesta Stamp Set, featuring avocados!
I began with a Thick Basic White card base, 8 1/2″ X 5 1/2″, folded at 4 1/4″. Then, I used an Around The Bend Die to cut the right side of the card front to add interest, and make the birthday card look festive.

Holy Guacamole!
After preparing my card base, I stamped six avocado halves in Memento Black Ink. This was followed by stamping three more avocado halves on Basic White Cardstock, which I fussy cut, and colored with Stampin’ Blends in Old Olive and Soft Suede. Do you see the cute faces in the stamp set? I had to add the “wow” face to one of the avocados!
Next, I used another Around The Bend die to cut leaves from Old Olive Cardstock. Then, I glued the leaves, and attached the three, colored, avocados on Dimensionals.

The sentiments in the stamp set are so fun, and “Holy Guacamole it’s your birthday” worked perfectly for this card. I stamped it in Memento Black Ink, used a Harvest Die for cutting, and attached it with Dimensionals. I think a guy would really appreciate this card, don’t you?

My January Host Code Gift
Place an order of $75.00 or more, before tax and shipping, and I will send you the Faux Sea Glass Shapes in February, (150 adhesive-backed frosted shapes* 75 each size: 3 mm, 5 mm).
Clicking this shop button will take you to my store and automatically add my Host Code for January 2023.
Enjoy shopping the January-April 2023 Mini Catalog, and Free Sale-a-bration items! Click on the covers to see digital copies:
Thanks for stopping by! Have a great day!
Product List
Jan 14, 2023 | Gallery, Hand-Crafted Cards, TGIF |
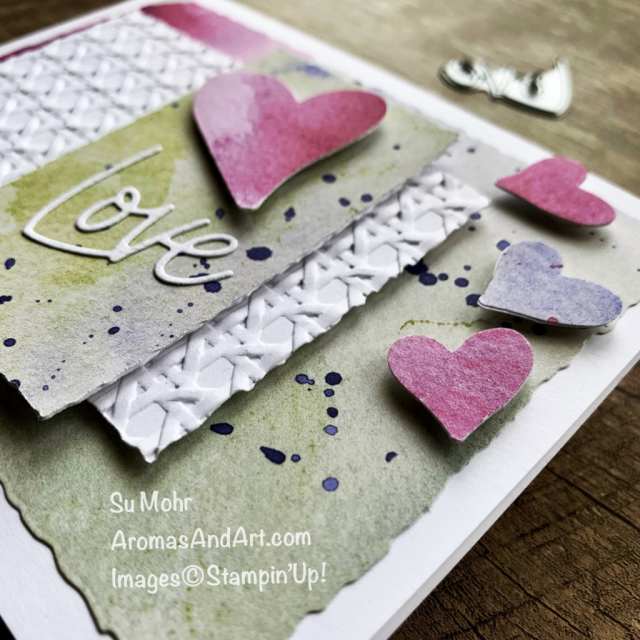
The floral patterns in the Dainty Flowers Designer Paper are beautiful, but don’t overlook this watercolor, splash pattern, on the back. I cut the first piece with the largest Deckled Rectangles Die, and glued it to a Thick Basic White card base, 8 1/2″ X 5 1/2″, folded at 4 1/4″. Then, I used the sixth largest Deckled Rectangles Die to cut a second piece for the top layer.

Watercolored Hearts
Next, I used the fourth largest Deckled Rectangles Die to cut Basic White Cardstock, which I embossed with the new, Cane Weave Embossing Folder. Isn’t the texture fabulous? After attaching the embossed piece to the card front with Dimensionals, I attached the top piece of Dainty Flowers Designer Paper, also on Dimensionals.

Adding hearts to my design was easy, using the Country Bouquet Punch. I punched three small hearts, and one large heart, from Dainty Flowers Designer Paper. Before attaching them with Dimensionals, I layered them with Thick Basic White Cardstock for thickness.

The last step was adding “love,” which was cut with a Love For You Die, from the same Dainty Flowers Designer Paper.
I was inspired by TGIF.

My January Host Code Gift
Place an order of $75.00 or more, before tax and shipping, and I will send you the Faux Sea Glass Shapes in February, (150 adhesive-backed frosted shapes* 75 each size: 3 mm, 5 mm).
Clicking this shop button will take you to my store and automatically add my Host Code for January 2023.
Enjoy shopping the January-April 2023 Mini Catalog, and Free Sale-a-bration items! Click on the covers to see digital copies:
Thanks for stopping by! Have a great day!
Product List
Jan 13, 2023 | Gallery, Hand-Crafted Cards |
It’s so much fun to punch hearts from the Fancy Flora Designer Paper, using the Country Bouquet Punch, and that’s how today’s card began. After punching three hearts I layered them with cardstock for thickness, and placed them on Dimensionals.

Fancy Flora Valentine Hearts
With a sketch in mind, I used Stitched Rectangles Dies to cut three layers of cardstock, to layer on a Thick Basic White card base, 8 1/2″ X 5 1/2″, folded at 4 1/4″. The first, Basic White Cardstock layer, was cut with the largest Stitched Rectangles Die, and stamped in Soft Sea Foam Ink, using the Hand-Drawn Dots Stamp.

The next layer, Soft Sea Foam Cardstock, was cut with the third largest Stitched Rectangles Die. And, the top layer, Basic White Cardstock, was cut with the fourth largest Stitched Rectangles Die.

After attaching the hearts, I stamped “Happy Valentine’s Day” in Memento Black Ink, and made two cuts with a Stitched Rectangles Die to make it the right size. For some added detail, I used a Forever Flourishing Die to cut Soft Sea Foam Cardstock to frame the sentiment.

I was inspired by FMS.

My January Host Code Gift
Place an order of $75.00 or more, before tax and shipping, and I will send you the Faux Sea Glass Shapes in February, (150 adhesive-backed frosted shapes* 75 each size: 3 mm, 5 mm).
Clicking this shop button will take you to my store and automatically add my Host Code for January 2023.
Enjoy shopping the January-April 2023 Mini Catalog, and Free Sale-a-bration items! Click on the covers to see digital copies:
Thanks for stopping by! Have a great day!
Product List
Jan 11, 2023 | Gallery, Hand-Crafted Cards, Pals Blog Hop |

Welcome to the Stampin’ Pretty Pals’ Blog Hop!
This month, our blog hop theme is Sale-A-Bration! We hope you will be inspired by all the beautiful creations the Pals made for you! As you hop from blog to blog, we would love for you to leave a comment. You will find the lineup at the end of my post to help you “hop” along from Pal to Pal.
I fell in love with the Dainty Flowers Design Paper when I first saw it online, and it was even more spectacular when seeing it in person. I decided the best way to show it off was on a Double-Z Fun Fold card.

Neil’s Anniversary Card
First, I cut a piece of 8 1/2″ X 11″ Mossy Meadow Cardstock in half, 4 1/4″ X 11″, and scored it at 2 3/4″ and 5 1/2″. You can use the other half to make a second card.
The three panels were decorated with Dainty Flowers Designer Paper; 2 1/2″ X 4″ for the two smaller panels, and 5 1/4″ X 4″ for the larger panel.

After gluing the panels, I cut a band for the bottom from Mossy Meadow Cardstock, 11″ X 1 1/4,” scored at 5 1/2″ and 2 3/4″. The band was decorated with three strips of Dainty Flowers Designer Paper. The long strip is 5 1/4″ X 1″, and the two shorter strips are 2 1/2″ X 1″.
Next, I added details, using new, Dainty Delight Dies, and new, Love For You Dies. The large vine was cut from Old Olive Cardstock, and doubled for sturdiness, since half of it is without support. I used a Foam Adhesive Sheet and Rich Razzleberry Cardstock for the flower on the front. The daisies are Crushed Curry with centers of Soft Suede, and stems of Mossy Meadow. “Love you so much” was cut from Thick Basic White Cardstock.
The trickiest part of the Double-Z Fun Fold is fastening the band. It seems odd, but the long section of the band is glued to the short front section. I find it easiest to apply glue to the folded band, because this exposes only the part that should have glue. Then, fold the card while adhering the band in place. I suggest having a “dry” run before applying glue.

The sentiment, “I thank God every time I think of you” is from the Hope & Prayer Stamp Set. I stamped it in Old Olive Ink on Dainty Flowers Designer Paper, used Deckled Rectangles Dies to cut it to size, and attached it with Dimensionals.
The Double-Z Fun Fold card, with this amount of decoration, fits nicely inside our Medium Envelopes. But, this card will be staying here, because it’s my husband’s anniversary card, when we celebrate February 1. Thirty-seven years have passed too quickly!

Thanks for hopping by!
More inspiration awaits, so use the lineup below to visit the rest of the Design Team. The Pals are excited to show you what they’ve created! Then, please mark your calendars for our next blog hop on February 8th, when we will be creating projects for Random Acts of Kindness Week.
Until then, have fun in your craft space.
Stampin’ Pretty Pals Blog Hop
- Mary Fish at Stampin’ Pretty
- Rae Harper Burnet at Wild West Paper Arts
- Mary Hanson at Up North Stampin’
- Debbie Crowley at expressively deb …
- Stesha Bloodhart at Stampin’ Hoot!
- Beth McCullough at Stamping Mom
- Melissa Seplowitz at The Stamping Ninja
- Su Mohr at Aromas And Art. ***YOU ARE HERE***
- Peggy Noe at Pretty Paper Cards
- Debbie Mageed at Secrets to Stamping
- Lisa Ann Bernard at Queen B Creations
- Karen Hallam at Karen’s Stamping Habit
- Tricia Chuba at ButterDish Designs
- Windy Ellard at Windy’s Wonderful Creations
- Lori Webb at Clever Copies
- Jill Loveland at Simple Stamping
- Pamela Sadler at Stampin Pink Rose
- Sue Jackson at Just Peachy Stamping
- Deb Walker at Deb Stamps Life
My January Host Code Gift
Place an order of $75.00 or more, before tax and shipping, and I will send you the Faux Sea Glass Shapes in February, (150 adhesive-backed frosted shapes* 75 each size: 3 mm, 5 mm).
Clicking this shop button will take you to my store and automatically add my Host Code for January 2023.
Enjoy shopping the January-April 2023 Mini Catalog, and Free Sale-a-bration items! Click on the covers to see digital copies:
Product List
Jan 10, 2023 | Gallery, Hand-Crafted Cards |
The Something Fancy Bundle has much to offer, and a favorite from the January-April 2023 Mini Catalog. It has ten wonderful sentiments with twelve dies that not only layer, but can be converted to tags. It’s pictured in the catalog on pages 14 -17, as part of the Fancy Flora Suite. The Fancy Flora Designer Paper is fabulous, and you can see all of the patterns in my Product List below.

For today’s card, I cut a 4″ X 5 1/4″ piece of Fancy Flora Designer Paper in natural tones. This was glued to a Soft Suede card base, 8 1/2″ X 5 1/2″, folded at 4 1/4″.
The focal point is a layered tag, tied at the top with Burlap Ribbon. Don’t you love the stitching? The ribbon is the color of burlap, but it’s actually very soft, and comes in a combo pack with red ribbon.
The larger tag was cut from Soft Succulent Cardstock, and the smaller tag was cut from a white portion of the Fancy Flora Designer Paper. Prior to tying them together I stamped The sentiment in Evening Evergreen Ink. “Thank you” is from the Something Fancy Stamp Set.

Something Fancy Tagged
After stamping, I gave the tag texture with the Timeworn Type embossing Folder, and attached the double tag with Dimensionals.

As a final touch, I added three Brushed Brass Butterflies.

I was inspired by The Paper Players.

My January Host Code Gift
Place an order of $75.00 or more, before tax and shipping, and I will send you the Faux Sea Glass Shapes in February, (150 adhesive-backed frosted shapes* 75 each size: 3 mm, 5 mm).
Clicking this shop button will take you to my store and automatically add my Host Code for January 2023.
Enjoy shopping the January-April 2023 Mini Catalog, and Free Sale-a-bration items! Click on the covers to see digital copies:
Thanks for stopping by! Have a great day!
Product List





