Jan 13, 2020 | Gallery, Hand-Crafted Cards |
When you start with a stamp from the Beautiful Moments Stamp Set, it’s hard to beat simple stamping. I rarely make a card without die-cutting, but this card is just stamps, ink and paper; true #simplestamping.

I began with a Thick Whisper White card base, and a stamp from the Painted Poppies Stamp Set. First, I stamped the “splotch” in Pool Party Ink on scratch paper, then without re-inking, I stamped twice on the card front. Next, I stamped the “splotch” in Soft Sea Foam Ink in the same manner.

The other three stamps I used are from the Beautiful Moments Stamp Set. Both stamp sets are in Stampin’ Up’s 2020 Mini Catalog, available January 3-March 31, as long as supplies last.
I stamped the backward lady and “Thinking of you,” in Mossy Meadow Ink, and the two birds in Pool Party Ink.
TIP: I used four Clear Blocks with the rubber stamps, but you could get by with just using the “D”. For clarity, you can refer to the pictures in my Product List.

“Thinking of You” is the theme at the Sisterhood of Crafters, and I’m adding today’s card to their gallery.

How would you like to add the Beautiful Moments and Painted Poppies stamp sets to your Starter Kit? Now is the best time to join Stampin’ Up! I’d love to be your Demonstrator, and have you on my team.
Click here for details

Thank you for visiting today! I hope this encourages you to try some #simplestamping.

Product List
Jan 12, 2020 | Gallery, Hand-Crafted Cards |

It’s time to Sale-A-Brate! This is Stampin’ Up’s! three-month promotion, January 3-March 31, when the Lily Pad Dies, the Lovely Lily Pad Stamp Set, and Lily Impressions Designer Paper can be yours for FREE.

Water Lilies
I began today’s card with a Coastal Cabana card base, a layer of Bermuda Bay, and topped it with the gorgeous, brushstroke, Lily Impressions Designer Paper.

First, I cut one large lily pad and two smaller ones from Bermuda Bay Cardstock, using the dies from the Lily Pad Die Set.
Second, I used dies from the same set to cut the water lilies, and used a paper-piecing technique. To accomplish this, I cut the two lilies from Noble Peacock Foil, which gives them a nice shine. Then, I cut the lilies a second time, from a piece of red, Lily Impressions Designer Paper. Third, I added tiny dots of glue to the open spaces, placing the petals in the proper space, much like a jigsaw puzzle.
TIP: Using the Take Your Pick Tool simplified filling in the “holes,”because I was able to pick up the tiny petals with the sticky point.

The sentiment, “Sending Hugs,” is from the Perfectly Framed Stamp Set from the Mini Catalog. This set was designed to fit the Ornate Frames Die Set from the 2019 Holiday Catalog. How great is that!
Did you notice the Metallic Baker’s Twine and Sequins? They are from another FREE product that’s being offered during Sale-A-Bration. You can check out the additional colors in my Product List.

How do you get these products for FREE? For every $50.00 or $100.00 that you spend you can choose an item from the Sale-A-Bration brochure. You can view digital copies of the catalogs by clicking on their covers, located under my picture, on the right side of this page.
If you would like even more great deals, you can click here for information about joining Stampin’ Up!
Thanks so much for hopping by! We love to read your comments. Please click to leave a COMMENT HERE.
Be sure to click on the next button to hop to the next Kre8tor, Janey Backer. We are all excited to share the new Sale-A-Bration products with you.
 Melissa Tennison USA
Su Mohr. *YOU ARE HERE***
Janey Backer USA
Tracie St-Louis – Ottawa, Canada
Alexandra Rauf
Jacqui Lawrence (UK)
Rochelle Laird-Smith (Australia)
Cheryl Hamilton
Cheryl Taylor (UK)
Laura Mackie (UK)
Anastasia Radloff
Tricia Butts
Sue McDonald
Deb Naylor
Rebecca-Jo Unwin- Australia
Susan Simpson aka Craftyduckydoodah!
Jan Musselman – USA
Dana Sullivan – USA
Libby Fens
Sandra Roberts (UK)
Nicole Mahler
Michelle Bryant
Product List
Jan 10, 2020 | Gallery, Hand-Crafted Cards |
I know I have a lot of favorites, but the Timeless Tropical Bundle is among them. My first card using the set was the pineapple, and today’s card features the hibiscus; both prominent, tropical images.

Hibiscus
This flower was really fun to color. I first stamped it in Lovely Lipstick Ink on Whisper White Cardstock, then used three Stampin’ Blends for coloring: Light and Dark Flirty Flamingo, and Dark Mango Melody. Then, I stamped three leaves in Old Olive Ink on Whisper White Cardstock, and colored with a Light Old Olive Stampin’ Blend.
The fun continued, because the die set, In The Tropics, has two dies for cutting the flower and leaves.

For the background, I embossed Whisper White Cardstock with the Scripty Embossing Folder, and gave it a 1/16th inch border of Basic Black Cardstock. I layered this on a Thick Whisper White card base.

After gluing the leaves to the hibiscus, I placed it on Dimensionals, positioned for this week’s Freshly Made Sketches challenge.

The sentiment is from the Colorful Seasons Stamp Set, Stamped in Memento Black Ink, and cut with a Stitched Rectangles Die.

I hope you’ve enjoyed this trip to the tropics! Keep scrolling to see my product List. And, don’t forget, this is the best time to join Stampin’ Up!
Click here to join
Thank you, have a wonderful day!
Product List
Jan 9, 2020 | Gallery, Global Design Project, Hand-Crafted Cards |
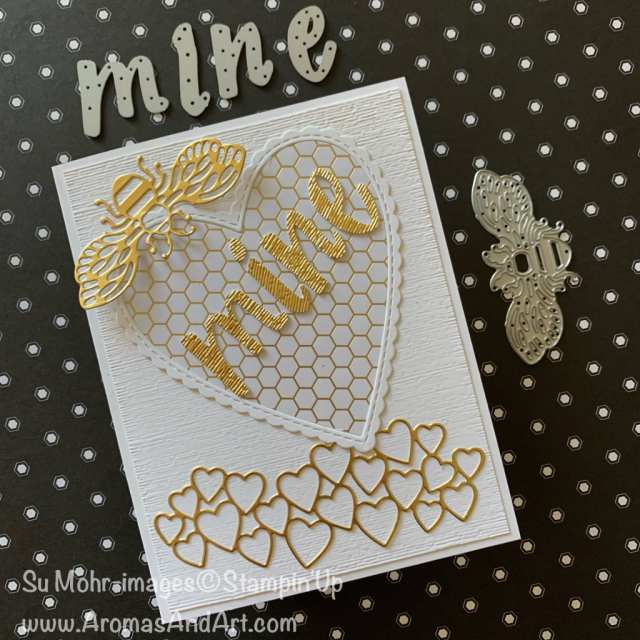
Honey bees and Valentines go together, don’t you think? We often call our loved ones “Honey,” so it seems natural to combine the two.
Bee Mine
Consequently, I couldn’t resist the play on words with “bee” mine. “M-i-n-e” was made with the Hand-Lettered Prose Die Set and Gold Foil. These letters come in handy for saying exactly what you need to say. I made the letters extra special by embossing them with the Subtle Textured Embossing Folder, and layering them for thickness.
The bee was also cut from Gold Foil, using a Detailed Bee Die. Isn’t she fabulous?

The large heart, and hearts along the bottom are from the Be Mine Stitched Die Set in the Annual Catalog. The center of the large heart is the new, Golden Honey Designer Paper, and there’s a scalloped edge of Thick Whisper White Cardstock. I used more Gold Foil for the small hearts.

The background is Whisper White Cardstock embossed with the Subtle Textured Embossing Folder, layered on a Thick Whisper White card base. Not all Valentines have to be red or pink! Although, this design would look great in those colors. Hmmm, I can’t wait to get started!

My layout was inspired by Global Design Project.

Thanks so much for visiting. If you’d like details on today’s supplies click on the pictures in my Product List. You’ll notice that the Golden Honey Designer Paper has a price of $0.00. That’s because it is FREE with a qualifying order of $50 during Sale-A-Bration.
Have you thought about Joining Stampin’ Up? Sale-A-Bration is the best time to join, and I’d love to have you on my team. There’s no need to do the business. “Hobby” demonstrators are welcome. Why not get the specials and discount?
Click here for more information
Product List
Jan 8, 2020 | Gallery, Hand-Crafted Cards, Pals Blog Hop |

Welcome to the Pals’ Blog Hop! We’re so glad you’re here because it’s “Time to Sale-A-Brate”! We’re showcasing our favorite new products from 2020 Sale-A-Bration brochure. You may be starting the hop here or coming from a previous Pal’s blog. Either way, you’ve come to the right place. You’ll find the full line-up below to help you move, or “hop” along from Pal to Pal.
It’s hard to resist the sweet bees in the Honey Bee Bundle, especially when combined with the fabulous, FREE, Golden Honey Designer Paper.

Honey Bee
How do you get the Golden Honey Designer Paper? During Sale-A-Bration (Jan 3-March 31), when you place a qualifying order of $50.00, you can choose the Golden Honey DSP as your FREE item.
For instance, if you purchase the Honey Bee Bundle (41.25) and a pack of Cardstock(8.75), the Golden Honey Designer Paper is yours for FREE. But, don’t delay, this is only as long as supplies last.

The Golden Honey Designer Paper has bees which coordinate perfectly with the Detailed Bee Die Set. The Honey Bee stamp set has this same bee, so you have options. You can stamp the bee, and you’ll never run out of bees. I cut my three bees from the DSP, and colored the stripes with a Light Daffodil Delight Stampin’ Blend.

Don’t you just love the curved sentiment? “Wishing you sunshine & happiness” was designed to fit perfectly over the hive. I cut the hive with a Detailed Bee Die.
To match the sentiment, I chose a happy color, Granny Apple Green for the card base, topped with a sunny color, Daffodil Delight. The top layer is Thick Whisper White, which I lifted on Foam Adhesive Strips, over a layer of busy bees from Golden Honey DSP.
TIP: Foam Adhesive Strips are twice as thick as Dimensionals, and their length is great for creating sturdy depth.
TIP: Cutting the Daffodil Delight and Whisper White layers with Stitched Rectangles Dies, makes for precise layering, without measuring. Plus, you get the added detail of stitching.

To complete the design, I stamped the flowers in Memento Black Ink, and used Detailed Bee Dies for cutting. Then, I colored them with two Stampin’ Blends: Light Daffodil Delight and Dark Granny Apple Green.

Here’s a Valentine using a Detailed Bee Die and the Golden Honey DSP. Click on card for details.
Thanks so much for hopping by! I appreciate you!
More inspiration awaits! Use the Blog Hop Line-up below to visit the rest of this month’s Design Team. My fellow Pals are excited to show you what they’ve created! Don’t forget to show us some love by commenting on our creations. Please click to leave a COMMENT HERE.
Mark your calendars for Wednesday, February 12th, for our Art From The Heart blog hop when our Design Team showcase projects made from the heart for any occasion. Don’t miss the fun!
Pals Blog Hop Line-Up
- Mary Fish at Stampin’ Pretty!
- Su Mohr at Aromas And Art. *YOU ARE HERE*
- Jen Roque at Stamp Camp with Jen
- Denise Hoepfner at The Mountain Magpie
- Karen Hallam at Karen’s Stamping Habit
- Tricia Chuba at ButterDish Designs
- Linda Suarez at Lucky Dog Stamper
- Mary Hanson at Up North Stampin’
- Peggy Noe at Pretty Paper Cards
- Lori Pinto at LollyPop Paper and Ink
- Jackie Beers at Blue Line Stamping
- Jennifer Michalski at Stamping Serenity
- Debra Simonis at Deb’s Stampin’ Grounds
- Lisa Ann Bernard at Queen B Creations
- Beth McCullough at Stamping Mom
- Stesha Bloodhart at Stampin’ Hoot!
- Katy McGloin at Just Fun Stamping
- Lynn Kolcun at Avery’s Owlery
- Leah O’Brien at Ink, Paper, Stamps, Oh My!
- Debbie Mageed at Secrets to Stamping
- Sue Jackson at Just Peachy Stamping
- Pamela Sadler at Stampin Pink Rose
Have you thought about joining Stampin’ Up! to get a discount on your crafting supplies? Now is the best time to join, and I’d love to have you on my team!
Click here to join:
Product List
Jan 7, 2020 | Gallery, Hand-Crafted Cards |
Umbrellas indicate showers, and when there are showers, something new is around the corner. The new, Under My Umbrella Bundle, has the stamps and the punch to make wonderful cards for many occasions.
You could be thinking of weather, but I have wedding showers and baby showers in mind.

Shower Days
I began with a Highland Heather Card base, and a layer of Poppy Parade Cardstock. Then, I embossed the Whisper White top layer with the Subtle Textured embossing folder.
Prior to embossing, I stamped three umbrella handles, from the Under My Umbrella Stamp Set, in Memento Black Ink.

The umbrellas were made with Designer Paper from 6X6 Packs, which you can see in my Product List. The check is current, while the stripe and dot have been replaced with new patterns.
I used Versamark to stamp the frames on the DSP, sprinkled with Black Embossing Powder, and set with the Heat Tool.
Finally, I used the Umbrella Builder Punch to cut the umbrellas, and placed them on Dimensionals.

“It’s your day!” is from the Under My Umbrella Stamp Set, stamped in Gorgeous Grape on Whisper White Cardstock. I used a Merry Christmas label die for cutting, which fit perfectly within the Ornate Frame Die. The Ornate Frame was cut from Highland Heather Cardstock.

The colors were inspired by Fab Friday.

I’m also sharing with the Paper Player’s, whose theme is “something new.”

Thanks for stopping by. You can purchase your own umbrellas by clicking on the pictures in my Product List, and filling your shopping bag! Or, include it in your Starter Kit, and start saving on your crafting supplies.
Click here to join now!
Now, is the best time to join Stampin’ Up! I’d love to have you on my team. Enjoy your day!
Product List





