Sep 24, 2019 | Gallery, Hand-Crafted Cards, TGIF |
Today’s card began as an “eclipse-a-daisy,” while experiencing an “oops-a-daisy.”

oops-a-daisy
But, the actual beginning was TGIF’s challenge, to use Perennial Essence or Mosaic Mood Designer Paper.

The paper that caught my eye was the Perennial Essence design that has beautiful, little daisies falling through it.
After trimming the sides with a Be Mine Stitched Die, I grabbed my Medium Daisy Punch, and punched out a daisy. One daisy calls for another, right?

After punching a second round of petals, and attaching with Mini-Dimensionals, I added the daisy center from a yellow spot on the DSP. If you missed the instructions on my notched, daisy center, click on this picture.

Birthday Daisies
I decided not to make a “true eclipse,” because I liked the way the Thick Whisper White card base was peeking through the bottom.
The daisy stem was made with a die from Sweet Silhouettes, simply cutting off the dandelion top. The leaves were made with Magnolia Memory Dies.

Here’s where the “oops-a-daisy” comes into play. The “love” and “you” dies are from the Well Written Die Set, and somehow, within a matter of minutes, I lost the “you” die. I spent, at least, 30, frustrated minutes searching, because I couldn’t complete my card without it. Besides, I have OCD when it comes to losing things. “Lo and behold,” it had fallen in the trash!
I was able to complete my card with “love you,” in Thick Whisper White Cardstock, matching the stem and card base. Whew!

Thank you for stopping by. May we all find things we’ve lost!
But, we can go shopping and buy new things, so have fun shopping in my store! In case you didn’t know, I’m my best customer!

Product List
Sep 23, 2019 | Gallery, Hand-Crafted Cards |
Holiday china is so pretty, and this cup happens to be holding decaf coffee with lots of cream and sugar, just like I like it.

Holiday China
The cup was made with the Tea Together Stamp Set, Tea Time Dies, and the holly print from Wrapped In Plaid Designer Paper.

The 1 1/2″ vertical stripe on the right side is from the retired Regals 6X6 Designer Paper in Shaded Spruce, but I’ve listed the current Regals 6X6 DSP in my Product List. The stripe is bordered with Whisper White Cardstock that was cut with the Stitched Lace Dies. These were glued to 4″ X 5 1/4″ Whisper White Cardstock, which was glued to a Thick Whisper White card base.

The sentiment is from the First Frost Stamp set, and framed with die-cuts from the coordinating, Frosted Bouquet Dies. I used Cherry Cobbler Cardstock and Cherry Cobbler Ink.
To add to the holiday feel, I found some pine branches and peppermint sticks in the Sip Sip Hooray Stamp Set, cut with the Sip and Celebrate Dies. I stamped them in Shaded Spruce and Cherry Cobbler Ink.

My inspiration was from Fusion’s challenge, the coffee theme and the sketch.

Thank you for stopping by. Wishing you many days of warmth and good cheer during the holiday season!
Product List
Sep 22, 2019 | Gallery, Hand-Crafted Cards |
Have you ever seen a juggling snowman? Well, look no further!

Juggling Snowman
This adorable snowman is from the Snowman Season Stamp Set in the Stampin’ Up! 2019 Holiday Catalog. I stamped him in Memento Black Ink on Whisper White Cardstock, and used my Paper Snips for fussy cutting (cutting by hand). A little color was added with two Stampin’ Blends: Dark Pumpkin Pie for his carrot nose, and Light Smoky Slate for definition.
He wanted to stand by a Christmas tree, so I punched one out from the 6X6 Wrapped in Plaid Designer Paper, using the Pine Tree Punch. Evidently, the snowman loved the tree, and got so excited, he started juggling snowballs made of Sparkle Glimmer Paper.

TIP: I first tried making the snowballs with the 1/2″ Handheld Punch, but the snowman complained they were too big and heavy. Fortunately, there’s a small, round die in the Seasonal Layers Die Set, just the right size.
“Let It Snow” is one of the sentiments in the Snowman Season Stamp Set, which seemed perfect for this scene. I stamped it in Shaded Spruce Ink on Whisper White Cardstock, and the snowman wanted to watch me fussy cut it, so I did.
The three large snowflakes are cut with a Seasonal Layers Die from Sparkle Glimmer Paper.

The background is a stripe from 6X6 Wrapped In Plaid Designer Paper. I chose this vertical stripe to emphasize the “tall & skinny” shape of this card.
I cut a second piece of Wrapped in Plaid DSP to decorate the inside, and added “Merry Christmas” from the Snowman Season Stamp Set. It was stamped in Shaded Spruce Ink on Whisper White Cardstock, and cut with a Stitched Rectangles Die. I made it large enough for a personal note.

It’s hard to believe this is my first 3 1/2″ X6″ card, but the Paper Players challenge this week was my incentive. I discovered it was easy, because I had 12X12″ Whisper White Cardstock, from which I cut a 3 1/2″ strip, and scored at 6″.

If you’d like to see more “tall & skinny” cards, check out the Paper Player’s blogs.
The Paper Players
Product List
Sep 20, 2019 | Gallery, Hand-Crafted Cards |
I just can’t stop punching the daisies! Today’s daisies are on a Happy Birthday card.
Birthday Daisies
This card began with that pretty strip of daisies on the burlap background from Pressed Petals Designer Paper. Can you see where I found it? This wonderful, piece of 12X12 paper has great sections that can be cut apart for simple card making. Plus, the paper pack has 24 sheets, so it’s a great deal. Click on the picture in my Product List for details.

I attached the daisy strip to Whisper White Cardstock, which I embossed with the Script Embossing Folder. Then, this layer was glued to a Thick Whisper White card base.

The two daisies were made with Whisper White Cardstock and the Medium Daisy Punch. I punched two rounds of petals in plain white, and two that I first stamped (Daisy Lane Stamp Set) in Rococo Rose Ink.
Next, the centers were made by stamping the daisy in Crushed Curry Ink, then punching the centers with the 1/2″ Circle Punch. You need to cut some of the petals to make it fit in the punch.
My example is with DSP, and not the daisy I used on this card, but now you can see how I made the notches.


Finally, “Happy” was made with a die from the Merry Christmas Die Set, and burlap paper from Pressed Petals DSP. To complete the sentiment, I stamped “birthday,” from the Well Said Stamp Set, in Rococo Rose Ink, on Whisper White Cardstock, and used a Merry Christmas Label Die for cutting. Happily, it was a perfect fit.

I’m sharing this birthday card with Seize the Birthday, a great place for inspiration.

Thank you for stopping by! Please enjoy shopping at my store!
Product List
Sep 19, 2019 | Gallery, Hand-Crafted Cards |
“Hey, friend,” how about a clean & simple card for today?

“Hey, friend”
As soon as I saw this week’s Freshly Made Sketches challenge, I was excited to participate.

I began by choosing three papers for my rectangles: the floral print and script are Pressed Petals DSP, and the check is In-Color 6X6 DSP. Using the smallest Stitched Rectangles Die made cutting a breeze.
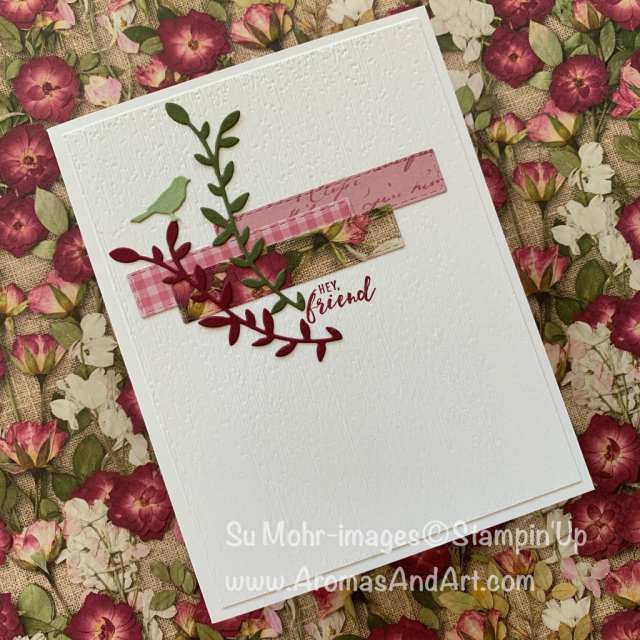
The design called for a small sentiment, and Itty Bitty Greetings provided “hey, friend.” I stamped it in Merry Merlot Ink on the Whisper White background, and embossed this layer with Subtle Texture.
I followed the sketch, adding two sprigs to the design. They were made with a Botanical Tags Die, and two colors from the Pressed Petals DSP; Mossy Meadow Cardstock, and Merry Merlot Cardstock.

My favorite, little, bird from the same Botanical Tags Die Set, completed today’s friendship card. I simply snipped him from the tag, after die-cutting from Pear Pizzazz Cardstock.
You can click on the Botanical Tags Dies in my Product List for details, and put it in your shopping cart for purchase.

Thank you for visiting today. This was such a fun challenge, you may want to give it a try. Happy stamping!
Product List
Sep 18, 2019 | Gallery, Global Design Project, Hand-Crafted Cards |
Today’s card features mums, in all their Fall glory!

Mums for you
It was fun stamping the mums from the Daisy Lane Stamp Set, and cutting them with the Medium Daisy Punch. I used Crushed Curry and Daffodil Delight Cardstock with Real Red Ink for my Fall colors.
My fern for the mums is from the Tropical Die Set, cut from Pear Pizzazz Cardstock.
The word “mums” was made with the Hand-Lettered Prose Dies, and a retired piece of dotted, Subtles 6X6 DSP. I gave several layers to the letters with Pear Pizzazz Cardstock.
TIP: The retired Subtles 6X6 DSP is in the Clearance Rack. Just click on my “shop” button, and you’ll see “Clearance Rack” on the left side of the page.
The current checked, Subtles 6X6 DSP is pictured in my Product List.

To complete the sentiment, I added “for you” from the Itty Bitty Greetings Stamp Set. I stamped it in Old Olive Ink on Whisper White Cardstock, and cut with a Stitched Nested Label Die.

For the background, I embossed Whisper White Cardstock with the backside of the Basket Weave Embossing Folder, and I adhered this to a Thick Whisper White card base.
I decorated the envelope flap with Pressed Petals Designer Paper, which you can see in the top photo.

My inspiration for today’s project was the Global Design Project’s challenge theme.

I appreciate you following my blog. Sharing with you keeps me creating, which is truly a joy! Thank you! I hope you’ve been inspired!
Product List





