This month, the theme is Sale-A-Bration. We hope that you will be inspired by the creations the Pals are sharing with you! Then, you will find the lineup at the end of my post to help you “hop” along from Pal to Pal.
I HAD to choose my favorite Sale-a-bration item; Flight & Airy Designer Paper. In addition to the featured hearts, I decorated the envelope flap with one of the patterns. Follow along to see how I combined it with the Adoring Hearts Bundle in the January-April 2024 Mini Catalog.
Adoring Hearts
The beautiful, floral hearts were cut with a large, Adoring Hearts Die, backed with cardstock for thickness, and placed on Dimensionals. Two, small, leaf dies were used to cut Thick Basic White Cardstock, which were glued in between the hearts.
The background is Basic White Cardstock, cut with the largest Perennial Postage Die, another favorite from the January-April 2024 Mini Catalog. This was glued to a Thick Basic White card base, 8 1/2″ X 5 1/2″, folded at 4 1/4″.
“Just for you” is from the Adoring Hearts Stamp Set. I stamped it in Memento Black Ink, and used it’s Adoring Hearts Die for cutting. Don’t you love the curved banner?
After adding three, Pastel Adhesive-backed Sequins, my card was complete.
Lily says, “Thank you for visiting my “Go Go.”
More inspiration awaits, so use the lineup below to visit the rest of the Design Team. Then, please mark your calendars for our next blog hop next month, when our theme will be “Love is in the Air” on February 14th.
Place an order of $75.00 or more, before tax and shipping, and I will send you the Ombre Matte Decorative Dots in February (160 adhesive-backed pieces).
Happy Holidays! This month, the theme is Winter Wonderland. We hope that you will be inspired by all the amazing creations the Pals are sharing with you! Then, you will find the lineup at the end of my post to help you “hop” along from Pal to Pal.
For my Winter project, I chose Winter Meadows Designer Paper on a fun fold card, the “Triple Fold-out.”
For those who like to plan ahead, Winter Meadows Designer Paper is a carry-over to 2024, so you might want to grab some now.
Triple Fold-out
I began by cutting Basic White Cardstock, 4 1/4″ X 11″. Then, I scored it four times: 2 1/2″, 3 3/4″, 6 3/4″, and 8 1/4″. After folding and burnishing the folds (mountain, valley, mountain, valley), I prepared the panels.
There are two squares of Misty Moonlight Cardstock, 4″ X 4″, topped with Winter Meadow Designer Paper, 3 3/4″ X 3 3/4″. The third panel has Misty Moonlight Cardstock, 2 1/2″ X 3 3/4″, topped with Winter Meadow Designer Paper, 2 1/4″ X 3 3/4″.
The third panel is glued flat, but the first two panels are glued to the Basic White card base with an overlap, so take care not to glue the entire panel.
I couldn’t resist adding birds to the scene, using two from Flight & Airy Designer Paper. This paper is a FREE Sale-a-bration item, available to customers January 3, 2024. You’re going to love it!
To give the birds a place to perch, I cut Basic White Cardstock with a Christmas Pinecone Die, snipped three sections, and glued it on each panel.
“Merry Christmas” and “Wishing you a wonderful season filled with all the good things that warm your heart and lift your spirit” are from the Regal Reindeer Stamp Set. They were stamped in Night of Navy Ink on Basic White Cardstock, and I used the Double Oval Punch and Something Fancy Dies for cutting.
As a final touch, I added three, Fresh Freesia, Tinsel Gems.
Thank you for visiting. Have a wonderful holiday season!
More inspiration awaits, so use the lineup below to visit the rest of the Design Team. Then, please mark your calendars for our next blog hop next month, when our theme will be “Sale-A-Bration,” where the projects will showcase all of the great products available with orders over $50.
Place an order of $75.00 or more, before tax and shipping, and I will send you Iridescent Adhesive-backed Discs (200, 40 each of five colors) in January.
This month, the theme is Home for the Holidays. We really hope that you will be inspired by all the amazing creations the Pals are sharing with you! Then, you will find the lineup at the end of my post to help you “hop” along from Pal to Pal.
Everyone needs gift card holders for the Holidays! This year, I’m using Scalloped Gift Card Boxes, because they are sturdy, easy to make, and fun to decorate.
Scalloped Gift Card Boxes
The boxes come 10 in a pack, and the tilt-up card holder sold me. To assemble, I folded all the score lines, then folded and notched one side at a time, and folded the front last.
The tilt-up card holder fits neatly inside, displaying the gift card beautifully. Isn’t it cute?
I used Traditions of Saint Nick to decorate five of the boxes. The top is 4″ X 2 3/4″, the front and back strips are 4″ X 3/4″, and the two sides are 2 3/4″ X 3/4″.
Joy Of Christmas Designer Paper was used to decorate the other five boxes.
For the tags, I used two Saint Nicholas Dies to cut Saint Nick from the Designer Paper, backed him with Basic White Cardstock, and punched a hole for the tie. I also used a Tailored Tags Die to cut the Joy Of Christmas DSP, backed with Basic White Cardstock, and added a deer, cut with a Grove Die.
I stamped “to” and “from” on the back of the tags with a Joy Of Noel stamp, and Mossy Meadow Ink.
My Scalloped Gift Card Boxes are ready for gift cards, and wrapping with Real Red Ribbon and Linen Thread.
More inspiration awaits, so use the lineup below to visit the rest of the Design Team. Then, please mark your calendars for our next blog hop next month, when our theme will be Winter Wonderland.
This month, the theme is The Color Purple. We really hope that you will be inspired by all the amazing creations the Pals are sharing with you! Then, you will find the lineup at the end of my post to help you “hop” along from Pal to Pal.
The Night Divine Bundle was my choice for this month’s The Color Purple theme. I began by using a Blending Brush to add Fresh Freesia Ink to Basic White cardstock, 4″ X 5 1/4″. Then, I stamped “O Holy Night,” from the Night Divine Stamp Set, in Gorgeous Grape Ink. This layer was glued to a Fresh Freesia card base, 8 1/2″ X 5 1/2″, folded at 4 1/4″.
O Holy Night
Next, I used Night Divine Dies to cut, Mary, Joseph, Jesus, a Shepherd, and a Wiseman (conveniently, all one die) from Highland Heather Cardstock. And, I cut the donkey and lamb from Basic White Cardstock. Don’t you love the detail in the die-cuts?
The frame for the scene was cut with a Night Divine Die from Gorgeous Grape Cardstock, and all was glued in place. After adding a Fresh Freesia star, and giving the animals a double layer for thickness, my card was complete.
More inspiration awaits, so use the lineup below to visit the rest of the Design Team. Then, please mark your calendars for our next blog hop next month (second Wednesday), when our theme will be Home for the Holidays.
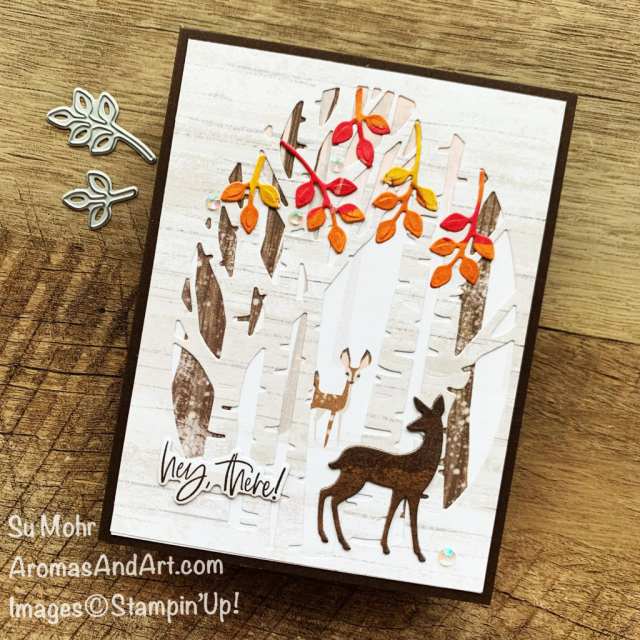
This month, the theme is All Creatures Great and Small. We really hope that you will be inspired by all the amazing creations the Pals are sharing with you! Then, you will find the lineup at the end of my post to help you “hop” along from Pal to Pal.
Have you seen the One Horse Open Sleigh Designer Paper? It’s an “online exclusive” product, with fabulous designs for the holidays, which you can view by clicking on its picture in my Product List below.
I began today’s card with one of the scenes, cut 4″ X 5 1/4″, glued to an Early Espresso card base, 8 1/2″ X 5 1/2″, folded at 4 1/4″. See the cute deer facing us?
Next, I cut a wood pattern from the designer paper, 4″ X 5 1/4″. Then, I used an Aspen Tree Die to cut the large oval of trees, and glued it on top of the scene, making sure the deer was peeking through the trees.
Deer among trees
The deer silhouette is from the Grove Dies, cut from another One Horse Open Sleigh wood pattern, layered for thickness, and glued in place.
The branches of Fall leaves were cut with two Grove Dies from Masterfully Made Designer Paper, and glued in place.
“Hey there!” is from the Charming Sentiments Stamp Set. I stamped it in Early Espresso Ink on the designer paper, used its Sentiment Silhouettes Die for cutting, layered it for thickness, and glued it in place.
A little sparkle was added with Iridescent Rhinestones.
Thank you for spending a few moments of your summer with me.
More inspiration awaits, so use the lineup below to visit the rest of the Design Team. Then, please mark your calendars for our next blog hop next month (second Wednesday), when our theme will be The Color Purple.
Place an order of $75.00 or more, before tax and shipping, and I will send you the Festive Pearls in October.
200 adhesive-backed pieces, 50 each of 4 colors
Come one, come all! Mark your calendars for October 7th. You won’t want to miss this FREE World Card Making Day Event! Questions? Send me an email, [email protected].
This month, the theme is Punch Your Art Out. We really hope that you will be inspired by all the amazing creations the Pals are sharing with you! Then, you will find the lineup at the end of my post to help you “hop” along from Pal to Pal.
Peter, the Easter Bunny Punch, has been sitting idle for a while now, and said he didn’t want to wait until it was time to make Easter cards. He said he is a “unique” rabbit, and would make a perfectly good “snow bunny,” if I cut him from Earthen Elegance Designer Paper. What do you think?
He also wanted me to decorate his envelope with another pattern of Earthen Elegance Designer Paper to match his fur. It was easy to cut a section, 5 3/4″ X 2 1/2″, glue it to the flap, and trim the excess with Paper Snips while using the flap as a template.
Peter the Snow Bunny
To further prove his worthiness, he asked to have a beautiful background of snow, pine needles and pinecones. We found the perfect die in the Christmas Pinecone Die Set, cut it from Basic White Cardstock, and glued it to Basic White Cardstock, 4″ X 5 1/4″. This was glued to a Pecan Pie card base, 8 1/2″ X 5 1/2″, folded at 4 1/4″.
Peter had been sitting next to the Double Oval Punch, which encouraged him to speak up. So, Peter returned the favor by requesting the Double Oval Punch be used for the sentiment.
The sentiment, ” ‘Tis the season,” is from the Brightest Glow Stamp Set, stamped in Mossy Meadow on Basic White Cardstock, and punched with the plain oval. The scalloped oval was punched from Basic White Cardstock, also, and attached with Dimensionals.
For a touch of red and green, I stamped some pine and berries from the Cottage Wreaths Stamp Set. The pine is Mossy Meadow, and the berries, Cherry Cobbler, cut with Country Wreaths Dies, and glued to the sentiment.
The big question is, how do you catch a “unique” rabbit? Unique up on it. (my husband’s joke).
Thank you for hopping by! Have a great day!
More inspiration awaits, so use the lineup below to visit the rest of the Design Team. Then, please mark your calendars for our next blog hop next month, when our theme will be All Creatures Great and Small.
Place an order of $75.00 or more, before tax and shipping, and I will send you the Tinsel Gems Three-Pack in September. The pack contains 150 adhesive-backed pieces in three colors: Fresh Freesia, Lost Lagoon, and Misty Moonlight.
During the month of August, shop the Kits Collection, and receive up to 30% discount! Click to enter Online Exclusives where they are located.
Enter your email below to receive each of my new posts by email!
Archives
Categories
Disclaimer
My name is Su Mohr, Independent Stampin' Up! Demonstrator. I am responsible for the content on this site. Stampin' Up! does not endorse the use of or contents of the classes, services, or non-Stampin' Up! products I may offer here.


 Product List