Dec 18, 2019 | Gallery, Global Design Project, Hand-Crafted Cards |
Today’s card was designed around a Stitched Nested Labels die-cut, the irregular hexagon that’s holding “Thank You.”

Lacey Thank You
I wanted to use this die, because of the challenge at Global Design Project.

I also wanted to use the new 2020 Peaceful Poppies Designer Paper. It’s fabulous, and I couldn’t wait to cut into it! The first layer on the card is a beautiful, all-over floral print, which I adhered to a Thick Whisper White card base.
Next, I chose a coordinating stripe in Pool Party, and used the second to largest, Stitched Nested Labels Die, for cutting. Then, I layered the the die-cut on a second die-cut for thickness, and added Dimensionals. Doesn’t it look like a worn piece of denim?

Beneath the hexagon is a layer of Whisper White Cardstock, cut with Stitched Lace Dies. I trimmed the four sides with the long, skinny, accompanying die.
TIP: By using a foam mat and bristle brush, very few holes had to be individually poked. Also, I used a piece of cardstock slightly larger than the die, so the cardstock could be peeled away from the die.

Just one more die-cut was needed to complete my card, Thank You from Thick Whisper White Cardstock.

You can click on the pictures in my Product List to see details of today’s supplies. The dies are available now, and you can order the Peaceful Poppies DSP on Jan. 3, 2020.
“Thank You” for visiting me today!

Product List
Dec 16, 2019 | Gallery, Hand-Crafted Cards |
Everyone loves tulips! Right? The Timeless Tulips Stamp Set is perfect for Mother’s Day, Easter, sympathy, bitrthday, get well, and Spring. The images and sentiments have you covered, which you can see in my Product List below, and will be available January 3, 2020.

Hello Tulips
I began by stamping “off” three tulips in pretty, Merry Merlot, on Whisper White Cardstock. There is a Tulip Builder Punch that comes bundled with the Timeless Tulips Stamp Set, but I used my Paper Snips for cutting the three tulips.
Next, I stamped three stems in Mossy Meadow and Pear Pizzazz Inks on a Whisper What Cardstock layer. Then, I stamped six leaves to match the stems, and fussy cut the leaves.

Before arranging the flowers and leaves on the white layer, I embossed it with the new, 2020 Coastal Weave Embossing Folder. I love the look of this woven mat, and it’s sure to become a favorite. Behind the white mat is a layer of Magnolia Lane Designer Paper, which is glued to a Mossy Meadow card base. I used Stitched Rectangles Dies to cut the layers, making layering a breeze.
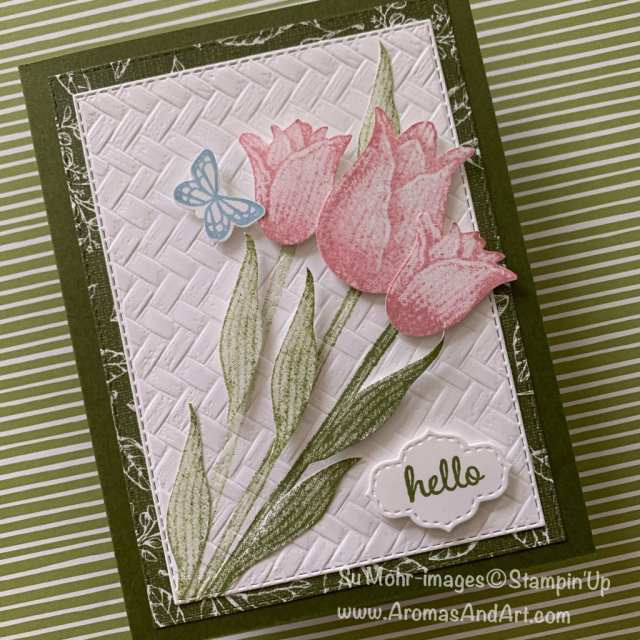
The sentiment, “hello,” is from the Timeless Tulip Stamp Set, stamped in Mossy Meadow Ink, and cut with the smallest, Stitched So Sweetly Die. This new die set will also be getting lots of use!
And, just when I thought my card was complete, a little, Seaside Spray, butterfly flew onto my card. You don’t usually see blue butterflies! It was made with the Butterfly Gala Stamp set and Butterfly Duet Punch.

My inspiration for today’s card was a color challenge at Fab Friday.

Thanks for dropping by to say “hello.” The first two items, and the embossing folder, in my Product List will be available January 3, 2020. Everything else is available today.
Go shopping at my store, and give the gift of paper crafting. Enjoy the rest of your day!
Product List
Dec 15, 2019 | Gallery, Hand-Crafted Cards, TGIF |
One of the most beautiful dies in my collection is the tree from the Sweet Silhouettes Die Set. Here it is, cut from Thick Whisper White Cardstock.

Forever Tree
I knew I wanted to use this tree as soon as I saw this week’s TGIF challenge.

I decided a “white on white” card would be perfect for the anniversary card I had in mind.
First, I embossed a Whisper White Cardstock layer with the Subtle Textured Embossing Folder. Then, I glued a white band, bordered in Gold Foil, across the middle of the layer. Next, I placed the tree on top of the band, and glued the layer to a Thick Whisper White card base.
TIP: I glued the branches, not the leaves, so they would lift, creating shadows and dimension.

The Sweet Silhouettes Die Set also has the word, “forever,” which I cut from Gold Foil, and glued on top of the tree, in the middle of the band.

The tiny pearls were the final touch.

Keep scrolling to see my short Product List for today’s card. You’ll notice, there’s no ink. Sometimes you can let sensational dies do all the work!
Have a wonderful day!
Product List
Dec 13, 2019 | Gallery, Hand-Crafted Cards |
My Christmas cards are in the mail, so I rewarded myself with time to play with a new stamp set, Thoughtful Blooms.

Wandering Vine
Thoughtful Blooms happens to be one of the 2020 Sale-A-Bration stamp sets, and the really exciting thing about it is the coordinating, Small Bloom Punch. I know how we all love punches, and both items are FREE with a qualifying order, beginning January 3rd!

I began by stamping three, solid flowers, in half-strength Highland Heather Ink on Whisper White Cardstock. Next, I stamped their outlines in full-strength, Highland Heather Ink, and the centers in Crushed Curry Ink. Then, I had the fun of using the Small Bloom Punch for cutting.
The vine for my flowers was easily stamped, three times, in Garden Green ink on Whisper White Cardstock. After stamping the vine, I used the Brick & Mortar Embossing Folder to build the wall.

The small, “thank you” is also from the Thoughtful Blooms Stamp Set, surrounded by Garden Green Cardstock, cut with an Ornate Frames Die. Isn’t it cute?

If you’re wondering what inspired me to make a climbing vine, it was this week’s CAS(E) this sketch challenge.

The Sale-A-Bration items aren’t in my store yet, but you’ll find the other supplies in my Product List.
Come back Jan. 3rd to shop, and qualify for FREE Sale-A-Bration items! Thanks for visiting me today!
Product List
Dec 12, 2019 | Gallery, Hand-Crafted Cards |
Sale-A-Bration is coming soon! January 3, 2020, you’ll be able to qualify for FREE product. You’re going to want the Lovely Lily Pad Stamp Set and coordinating Lily Pad Dies, two of the FREE items with a qualifying order.

Lily Pad Day
This stamp set is special, because it’s reversible; a unique quality Stampin’ Up! introduced last season.
I first used the smooth side of the stamp, stamping the lily in Flirty Flamingo Ink. Then, I turned the stamp over, stamping in Melon Mambo Ink for the outline.
The leaves were stamped the same way, using Granny Apple Green and Garden Green. I chose my pinks and greens from the colors in the coordinating Lily Impressions Designer Paper, even though it doesn’t appear on this card. The DSP is another FREE item, and it’s gorgeous!
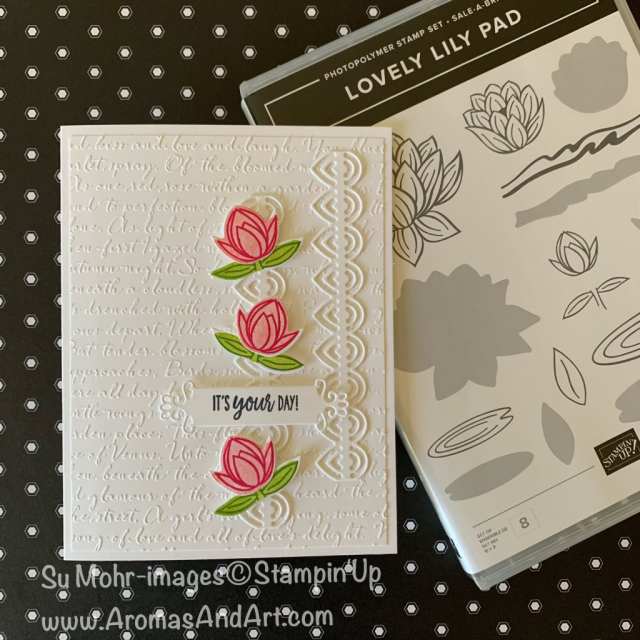
After stamping the three flowers and leaves, I used the Lily Pad Dies for cutting, and glued the lilies on the stems.
I wanted the lilies to stand out, so used a Whisper White background, embossed with the Scripty Embossing Folder, which I glued to a Thick Whisper White card base. Additional texture was added with two strips of Thick Whisper White Cardstock, cut with a wonderful, Lily Pad Die. See the die on the left? It’s 4 1/4″ long.

Last, but not least, the sentiment is from Under My Umbrella, a new stamp set from the 2020 Mini Catalog. I stamped “It’s your day” in Memento Black Ink, and used an Ornate Frames Die for cutting. After lifting the lillies and sentiment on Dimensionals, my “sneak peek” card was complete.

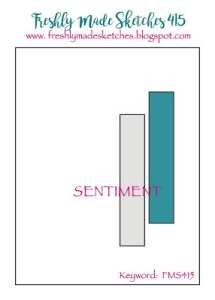
I think you can see how Freshly Made Sketches was my inspiration.
Now, back to addressing Christmas cards. Sorry, I just had to take a break into Spring!
The Sale-A-Bration items aren’t in my store yet, but you’ll find the other supplies in my Product List. Come back Jan. 3rd! Thanks for visiting me today!
Product List
Dec 11, 2019 | Gallery, Hand-Crafted Cards, Pals Blog Hop |

Welcome to the Pals’ Blog Hop! We’re so glad you’re here because we made some great projects for our Retirement Fun Fold Party – showcasing our favorite products from the Holiday Catalog that will be leaving us forever. You may be starting the hop here or coming from a previous Pal’s blog. Either way, you’ve come to the right place. You’ll find the full line-up below to help you move, or “hop” along from Pal to Pal.
I know we have Holiday on our minds, but the retiring items I’m sharing are fabulous year-round. And, this is the best reason for getting them before they retire. Today’s card is celebrating a wedding, but would work perfectly for an anniversary, birthday, or Happy New Year!

“clink”
The “fun fold” I chose is called a Double Z Fold Card, and photographing it is the most difficult part about it. Funny, huh? Hopefully, my instructions will enable you to make it quite easily.
First, cut a piece of 8 1/2″ X 11″ Cardstock in half, 4 1/4″ X 11″. This is in the neutral color, Gray Granite. Score at 2 3/4″ and 5 1/2″. I used the “bubbles’ die from the retiring Sip & Celebrate Die Set to cut the back section of the card base. And, I added Whisper White Cardstock to the middle section for a personal message.
Second, cut a band for the bottom, 11″ X 1 1/2.” Score at 5 1/2″ and 2 3/4″. I decorated the band with three strips of Perennial Essence Designer Paper, which I embossed with the retiring embossing folder, Stylish Scroll.

The trickiest part of the Z-Fold is fastening the band. Apply glue to the front of the card, and to the back of the end of the band. I don’t normally use this much glue, but I wanted you to see it. LOL. Then attach the band, closing the card while fastening to make sure it attaches evenly.
TIP: Liquid Glue gives you a little wiggle room.

Close, flip up, and position.

Now, for the champagne! I used the die from the Sip & Celebrate Die Set to cut the stemware from Mercury Glass Acetate. This was backed with Whisper White Cardstock that I stamped in Blushing Bride Ink with a stamp from the Sip Sip Hooray Stamp Set.

Next, I cut “cheers” from Sparkle Glimmer Paper, using a die from the Cheers Die Set, and glued it to the front band.
“Happy Wedding Day” is from the Beautiful Bouquet Stamp Set, stamped in Gray Granite Ink, and cut with an Ornate frames die. A second die from the set was used to cut the fancy frame from Perennial Essence DSP.

For the final touch, I used the Hand-Held 1/16″ punch to add a few Sparkle Glimmer Paper “bubbles.”

If you haven’t tried this Fun Fold, you should! It will fit right inside our Medium Envelope, which is another thing to love about it.
Thanks so much for stopping by today.
More inspiration awaits! Use the Blog Hop Line-up below to visit the rest of this month’s Design Team. My fellow Pals are excited to show you what they’ve created! Don’t forget to show us some love by commenting on our creations. Please click to leave a COMMENT HERE.
Mark your calendars for Wednesday, January 8th, for our Time to Sale-A-Brate blog hop when our Design Team showcase projects using brand new products from the new mini catalog and Sale-A-Bration brochure. Don’t miss the fun!
Pals December 2019 Blog Hop Line-Up
- Mary Fish at Stampin’ Pretty
- Jackie Beers at Blue Line Stamping
- Lisa Ann Bernard at Queen B Creations
- Beth McCullough at Stamping Mom
- Katy McGloin at Just Fun Stamping
- Stesha Bloodhart at Stampin’ Hoot!
- Jeanie Stark at Just Stampin’
- Su Mohr at Aromas And Art ***YOU ARE HERE***
- Debra Simonis at Deb’s Stampin’ Grounds
- Lynn Kolcun at Avery’s Owlery
- Peggy Noe at Pretty Paper Cards
- Jen Roque at Stamp Camp with Jen
- Mary Hanson at Up North Stampin’
- Karen Hallam at Karen’s Stamping Habit
- Tricia Chuba at ButterDish Designs
- Wendy Klein at Doggone Delightful Stampin’
The supplies for today’s card are in my Product List. The first group has the five products that are retiring, and the second group are continuing. The retiring products are only while supplies last, so click on the pictures to put them in your shopping bag.
And, here is a deal from Stampin’ Up! you don’t want to miss! 24 hours of FREE SHIPPING. It’s only happening December 11. 12:01 am (MT)–11:59 pm (MT)

Thanks so much for shopping with me! I appreciate your support!
Product List
Product List





