Aug 18, 2019 | Gallery, Hand-Crafted Cards |
Dino Days has become my favorite set for kids; kids of all ages. When I saw the Paper Players challenge was a “clean & simple, card for kids,” I reached for my Dino Days stamp set and coordinating Dino Dies.

Gingham Dino
I began by using a Dino Die to cut Dino from Purple Posy, gingham, In Color 6X6 Designer Paper. It was tempting to cut more dinosaurs, but I kept in mind that this needed to be a CAS (clean & simple) card. So, instead of a friend, he just got some palm branches (Tropical Dies) for sustenance. One was cut from Granny Apple Green Cardstock, and one from a scrap of DSP.

Still thinking of CAS, I stamped “You’re RAWRsome!” right on the Whisper White background, rather than a separate piece of paper that would get placed on Dimensionals.
The white background was cut with a Stitched Rectangle Die, layered on Granny Apple Green, which was cut with the next size, and layered on a Gorgeous Grape card base. It’s so easy to layer this way, with the Stitched Rectangle Dies.

Trying to keep this CAS, I intended to glue Dino on top of the palms. However, Dino felt he deserved to be raised (imagine that!) on Dimensionals, so I complied. He was very persuasive in his cute, gingham suit.

Clicking on this picture will take you to the Paper Players site, where you can play along.

Thank you for stopping by. You can see Dino’s friends by clicking on the picture in my Products List below.
Dino hopes he inspired you, and he wants me to read all of your comments to him. Please click to leave a COMMENT HERE.
For more inspiration, check out the blogs of the Paper Players Design Team:

Product List
Aug 17, 2019 | Gallery, Hand-Crafted Cards |
Today’s card is showing the versatility of the Playful Penguins stamp set.

Penguin Friends
The adorable penguins are beautifully sketched, and the stamp set has sentiments for Christmas, New Year’s, and friendship cards.
If you’d like to see details of two, Playful Penguins Christmas cards, click on their pictures below my Product List.

I began by stamping two of the penguins from the Playful Penguins stamp set in Memento Black Ink on Whisper White Cardstock. I also stamped the scarf from the set in Balmy Blue Ink, and Granny Apple Green Ink. After fussy-cutting, I glued the scarves to the penguins, and placed my smartly dressed animals on Dimensionals.

The background is Whisper White Cardstock with the top half embossed by the Eyelet Lace embossing folder, and the bottom half by the Subtle Textured embossing folder.
TIP:I did the top half first, and ran it through the embossing machine a second time for the bottom half.

The Freshly Made Sketches challenge gave me the idea of half n’ half embossing for the background.

And, the snow drift provides suitable waves for this week’s CAS(E) this sketch.

The snow drift was cut with a die from the Magnolia Memory set. You just never know where you’ll find a snow drift!
“Always by your side,” stamped in Balmy Blue Ink, fit perfectly, right between the friends.

Thank you for visiting my blog today. The penguins will be available September 4th, but everything else in my Product List is available today. Thanks for shopping!
Product List
Aug 16, 2019 | Gallery, Global Design Project, Hand-Crafted Cards |
Some of my favorite Christmas cards from last year were made with the carry-over stamp set, Winter Woods. It has a fabulous tree that I’m using on today’s card. You can order this current Stampin’ Up! product right now!

In the Woods
I stamped the tree in Garden Green Ink on Thick Whisper White Cardstock, and cut it with its die from In the Woods die set.

I made the background with the Buffalo Check stamp and Real Red Ink on Whisper White cardstock. Before gluing it to the Thick Whisper White card base, I tied Linen Thread around the top.
The sentiment is from the Itty Bitty Greetings stamp set, stamped in Soft Suede ink, and cut with a Merry Christmas label die.

While making today’s card, I kept the Global Design Project sketch in my mind.

To go along with the strip at the bottom of the sketch, I stamped pinecones in Soft Suede Ink. This pinecone is from the new stamp set, Perfectly Plaid (I was anxious to see what it looked like), but there is a pinecone in Winter Woods also. You can see them in the pictures in my Product List below.
I lifted the pinecone strip, tree, and sentiment on Dimensionals, and decorated the tree with a Gold Glimmer Paper star. At the last minute, I embossed the envelope with the Pinewood Planks embossing folder, shown in the first picture. It has a woodsy feel, don’t you think?

Once again, I thank you for paying me a visit. What would I do without you! I appreciate you shopping at my store!
Product List

Garden Green Classic Stampin’ Pad
[126973]
$6.50
Aug 15, 2019 | Gallery, Hand-Crafted Cards |

Today’s Seize the Birthday “topping” is “butterflies.” I like the combination of black, white and bright, and had fun using my Stampin’ Write Markers to color the butterflies.

Butterfly Wishes
I began with a butterfly stamp from the Butterfly Wishes Stamp Set. This butterfly coordinates with the Butterfly Duet Punch, so I knew I could easily make it fly on the card front, by punching and adding a Dimensional.
The stamp set also has a great birthday sentiment, “Love to celebrate you, ” which I stamped in Memento Black ink on the Thick Whisper White card base.

The Stamparatus is a handy tool, which I used to color the butterflies. You can click on the picture of it in my Product List, if you’d like more information about it.
I placed the butterfly stamp on the top plate, then colored it with three colors of Stampin’ Write Markers in orange/pink shades, lowering the plate to the white cardstock, held in place by a magnet. I cleaned the stamp, moved the cardstock, and repeated the process in red shades and purple shades.
Stampin’ Writes can be purchased individually, or in color groupings that you can see in my Product List.

Since the card base is “thick,” I decided to make a one-layer card, and embossed the right side with the Swirls & Curls Embossing Folder. To add some black, I colored a strip of Laser-Cut Designer Series Paper with black ink and a Sponge Dauber, and glued it next to the embossed section.
The last detail was five, Black Rhinestones.

I’m having so much fun being a Surprise Party Guest. You should join the party at Seize the Birthday by posting your creation in the gallery!
Thanks so much for stopping by, and shopping at my store. I appreciate your support!
Product List
Aug 14, 2019 | Gallery, Hand-Crafted Cards, Pals Blog Hop |

Welcome to the Pals’ August Blog Hop! We’re so glad you’re here because we made some great projects for “Special Occasions” – cards or projects that adds beauty to the special occasions we all love to make cards for! You may be starting the hop here or coming from a previous Pal’s blog. Either way, you’ve come to the right place. You’ll find the full line-up below to help you move, or “hop” along from Pal to Pal.
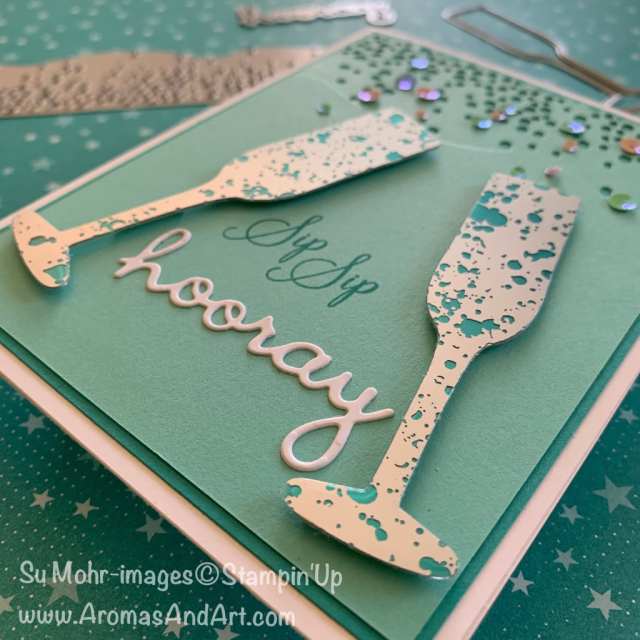
Special occasions often involve celebrating with a “toast.” I’m excited to share with you the new Sip Sip Hooray stamp set with coordinating dies; appropriate for weddings, anniversaries, birthdays, the New Year, you name it.

Sip Sip Hooray
I began with the champagne flutes, and excitedly used a Sip & Celebrate Die to cut into the Mercury Glass Acetate. I just received this new product in my 2019 Holiday pre-order, and couldn’t wait to play with it! It really looks like glass, and it’s wonderful the way it allows color to show through it.
After experimenting with several backings, I decided on a piece of Noble Peacock Foil. I used the same die to cut more flutes, glued the acetate and foil together, and placed my completed champagne flutes on Dimensionals.
TIP: Dot glue on the solid areas of the acetate, so it doesn’t show.

The background is Coastal Cabana Cardstock, layered on Bermuda Bay Cardstock, layered on a Thick Whisper White card base.
The top layer was given some fun bubbles with a die in the Sip & Celebrate Die Set. More bubbles were made with Iridescent Sequins.

“Sip Sip” is from the Sip Sip Hooray Stamp Set, stamped in Bermuda Bay Ink. The stamp set has “hooray” but I used the word from the Well Written Die Set, cutting it from Thick Whisper White Cardstock.
Thank you for visiting my blog! I appreciate your support, and shopping at my store. The Holiday items will be available Sept. 4th, but you can see details about them by clicking on the pictures in my Product List.
More inspiration awaits! Use the Blog Hop Line-up below to visit the rest of this month’s Design Team. My fellow Pals are excited to show you what they’ve created! Don’t forget to show us some love by commenting on our creations. Please click to leave a COMMENT HERE.
Mark your calendars for Wednesday, September 11, 2019 when our Hoppin’ Pals share their “It’s the Sentiment that Counts” projects. Don’t miss the fun!
Pals Blog Hop Line-Up
- Mary Fish at Stampin’ Pretty
- Jeanie Stark at Just Stampin’
- Terri George at Stamp Me Crafty
- Lisa Ann Bernard at Queen B Creations
- Stesha Bloodhart at Stampin’ Hoot!
- Debbie Mageed at Secrets to Stamping
- Leah O’Brien at Stamping By The Bay
- Karen Hallam at Karen’s Stamping Habit
- Jennifer Michalski at Stamping Serenity
- Rosanne Mulhern at Heartfelt Stamping
- Peggy Noe at Pretty Paper Cards
- Denise Hoepfner at The Mountain Magpie
- Wendy Klein at Doggone Delightful Stampin
- Pamela Sadler at Stampin Pink Rose
- Tricia Chuba at ButterDish Designs
- Su Mohr at Aromas And Art (YOU ARE HERE)
- Mary Hanson at Up North Stampin’
- Katy McGloin at Just Fun Stamping
- Jill Killeen at Killeen House Studio
- Beth McCullough at Stamping Mom
- Lynn Kolcun at Avery’s Owlery
- Katie Ferguson at Cottage Paper
- Rae Harper Burnet at Wild West Paper Arts
Product List
Aug 13, 2019 | Gallery, Hand-Crafted Cards, TGIF |
Feels Like Frost Designer Paper is absolutely gorgeous, and I’m excited to share it with you. I love the photographed images of this 6″ X 6″ DSP from the 2019 Holiday Catalog.

Frosty Dandelion
I began with a Seaside Spray card base, and trimmed a piece the 6″ X 6″ DSP to 4″ X 5 1/4″. To add dimension, I used a Stitched Nested Label Die to cut a section from the top of the DSP. Then, I layered it for thickness, and placed it on dimensionals.

To hold the sentiment, I used a smaller Stitched Nested Label Die to cut a piece of the “left-over” DSP for the sentiment. “Tis the Season” is from the Itty Bitty Greetings stamp set, stamped in Night of Navy Ink.

The “frosty” dandelion is from the Sweet Silhouettes die set, cut from Sparkle Glimmer Paper. I’m not sure what the plant is in the photo, but they look similar, don’t they?

My layout was inspired by this week’s TGIF challenge. So, I HAD to sprinkle on some Woven Threads Sequins.

I hope you enjoyed this sneak peek. If you liked it, you can get a glimpse of the entire pack of Feels Like Frost DSP by clicking on the picture in my Product List.
Have a wonderful day!
Product List





