Oct 15, 2021 | Gallery, Hand-Crafted Cards |
Who doesn’t love star-shaped Christmas cookies? Keep reading for the “paper” recipe.
I began by mixing up some cookie dough from Cinnamon Cider Cardstock, and using Christmas Trimmings Dies for cutting. This gave me two sizes of cookies. I’ll take the larger, please.

Christmas Cookies
Next, the cookies were given texture with the Tasteful Textile embossing folder. As my mouth was watering, I iced the cookies with Thick Basic White Cardstock, cut with Christmas Trimmings Dies. For added decoration, I used Christmas Trimmings Dies to give the cookies Cherry Cobbler berries and Mossy Meadow holly leaves.

The cookies are on a mat of Tidings of Christmas Designer Paper, cut with the second largest Stitched Rectangles Die. Prior to placing the cookies, the striped mat was glued to a Thick Basic White card base, 8 1/2″ X 5 1/2″, folded at 4 1/4″.

The sentiment is on Thick Basic White Cardstock, 4″ X 3/4″, with a flagged end. “Christmas” is from the Snowman Season Stamp Set, stamped in Cherry Cobbler Ink. “Cookies” is from the Love You More Than Die Set, cut from Cinnamon Cider Cardstock.
To complete the recipe, I glued the larger cookie flat, and placed the sentiment on Dimensionals, along with the smaller cookie. I made an extra cookie, because I couldn’t wait to take a bite!

I was inspired by Freshly Made Sketches.

My October Host Code Gift
Just type the current host code (found beneath my profile picture) in the box provided, on your order of $75.00 or more, and I will send you the Bumblebee Trinkets in November.
“Create quite the buzz when you finish off your paper crafting projects with these Bumblebee Trinkets. The matte gold finish makes for the perfect combination of elegant and adorable. Add them to your next handmade card or gift; your friends and family will “bee” delighted”.
20 pieces, 1/2″.

I appreciate you visiting. Thank you! I would love for you to join my Dream Makers team. Think of the Starter Kit as the Ultimate Bundle, and take it for a “test drive.” No obligation! Click here When I’m not making cards, I’m spending time with my biggest fan.

Click here to shop today!

Product List
Oct 14, 2021 | Gallery, Hand-Crafted Cards, TGIF |
One of my favorite die sets in the July -December 2021 Mini Catalog is Giving Gifts. I love Santa and his reindeer, and the frame can be easily snipped away. For today’s card, I used Night of Navy Cardstock, leaving the bottom of the frame for gluing to the sentiment label.

Santa in the forest
The sentiment is from one of my favorite stamp sets in the catalog, Heartfelt Wishes. Isn’t the font fabulous? I stamped “happiest holidays” in Night of Navy Ink on Thick Basic White Cardstock, used an Ornate Layers Die for cutting, and placed it on Dimensionals.

I used the same Ornate Layers Die to cut the three panels behind Santa. This is Beauty of the Earth Designer Paper in a sketchy, blue, forest pattern, that I thought Santa and his reindeer would enjoy.

Behind the three panels is Basic White Cardstock, 4″ X 5 1/4″, embossed with one of the Wintry Embossing Folders on an angle. It’s one of the narrow embossing folders that fits in the Mini Stampin’ Cut & Emboss Machines, with details in my Product List below. I glued the embossed pine boughs to a Thick Basic White card base, 8 1/2″ X 5 1/2″, folded at 4 1/4″.
Finally, I added three, bright, Rhinestones to light the way, and my card was complete.

I was inspired by TGIF.

My October Host Code Gift
Just type the current host code (found beneath my profile picture) in the box provided, on your order of $75.00 or more, and I will send you the Bumblebee Trinkets in November.
“Create quite the buzz when you finish off your paper crafting projects with these Bumblebee Trinkets. The matte gold finish makes for the perfect combination of elegant and adorable. Add them to your next handmade card or gift; your friends and family will “bee” delighted”.
20 pieces, 1/2″.
I appreciate you visiting. Thank you! I would love for you to join my Dream Makers team. Think of the Starter Kit as the Ultimate Bundle, and take it for a “test drive.” No obligation! Click here When I’m not making cards, I’m spending time with my biggest fan.
Click here to shop today!
Product List
Oct 13, 2021 | Gallery, Hand-Crafted Cards, Pals Blog Hop |

Welcome to the Stampin’ Pretty Pals’ Blog Hop! This month, the theme is Fantastic Fun Folds and 3D Projects. We really hope that you enjoy and will be inspired by them! As you hop from blog to blog, don’t forget to leave comments because we love hearing from you. You will find the lineup at the end of my post to help you “hop” along from Pal to Pal.
It’s October, and that means it’s time to share my favorite, easy-to-make, gift card holder. It’s always fun changing it up with the latest designer papers, stamps, and die-cuts.
I chose three colors of cardstock, Evening Evergreen, Old Olive and Cherry Cobbler, to coordinate with Sweet Stockings Designer Paper. Aren’t the animals adorable? You can see all 12 patterns of paper in my Product List below.

Gift Card Holders
INSTRUCTIONS
Cut 8 1/2″ X 11″ cardstock into two pieces that are 7 3/4″ X 5″. Score at 6″ and 2 1/2″.

Cut the bands 7 3/4″ X 1″. Score at 6 1/8″ and 2 1/2″. You want that extra 1/8 inch on the scoring, so the band will slide off and on easily.
To decorate the gift card holders, cut two pieces of Designer Series Paper: The bottom front is 4 3/4″ X 2 1/4″. The top front is 4 3/4″ X 1 1/2″.

Cut one piece of Basic White Cardstock for the sentiment on the inside, 4 3/4″ X 1 1/2″.

Use a 1 1/2″ or 1 3/4″ Circle Punch to make a finger slot in the middle of the bottom front.
Attach a piece of Tear & Tape to each side of the bottom (inside), and close, sealing your pocket.

Decorate the bands with cute animals from the Sweet Stockings Designer Paper, or from the Sweet Little Stockings Stamp Set.
TIP: Glue the band with the raw edge in front, and cover with your glued decoration. This keeps the back looking smooth and pretty.

Stampin’ Up’s Paper Trimmer was used for measuring, cutting, and scoring. It helps to have the right tools!

I appreciate you visiting today! When I’m not making cards, I’m spending time with my biggest fan.
More inspiration awaits, so use the lineup below to visit the rest of the Design Team. The Pals are excited to show you what they’ve created! Then, please mark your calendars for our next blog hop on November 10th. Our theme will be “Home for the Holidays” when our Design Team creates a project to celebrate the upcoming holidays. Until then, have fun in your craft space.
Stampin’ Pretty Pals Blog Hop
- Mary Fish at Stampin’ Pretty
- Pamela Sadler at Stampin Pink Rose
- Michelle Quinno at Shell Stamps
- Stesha Bloodhart at Stampin’ Hoot!
- Melissa Seplowitz at The Stamping Ninja
- Windy Ellard at Windy’s Wonderful Creations
- Jackie Beers at Blue Line Stamping
- Su Mohr at Aromas And Art. ***YOU ARE HERE***
- Jill Loveland at Simple Stamping
- Tricia Chuba at ButterDish Designs
- Ann Murray at Murray Stamps INK
- Beth McCullough at Stamping Mom
- Diana Carr at Secret Life of Paper
- Jennifer Roque at Stamp Camp with Jen
- Karen Hallam at Karen’s Stamping Habit
- Peggy Noe at Pretty Paper Cards
- Rae Harper Burnet at Wild West Paper Arts
- Deb Walker at Deb Stamps Life
- Debbie Mageed at Secrets to Stamping
- Lisa Ann Bernard at Queen B Creations
- Lori Webb at Clever Copies
- Lori Pinto at LollyPop Paper and Ink
- Mary Hanson at Up North Stampin’
- Amanda Howard at Papercrafting With Amanda
Product List
Oct 11, 2021 | Gallery, Global Design Project, Hand-Crafted Cards |
Welcome to this week’s Global Design Project; a fun color challenge, using Real Red, Basic Black, and Sahara Sand.
Joy to the World is one of my favorite Christmas carols, and the musical notes are on our Merry Melody Embossing Folder. I’m not a musician, and only know this because I was told. Since it’s a very old carol, I wanted to make the sheet music look old and worn.

Joy to the World
First, I embossed Basic White Cardstock, 5″ X 3 3/4″, with the Merry Melody Embossing Folder. Then, I used Sahara Sand Ink and a Blending Brush for coloring. The fun part was roughing it up by dragging a scissor blade along the edges, and I gave it more crumpling with my fingers.
The background for my Christmas Carol is a Real Red card base, 8 1/2″ X 5 1/2″, folded at 4 1/4″, topped with Regals 6″ X 6″ Designer Paper in a Real Red plaid.

Now, for the word, “JOY.” It was created with Playful Alphabet Dies, Pattern Party Designer Paper, and Foam Adhesive Sheets.
I attached a 1″X 2″ piece of black, Pattern Party Designer Paper, to a 1″ X 2″ piece of Foam Adhesive Sheet, placed the letters on top, and ran it through the Stampin’ Cut & Emboss Machine. Then, I turned the letters upside down, and ran it through a second time to make sure it was a good cut.
The Foam Adhesive Sheet is an easy way to give the small letters wonderful dimension, and it’s easy to peel the backing and stick them to the card front, especially when they are purposely crooked.

For a bit of embellishment, I added some holly and berries, cut with Christmas Trimmings Dies. The leaves were cut from Basic White Cardstock, colored with a Blending Brush and Mossy Meadow Ink. The berries were cut from Real Red Cardstock, and all were glued flat on the sheet music.

I hope you’ll be inspired by the entire design team, and add your creation to our gallery.

My October Host Code Gift
Just type the current host code (found beneath my profile picture) in the box provided, on your order of $75.00 or more, and I will send you the Bumblebee Trinkets in November.
“Create quite the buzz when you finish off your paper crafting projects with these Bumblebee Trinkets. The matte gold finish makes for the perfect combination of elegant and adorable. Add them to your next handmade card or gift; your friends and family will “bee” delighted”.
20 pieces, 1/2″.
I appreciate you visiting. Thank you! I would love for you to join my Dream Makers team. Think of the Starter Kit as the Ultimate Bundle, and take it for a “test drive.” No obligation! Click here When I’m not making cards, I’m spending time with my biggest fan.
Click here to shop today!
Product List
Oct 10, 2021 | Gallery, Hand-Crafted Cards |

Welcome to Stamping Sunday. Today we are excited to share our projects with the theme, “As the Season Turns.” You’ll find the designer’s name list below, making it easy to hop from blog to blog. Who is ready for some Fall inspiration?
The Quiet Meadow Bundle is one of my favorites, and the wildflowers are beautiful in all colors, including this Fall color palette. I used the Meadow Dies to cut from Cork Specialty Paper, along with Petal Pink and Calypso Coral Cardstock.

Wildflowers
After cutting my wildflowers, I stamped Basic White Cardstock, 4″ X 5 1/4″, with a flower from the Quiet Meadow Stamp Set. Using Crumb Cake Ink, I stamped full strength two times, and two times without re-inking. Then, dots were stamped with Cinnamon Cider Ink, followed by embossing the layer with the Timeworn Type Embossing Folder.

Next, I stamped “Thinking Of You,” in Crumb Cake Ink, on Thick Basic White Cardstock, and used a Meadow Die for cutting. Isn’t this label cute? It has holes for threading the Simply Elegant Trim, which I taped to the back of the layer, before gluing it to the Petal Pink card base, 8 1/2″ X 5 1/2″, folded at 4 1/4″. The bow was tied separately, and attached with a Glue Dot.
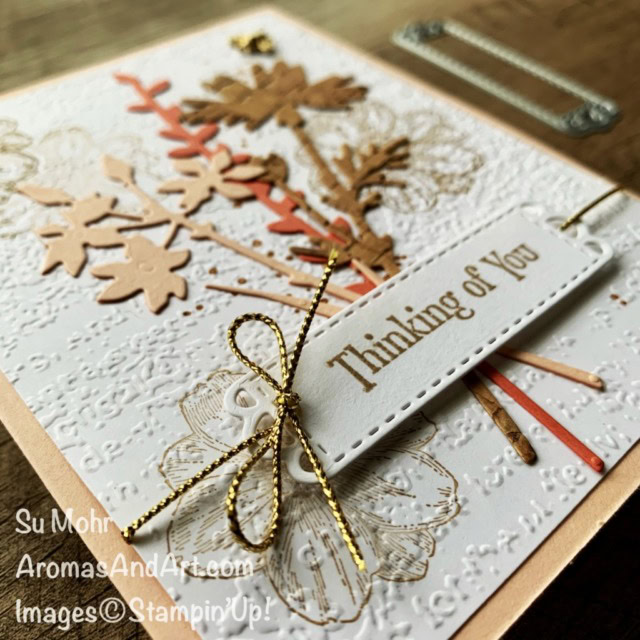
The last detail was adding the sweet, Bumblebee Trinket, which happens to be my October Host Code gift. The bumblebee was easily secured with a Glue Dot.

A small gift is always appreciated, especially when it’s chocolate. Large candy bars fit perfectly in the Ombre Gift Bags, and the bags are easy to decorate.
I used the same set of Meadow Dies with the cardstock colors, and Cork, but chose different wildflowers, and a butterfly.
It’s a good thing I have more candy, because this Reese’s didn’t survive the making of this gift set.

Our designers are excited to share their “as the season turns” projects with you, so hop along, and enjoy!
My October Host Code Gift
Just type the current host code (found beneath my profile picture) in the box provided, on your order of $75.00 or more, and I will send you the Bumblebee Trinkets in November.
“Create quite the buzz when you finish off your paper crafting projects with these Bumblebee Trinkets. The matte gold finish makes for the perfect combination of elegant and adorable. Add them to your next handmade card or gift; your friends and family will “bee” delighted”.
20 pieces, 1/2″.
I appreciate you visiting. Thank you! I would love for you to join my Dream Makers team. Think of the Starter Kit as the Ultimate Bundle, and take it for a “test drive.” No obligation! Click here When I’m not making cards, I’m spending time with my biggest fan.
Click here to shop today!
Product List
Oct 8, 2021 | Gallery, Hand-Crafted Cards |
Many of my customers tell me they find me on Pinterest, so I pay attention to the analytics offered there. Today’s card is using a layout that Pinterest tells me has been one of my most popular designs. You can see it at the bottom of this post.
I began with a Soft Sea Foam card base, 8 1/2″ X 5 1/2″, folded at 4 1/4″, topped with a layer of Soft Sea Foam Cardstock, 5 1/4″ X 4″. Prior to gluing, I embossed the layer with the Merry Melody Embossing Folder. Christmas calls for music, doesn’t it?

Merry Melody
Next, I cut the word “Merry” three times, and glued the three together for thickness. Wanting it to be subtle, I used the same color as the background, Soft Sea Foam.

The left side of the card was created with Painted Christmas Designer Paper and a Scalloped Contours Die. I cut a 1 1/4″ piece of the designer paper, and a 1 /1/4″ piece of Soft Sea Foam Cardstock, glued them together, and cut the edge with the Scalloped Contours Die. Then, I raised it on Dimensionals.

Now, for those adorable trees from the Christmas Trees Die Set. I cut one from Garden Green Cardstock, and one from Pear Pizzazz. Deciding the colors was easy, because Stampin’ Up! coordinates everything for us, and the names were listed with the Painted Christmas Designer Paper.
The cute tag is one of the Tailor Made Tag Dies, cut from Soft Sea Foam Cardstock, tied with Linen Thread, and attached with Dimensionals. “Christmas” is from the Snowman Season Stamp Set, stamped in Pear Pizzazz Ink.

I hope you enjoyed seeing how I created a Christmas card from my original, birthday design. You could say, I “cased” myself. Clicking on the picture will take you to the original blog post with the details.

My October Host Code Gift
Just type the current host code (found beneath my profile picture) in the box provided, on your order of $75.00 or more, and I will send you the Bumblebee Trinkets in November.
“Create quite the buzz when you finish off your paper crafting projects with these Bumblebee Trinkets. The matte gold finish makes for the perfect combination of elegant and adorable. Add them to your next handmade card or gift; your friends and family will “bee” delighted”.
20 pieces, 1/2″.
I appreciate you visiting. Thank you! I would love for you to join my Dream Makers team. Think of the Starter Kit as the Ultimate Bundle, and take it for a “test drive.” No obligation! Click here
When I’m not making cards, I’m spending time with my biggest fan.
Click here to shop today!
Product List





